On my current project for our mobile applications, we have an API-backend on the Yii PHP-framework, which is working now on an ordinary LEMP stack – Linux/NGINX/PHP-FPM/MySQL (AWS EC2 + MariaDB RDS).
Eventually, it’s time to break this monolith into microservices which will be orchestrated by the Kubernetes and will be running on the AWS EKS service.
In this post will take a brief overview of the main Kubernetes architecture and its components, and in the next posts – will take a closer look to its configuration and usage, alongside with the AWS EKS examples.
There are a lot of useful links in this post, but keep in mind that fact, that Kubernetes evolves very quickly so any examples can become outdated in a few months.
The next posts:
- Kubernetes: part 2 – a cluster set up on AWS with AWS cloud-provider and AWS LoadBalancer
- Kubernetes: part 3 – AWS EKS overview and manual EKS cluster set up
Contents
Architecture – an overview
In general, Kubernetes cluster components looks like next:

Or a bit more simple one:
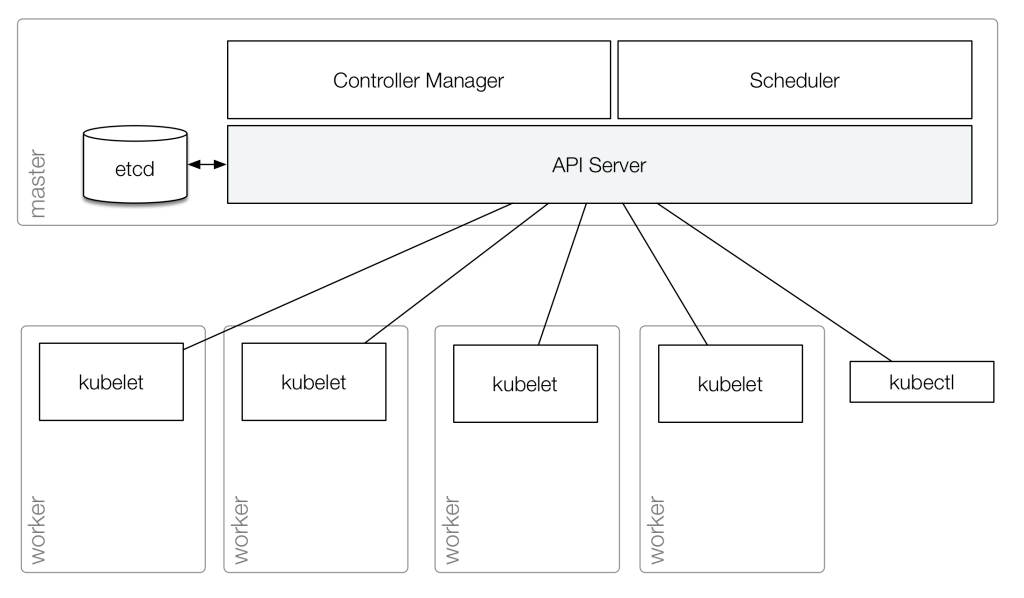
The cluster itself consists of one or more Master Nodes and one or more Worker Nodes.
Master Node
Services running on a Master Node are called “Kubernetes Control Plane” (excluding etcd), and the Master Node is used for administrative tasks only, while containers with your services will be created on a Worker Node(s).
Kubernetes core services aka Kubernetes Control Plane
On the Master Node, there are three main Kubernetes components which make the whole cluster working:
kube-apiserver- the main entrypoint for all requests to the cluster, for example
kubectlcommands will be sent as an API-requests into thekube-apiserveron the Master Node - the API server serves all REST-requests, validates them and sends them to the
etcd(API server is the only one service which talks to theetcd– all other components will speak to the API itself, and API serer in its turn will update data in theetcd, see the Components interaction) - the API server is also responsible for authentification and authorization
- the main entrypoint for all requests to the cluster, for example
kube-scheduler- makes a decision about which worker node w will be used for a new Pod creation (see. Pod) depending on resources requested and nodes usage
kube-controller-manager- a daemon for Controllers such as Replication Controller, Endpoints Controller, and Namespace Controller
- periodically compares a cluster state via API server and applies necessary changes
- also used for the Linux Namespaces (see the What is: Linux namespaces, примеры PID и Network namespaces, Rus) creation and management and garbage collection
etcd
Is a key:value storage used by Kubernetes for service discovery and configuration management.
Also, it keeps a cluster’s current and desired states: if K8s will find distinguishes between those states – it will apply the desired state to make it the current state.
Worker Node
Worker Node (previously known as a minion) – a virtual or bare-metal server with Kuberners components to create and manage Pods (see Pod).
Those components are:
kubelet: the main Kubernetes component on each cluster’s node which speaks to the API server, to check if there are new Pods to be created on the current Worker Node- it communicates to a Docker daemon (or other containers system like
rktorcontainerd) via its API to create and manage containers - after any changes in a Pod on a Node – will send them to the API server, which in its turn will save them to the
etcddatabase - performs containers monitoring
- it communicates to a Docker daemon (or other containers system like
kube-proxy: like a reverse-proxy service to forwarding requests to an appropriate service or applications inside a Kubernetes private network- uses IPTABLES by default (you can check existing rules by the
kubectl -n kube-system exec -ti kube-proxy-5ctt2 -- iptables --table nat --listcommand) - see. Understanding Kubernetes Kube-Proxy
- uses IPTABLES by default (you can check existing rules by the
Components interaction
Example when a new Pod created:
kubectlwill send a request to the API server- the API server will validate it and send to the
etcd etcdwill reply to the API that requests accepted and saved in a database- the API server will talk to the
kube-scheduler kube-schedulerwill choose a Worker Node to create a new Pod and sends this information back to the API server- the API server will send this information to the
etcd etcdwill reply it accepted and saved data- the API server talks to the
kubeleton a chosen Worker Node kubeletwill talk to the Docker daemon (or another container runtime used) via its API to create a new containerkubeletwill send information about new Pod back to the API server- the API server will update information in the
etcd
Kubernetes abstractions
Above we spoke about more or less “touchable” things such as virtual machines, networks, IP-addresses and so on.
But the Kubernetes itself is just a big piece of the… abstraction 🙂 placed upon a physical or virtual infrastructure.
Thus, Kubernetes has a lot of own objects which are abstract or logical Kubernete’s components.
Pod
The Pod – main logical unit in a Kubernetes cluster.
Inherently, Pod is kind of a virtual machine inside the Kubernetes cluster: it has own private IP, hostname, shared volumes etc (see. Volumes).
A Pod is a deployment unit (see Deployment) and inside of this “virtual machine” one or more containers will be created, which are tied by a common goal and which are a logical application with one or more processes running.
Each such a Pod is designated to run and serve an only one copy of an application: if you’ll want to make a horizontal scaling – you need to use a dedicated pod per each Worker Node.
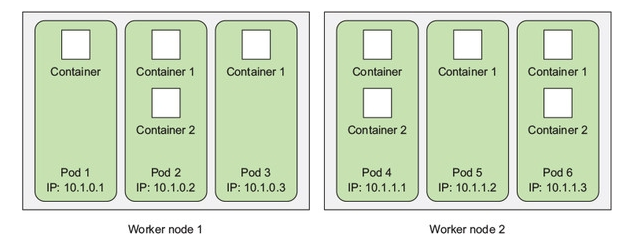
Such a nodes group called Replicated Pods and are managed by a dedicated controller (see Controllers).
In doing so containers itself are not the Kubernetes cluster objects and they are not managed by the Kubernetes directly, instead – Kubernetes manages Pods, while containers inside of this Pod shares its namespaces including IP addresses and ports and can communicate to each other via localhost (because of Pod is like a VM).
A Pod’s template example:
apiVersion: v1
kind: Pod
metadata:
  name: my-pod
  labels:
    app: my-app
    type: front-app

spec:
  containers:
  - name: nginx-container
    image: nginx
Services
Links:
Services in the first turn are everything about networking in a Kubernetes cluster.
They are used for communications between an application’s components inside and outside of it.
Basically, services are the same Kubernetes objects as Pod, ReplicaSets, DaemonSet are, and you can imagine a Service like a dedicated virtual machine inside of a cluster’s Node.
They can be displayed as the next:

Here is a user who connects to a frontend application via one Service, then this frontend talks to two backend applications using two additional Services, and backends communicates to a database service via other one Service.
ClusterIP
Will open access to an application via a cluster’s internal IP, thus will be accessible from within the cluster itself.
Is the default Service type.
NodePort
This Service type will open access to an application using a Worker Node’s static IP.
Also, automatically will create a ClusterIP service for the application to route traffic from the NodePort.

Here:
- 30008 – an external port on a Worker Node which can be used to connect to the
NodePortservice, must be in the 30000 – 32767 ports range NodePortservice with theClusterIP, own port (Port) and IP from theserviceSubnetblock- Pod with an application inside – Pod will accept new connections to its port 80 (TargetPort) and has an IP from the
podSubnetblock
Those networks can be found using the kubeadm config view command:
[simterm]
root@k8s-master:~# kubeadm config view
apiServer:
  extraArgs:
    authorization-mode: Node,RBAC
  timeoutForControlPlane: 4m0s
apiVersion: kubeadm.k8s.io/v1beta2
certificatesDir: /etc/kubernetes/pki
clusterName: kubernetes
controllerManager: {}
dns:
  type: CoreDNS
etcd:
  local:
    dataDir: /var/lib/etcd
imageRepository: k8s.gcr.io
kind: ClusterConfiguration
kubernetesVersion: v1.15.0
networking:
  dnsDomain: cluster.local
  podSubnet: 10.244.0.0/16
  serviceSubnet: 10.96.0.0/12
scheduler: {}
[/simterm]
And again – you can imagine a Service like another one VM inside of your Worker Node, in the same way as about Pods.
A NodePort service’s template example:
apiVersion: v1
kind: Service
metadata:
  name: my-svc

spec:
  type: NodePort
  ports:
    - targetPort: 80
      port: 80
      nodePort: 30008
  selector:
    app: my-app
    type: front-app
Service, Pod, labels, selectors
To make a Service distinguish which Pod has to be used to route traffic to – the Labels и Selectors are used.
In the pod’s template example above we added labels for our application:
apiVersion: v1
kind: Pod
metadata:
  name: my-pod
  labels:
    app: my-app
    type: front-app

spec:
  containers:
  - name: nginx-container
    image: nginx
Here it is – the labels:
...
  labels:
    app: my-app
Then in a Service’s description – we are using selectors:
...
  selector:
    app: my-app
Thus if a cluster has multiple Pods with such a label – then a Service will try to route traffic to all of them:

In case if an application placed on multiple Worker Nodes – then a NodePort service will be spread between all those nodes and 30008 port will be opened on every such a node.
Thus, you can access an application via a NodePort service using a Public IP of any Worker Node used:

LoadBalancer
Will create a cloud provider’s Load Balancer, for example – AWS ALB.
Worker Nodes will be attached to this Load Balancer, and traffic will be routed via internal LoadBalancer service to a node’s NodePort service.
NodePort and ClusterIP will be created automatically.
ExternalName
Will tie the Service to its externalName field value to return its CNAME value.
An ExternalName service template example:
apiVersion: v1
kind: Service
metadata:
  name: my-google-svc
spec:
  type: ExternalName
  externalName: google.com
After it will be created – you can reach it from any Pod via this Service name, for example, my-google-svc as per the template example above:
[simterm]
root@k8s-master:~# kubectl exec -it my-pod -- dig my-google-svc.default.svc.cluster.local +short
google.com.
74.125.193.101
...
[/simterm]
Volumes
Data in containers is an ephemeral, i.e. if a container will be recreated by the kubelet – then all data from the old container will be lost.
Also, multiple containers inside of the same Pod can use shared data.
The Volumes concept in the Kubernetes is similar to the Docker’s solution just with much more features.
For example, Kubernete’s Volumes supports various drivers to mount volumes to Pods, like awsElasticBlockStore, hostPath, nfs, etc.
Namespaces
- Namespaces
- Share a Cluster with Namespaces
- What is: Linux namespaces, примеры PID и Network namespaces
Namespace in the Kubernetes is kind of a dedicated cluster inside of your existing cluster with its own set of namespaces for networking, disks/volumes, processes and so on.
The main idea behind the Namespaces is to dedicate working environments, users and can be used to set resources usage limits – CPU, memory, etc. See Resource Quotas.
The Namespaces also used in the Kubernetes DNS service to create an URL in a <service-name>.<namespace-name>.svc.cluster.local view.
Most of the Kubernetes resources live in such a Namespaces, you can list them by the:
[simterm]
$ kubectl api-resources --namespaced=true
[/simterm]
To list resources living outside of any Namespace – use the next command:
[simterm]
$ kubectl api-resources --namespaced=false
[/simterm]
Controllers
A Controller in the Kubernetes are some continuously working process, which communicates to the API server and checks the current state of a cluster and makes necessary changes to make the current state to be equal to the desired state.
Besides the standard Controllers – you can create your own, see How to Create a Kubernetes Custom Controller Using client-go.
ReplicaSet
- ReplicaSet
- Key Kubernetes Concepts
- Kubernetes KnowHow – Working With ReplicaSet
- Знакомство с Kubernetes. Часть 4: Реплики (ReplicaSet) (Rus)
ReplicaSet is created by the Deployment and the main goal of the ReplicaSet is to create and scale Pods.
ReplicaSet is the next generation of the ReplicationController and can use multiple selectors (see Service, Pod, labels, selectors).
It’s recommended to use Deployment instead of creating ReplicaSet objects directly.
A ReplicaSet template example:
apiVersion: apps/v1
kind: ReplicaSet
metadata:
  name: my-nginx-rc
  labels:
    app: my-nginx-rc-app
spec:
  replicas: 3
  selector:
    matchLabels:
      app: my-nginx-rc-app
  template: # PODs template
    metadata:
      labels:
        app: my-nginx-rc-app
    spec:
      containers:
      - name: nginx-container
        image: nginx
Deployment
- Deployments
- Знакомство с Kubernetes. Часть 5: Развертывания (Deployments) (Rus)
- Kubernetes Deployments: The Ultimate Guide
- Deployment Strategies
- Kubernetes Deployment Tutorial For Beginners
- Managing Kubernetes Deployments
- K8s: Deployments vs StatefulSets vs DaemonSets
The Deployment controller will apply changes to Pods and RelicaSets and currently is the most used resource in the Kubernetes to deploy applications.
It’s mainly used for stateless applications, but you can attach a Persistent Volume and use it as a stateful application.
During a Deployment creation – it will create a ReplicaSet object which in its turn will create and manage Pods for this Deployment.
Deployment used to:
- update Pods –
Deploymentwill create a newReplicaSetand will update a deployment’s revision number (deployment.kubernetes.io/revision: ""which is used by aReplicaSet) - roll-back a deployment if it was unsuccessful using revisions
- Pods scaling and autoscaling can be done using Deployments (
kubectl scaleиkubectl autoscale, see kubectl Cheat Sheet) - can be used for the canary deployments (see the Intro to deployment strategies: blue-green, canary, and more)
 Beside of the
 Deployments the kubectl rolling-update can be used, although Deployments is the recommended way.
StatefulSet
StatefulSet are used to manage stateful applications.
It will create a Pod with a unique name directly instead of the ReplicaSet. Because of this when using StatefulSet you have no ability to run a deployment roll-back. Instead, you can delete a resource or make its scaling.
During the StatefulSet updates – a RollingUpdate will be applied to all nodes.
DaemonSet
DaemonSet is used when you need to run an application over all nodes in your cluster – not only on the Worker Nodes. If a new Pod will be created after DaemonSet – an application will be deployed on this new Pod as well.
DaemonSet is the perfect desition to run applications which has to be present on every node, for example – monitoring, logs collectors, etc.
During this, some nodes will decline to create Pods on them, such as the Master Node for example, because it has the node-role.kubernetes.io/master:NoSchedule set (see Taints and Tolerations):
[simterm]
# kubectl describe node k8s-master | grep Taint
Taints:             node-role.kubernetes.io/master:NoSchedule
[/simterm]
Respectively, when creating a DaemonSet which has to create Pods on the Master Node too you have to specify tolerations.
Such a DaemonSet template example:
apiVersion: apps/v1
kind: DaemonSet
metadata:
  name: my-nginx-ds
spec:
  selector:
    matchLabels:
      app: my-nginx-pod
  template:
    metadata:
      labels:
        app: my-nginx-pod
    spec:
      tolerations:
      - effect: NoSchedule
        operator: Exists
      containers:
      - name: nginx-container
        image: nginx
        ports:
        - containerPort: 80
During DaemonSet update – the RollingUpdate for all pods will be applied.
Job
Job in the Kubernetes indented to be used to create a Pod which will execute the only one task, once after it will finish a task execution – this Pod will be stopped.
Such a Job can create one or more Pods, can run your tasks in parallel, execute this task specified number of attempts.
A Job template example:
apiVersion: batch/v1
kind: Job
metadata:
  name: job-example
spec:
  completions: 2
  parallelism: 2
  template:
    metadata:
      name: counter
    spec:
      containers:
      - name: counter
        image: ubuntu
        command: ["bash"]
        args: ["-c",  "for i in {1..10}; do echo $i; done"]
      restartPolicy: Never
CronJob
Similar to the Job but intended to run tasks by a schedule – check the schedule parameter below:
apiVersion: batch/v1beta1
kind: CronJob
metadata:
  name: cronjob-example
spec:
  schedule: "*/1 * * * *"
  jobTemplate:
    spec:
      completions: 2
      parallelism: 2
      template:
        metadata:
          name: counter
        spec:
          containers:
          - name: counter
            image: ubuntu
            command: ["bash"]
            args: ["-c",  "for i in {1..10}; do echo $i; done"]
          restartPolicy: Never
Useful links
Common
- Concepts
- Key Kubernetes Concepts
- Kubernetes Master Components: Etcd, API Server, Controller Manager, and Scheduler
- Resource Quotas
- Kubernetes (все посты по тегу, интересный блог у человека)
- kubectl Cheat Sheet
- Taints and Tolerations
Networking
- Service
- Cloud Providers
- Understanding Kubernetes Kube-Proxy
- Kubernetes Services: A Beginner’s Guide
- Kubernetes – Services Explained
- Using Kubernetes LoadBalancer Services on AWS
Deployments
- Kubernetes Deployment Strategies
- Kubernetes Deployments: The Ultimate Guide
- Kubernetes Deployment Tutorial For Beginners
- Managing Kubernetes Deployments
- K8s: Deployments vs StatefulSets vs DaemonSets
Jobs
Misc
- How to Create a Kubernetes Custom Controller Using client-go
- Kubernetes KnowHow – Working With ReplicaSet
- Intro to deployment strategies: blue-green, canary, and more
![]()