 In the first part – Kubernetes: part 1 – architecture and main components overview – we did a quick glance about Kubernetes.
Also, check the third part – Kubernetes: part 3 – AWS EKS overview and manual EKS cluster set up.
The next thing I’d like to play with is to manually create a cluster using kubeadm, run a simple web-service there and access it via AWS LoadBalancer.
The main issue I faced with during this set up was lack of full-fledged documentation and up to date examples, thus had to do almost everything by the cut-and-try method.
Just to finally see a message saying:
WARNING: aws built-in cloud provider is now deprecated. The AWS provider is deprecated and will be removed in a future release
The example below uses the Kubernetes version: v1.15.2. and ЕС2 with OS Ubuntu 18.04
Contents
Preparing AWS
VPC
Create a VPC with the 10.0.0.0/16 CIDR:

Add a tag named kubernetes.io/cluster/kubernetes with the owned value – it will be used by K8s for AWS resources auto-discovery related to the Kubernetes stack, also it will add such a tag itself during creating new resources:

Enable DNS hostnames:


Subnet
Create a new subnet in this VPC:

Enable Public IPs for EC2 instances which will be placed in this subnet:


Add the tag:

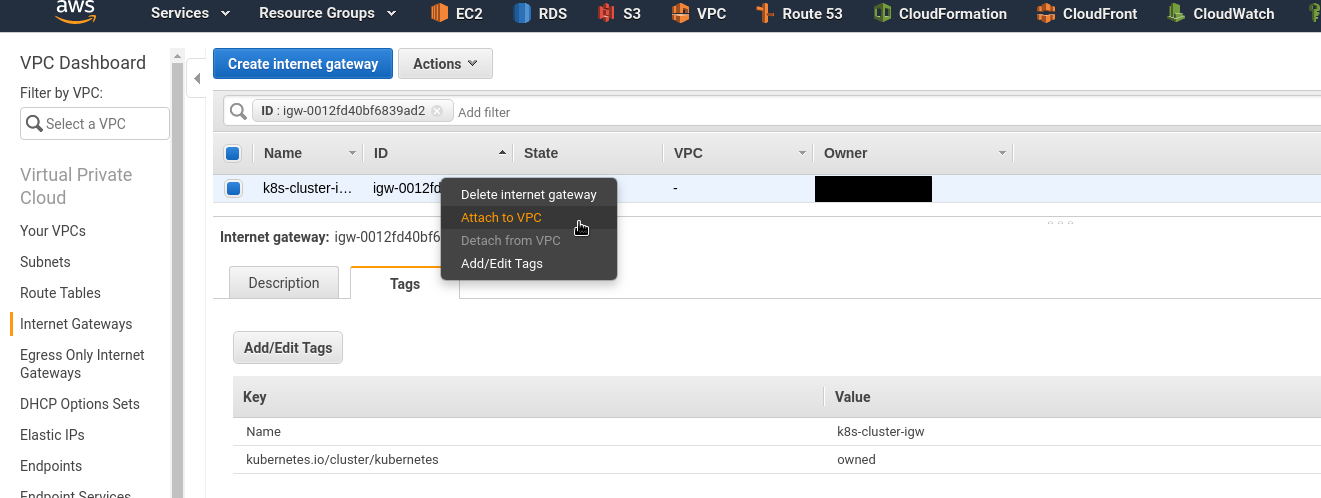
Internet Gateway
Create an IGW to route traffic from the subnet into the Internet:

For IGW add the tag as well, just in case:

Attached this IGW to your VPC:

Route Table
Create a routing table:

Add the tag here:

Click on the Routes tab, add a new route to the 0.0.0.0/0 network via the IGW we created above:

Attach this table to the subnet – Edit subnet association:

Choose your subnet created earlier:

IAM role
To make Kubernetes working with AWS need to create two IAM EC2 roles – for master and slaves.
You can also use ACCESS/SECRET instead.
IAM Master role
Go to the IAM > Policies, click Create policy, into the JSON add a new policy description (see cloud-provider-aws):
{
    "Version": "2012-10-17",
    "Statement": [
        {
            "Effect": "Allow",
            "Action": [
                "autoscaling:DescribeAutoScalingGroups",
                "autoscaling:DescribeLaunchConfigurations",
                "autoscaling:DescribeTags",
                "ec2:DescribeInstances",
                "ec2:DescribeRegions",
                "ec2:DescribeRouteTables",
                "ec2:DescribeSecurityGroups",
                "ec2:DescribeSubnets",
                "ec2:DescribeVolumes",
                "ec2:CreateSecurityGroup",
                "ec2:CreateTags",
                "ec2:CreateVolume",
                "ec2:ModifyInstanceAttribute",
                "ec2:ModifyVolume",
                "ec2:AttachVolume",
                "ec2:AuthorizeSecurityGroupIngress",
                "ec2:CreateRoute",
                "ec2:DeleteRoute",
                "ec2:DeleteSecurityGroup",
                "ec2:DeleteVolume",
                "ec2:DetachVolume",
                "ec2:RevokeSecurityGroupIngress",
                "ec2:DescribeVpcs",
                "elasticloadbalancing:AddTags",
                "elasticloadbalancing:AttachLoadBalancerToSubnets",
                "elasticloadbalancing:ApplySecurityGroupsToLoadBalancer",
                "elasticloadbalancing:CreateLoadBalancer",
                "elasticloadbalancing:CreateLoadBalancerPolicy",
                "elasticloadbalancing:CreateLoadBalancerListeners",
                "elasticloadbalancing:ConfigureHealthCheck",
                "elasticloadbalancing:DeleteLoadBalancer",
                "elasticloadbalancing:DeleteLoadBalancerListeners",
                "elasticloadbalancing:DescribeLoadBalancers",
                "elasticloadbalancing:DescribeLoadBalancerAttributes",
                "elasticloadbalancing:DetachLoadBalancerFromSubnets",
                "elasticloadbalancing:DeregisterInstancesFromLoadBalancer",
                "elasticloadbalancing:ModifyLoadBalancerAttributes",
                "elasticloadbalancing:RegisterInstancesWithLoadBalancer",
                "elasticloadbalancing:SetLoadBalancerPoliciesForBackendServer",
                "elasticloadbalancing:AddTags",
                "elasticloadbalancing:CreateListener",
                "elasticloadbalancing:CreateTargetGroup",
                "elasticloadbalancing:DeleteListener",
                "elasticloadbalancing:DeleteTargetGroup",
                "elasticloadbalancing:DescribeListeners",
                "elasticloadbalancing:DescribeLoadBalancerPolicies",
                "elasticloadbalancing:DescribeTargetGroups",
                "elasticloadbalancing:DescribeTargetHealth",
                "elasticloadbalancing:ModifyListener",
                "elasticloadbalancing:ModifyTargetGroup",
                "elasticloadbalancing:RegisterTargets",
                "elasticloadbalancing:SetLoadBalancerPoliciesOfListener",
                "iam:CreateServiceLinkedRole",
                "kms:DescribeKey"
            ],
            "Resource": [
                "*"
            ]
        }
    ]
}

Save it:

Go to the Roles, create a role using the EC2 type:

Click on the Permissions, find and attach the policy added above:


IAM Worker role
In the same way, create another policy for worker nodes:
{
    "Version": "2012-10-17",
    "Statement": [
        {
            "Effect": "Allow",
            "Action": [
                "ec2:DescribeInstances",
                "ec2:DescribeRegions",
                "ecr:GetAuthorizationToken",
                "ecr:BatchCheckLayerAvailability",
                "ecr:GetDownloadUrlForLayer",
                "ecr:GetRepositoryPolicy",
                "ecr:DescribeRepositories",
                "ecr:ListImages",
                "ecr:BatchGetImage"
            ],
            "Resource": "*"
        }
    ]
}
Save it as k8s-cluster-iam-worker-policy (can be used any name obviously):

And create a k8s-cluster-iam-master-role:

Running EC2
Create an EC2 using t2.medium type (minimal type as cKubernetes master needs to have at least 2 CPU cores), using your VPC and set k8s-cluster-iam-master-role as the IAM role:

Add tags:

Create a Security Group:

Wile Master is spinning up – creat a Worker Node in the same way just using the k8s-cluster-iam-worker-role:

Tags:

Attach existing SG:

Connect to any instances and check if the network is working:
[simterm]
$ ssh -i k8s-cluster-eu-west-3-key.pem ubuntu@35.***.***.117 'ping -c 1 1.1.1.1'
PING 1.1.1.1 (1.1.1.1) 56(84) bytes of data.
64 bytes from 1.1.1.1: icmp_seq=1 ttl=54 time=1.08 ms
[/simterm]
Good.
A Kubernetes cluster set up
Kubernetes installation
Perform the next steps on both EC2.
Update packages list and installed packages:
[simterm]
root@ip-10-0-0-112:~# apt update && apt -y upgrade
[/simterm]
Add Docker and Kubernetes repositories:
[simterm]
root@ip-10-0-0-112:~# curl -fsSL https://download.docker.com/linux/ubuntu/gpg | sudo apt-key add -
OK
root@ip-10-0-0-112:~# add-apt-repository "deb [arch=amd64] https://download.docker.com/linux/ubuntu $(lsb_release -cs) stable"
root@ip-10-0-0-112:~# curl -s https://packages.cloud.google.com/apt/doc/apt-key.gpg | sudo apt-key add -
OK
root@ip-10-0-0-112:~# echo "deb https://apt.kubernetes.io/ kubernetes-xenial main" > /etc/apt/sources.list.d/kubernetes.list
root@ip-10-0-0-112:~# apt update
root@ip-10-0-0-112:~# apt install -y docker-ce kubelet kubeadm kubectl
[/simterm]
Or do everything just be one command:
[simterm]
root@ip-10-0-0-112:~# apt update && apt -y upgrade && curl -fsSL https://download.docker.com/linux/ubuntu/gpg | sudo apt-key add - && add-apt-repository "deb [arch=amd64] https://download.docker.com/linux/ubuntu $(lsb_release -cs) stable" && curl -s https://packages.cloud.google.com/apt/doc/apt-key.gpg | sudo apt-key add - && echo "deb https://apt.kubernetes.io/ kubernetes-xenial main" > /etc/apt/sources.list.d/kubernetes.list && apt update && apt install -y docker-ce kubelet kubeadm kubectl
[/simterm]
Hostname
Perform the next steps on both EC2.
Afaik the next changes need to be done on Ubuntu only, and you can’t change a hostname which was set by AWS (the ip-10-0-0-102 in this example).
Check a hostname now:
[simterm]
root@ip-10-0-0-102:~# hostname
ip-10-0-0-102
[/simterm]
Get it as a fully qualified domain name (FQDN):
[simterm]
root@ip-10-0-0-102:~# curl http://169.254.169.254/latest/meta-data/local-hostname
ip-10-0-0-102.eu-west-3.compute.internal
[/simterm]
Set the hostname as FQDN:
[simterm]
root@ip-10-0-0-102:~# hostnamectl set-hostname ip-10-0-0-102.eu-west-3.compute.internal
[/simterm]
Check now:
[simterm]
root@ip-10-0-0-102:~# hostname
ip-10-0-0-102.eu-west-3.compute.internal
[/simterm]
Repeat on the worker node.
Cluster set up
Create file /etc/kubernetes/aws.yml:
---
apiVersion: kubeadm.k8s.io/v1beta2
kind: ClusterConfiguration
networking:
  serviceSubnet: "10.100.0.0/16"
  podSubnet: "10.244.0.0/16"
apiServer:
  extraArgs:
    cloud-provider: "aws"
controllerManager:
  extraArgs:
    cloud-provider: "aws"
Initialize cluster using this config:
[simterm]
root@ip-10-0-0-102:~# kubeadm init --config /etc/kubernetes/aws.yml
[init] Using Kubernetes version: v1.15.2
[preflight] Running pre-flight checks
        [WARNING IsDockerSystemdCheck]: detected "cgroupfs" as the Docker cgroup driver. The recommended driver is "systemd". Please follow the guide at https://kubernetes.io/docs/setup/cri/
        [WARNING SystemVerification]: this Docker version is not on the list of validated versions: 19.03.1. Latest validated version: 18.09
...
[kubelet-start] Writing kubelet environment file with flags to file "/var/lib/kubelet/kubeadm-flags.env"
[kubelet-start] Writing kubelet configuration to file "/var/lib/kubelet/config.yaml"
[kubelet-start] Activating the kubelet service
[certs] Using certificateDir folder "/etc/kubernetes/pki"
[certs] Generating "ca" certificate and key
[certs] Generating "apiserver" certificate and key
[certs] apiserver serving cert is signed for DNS names [ip-10-0-0-102.eu-west-3.compute.internal kubernetes kubernetes.default kubernetes.default.svc kubernetes.default.svc.cluster.local] and IPs [10.100.0.1 10.0.0.102]
...
[kubeconfig] Using kubeconfig folder "/etc/kubernetes"
[kubeconfig] Writing "admin.conf" kubeconfig file
[kubeconfig] Writing "kubelet.conf" kubeconfig file
[kubeconfig] Writing "controller-manager.conf" kubeconfig file
[kubeconfig] Writing "scheduler.conf" kubeconfig file
[control-plane] Using manifest folder "/etc/kubernetes/manifests"
[control-plane] Creating static Pod manifest for "kube-apiserver"
[control-plane] Creating static Pod manifest for "kube-controller-manager"
[control-plane] Creating static Pod manifest for "kube-scheduler"
[etcd] Creating static Pod manifest for local etcd in "/etc/kubernetes/manifests"
[wait-control-plane] Waiting for the kubelet to boot up the control plane as static Pods from directory "/etc/kubernetes/manifests". This can take up to 4m0s
[apiclient] All control plane components are healthy after 23.502303 seconds
[upload-config] Storing the configuration used in ConfigMap "kubeadm-config" in the "kube-system" Namespace
[kubelet] Creating a ConfigMap "kubelet-config-1.15" in namespace kube-system with the configuration for the kubelets in the cluster
...
[mark-control-plane] Marking the node ip-10-0-0-102.eu-west-3.compute.internal as control-plane by adding the label "node-role.kubernetes.io/master=''"
[mark-control-plane] Marking the node ip-10-0-0-102.eu-west-3.compute.internal as control-plane by adding the taints [node-role.kubernetes.io/master:NoSchedule]
...

Your Kubernetes control-plane has initialized successfully!
...
Then you can join any number of worker nodes by running the following on each as root:

kubeadm join 10.0.0.102:6443 --token rat2th.qzmvv988e3pz9ywa \
    --discovery-token-ca-cert-hash sha256:ce983b5fbf4f067176c4641a48dc6f7203d8bef972cb9d2d9bd34831a864d744
[/simterm]
Create a kubelet config file:
[simterm]
root@ip-10-0-0-102:~# mkdir -p $HOME/.kube
root@ip-10-0-0-102:~# cp -i /etc/kubernetes/admin.conf $HOME/.kube/config
root@ip-10-0-0-102:~# chown ubuntu:ubuntu $HOME/.kube/config
[/simterm]
Check nodes:
[simterm]
root@ip-10-0-0-102:~# kubectl get nodes -o wide
NAME                                       STATUS     ROLES    AGE   VERSION   INTERNAL-IP   EXTERNAL-IP   OS-IMAGE             KERNEL-VERSION    CONTAINER-RUNTIME
ip-10-0-0-102.eu-west-3.compute.internal   NotReady   master   55s   v1.15.2   10.0.0.102    <none>        Ubuntu 18.04.3 LTS   4.15.0-1044-aws   docker://19.3.1
[/simterm]
You can get your cluster-info using the config view:
[simterm]
root@ip-10-0-0-102:~# kubeadm config view
apiServer:
  extraArgs:
    authorization-mode: Node,RBAC
    cloud-provider: aws
  timeoutForControlPlane: 4m0s
apiVersion: kubeadm.k8s.io/v1beta2
certificatesDir: /etc/kubernetes/pki
clusterName: kubernetes
controllerManager:
  extraArgs:
    cloud-provider: aws
dns:
  type: CoreDNS
etcd:
  local:
    dataDir: /var/lib/etcd
imageRepository: k8s.gcr.io
kind: ClusterConfiguration
kubernetesVersion: v1.15.2
networking:
  dnsDomain: cluster.local
  podSubnet: 10.244.0.0/16
  serviceSubnet: 10.100.0.0/16
scheduler: {}
[/simterm]
kubeadm reset
In case you want to fully destroy your cluster to run set up it from the scratch – use reset:
[simterm]
root@ip-10-0-0-102:~# kubeadm reset
[/simterm]
And reset IPTABLES rules:
[simterm]
root@ip-10-0-0-102:~# iptables -F && iptables -t nat -F && iptables -t mangle -F && iptables -X
[/simterm]
Flannel CNI installation
From the Master node execute:
[simterm]
root@ip-10-0-0-102:~# kubectl apply -f https://raw.githubusercontent.com/coreos/flannel/master/Documentation/kube-flannel.yml
podsecuritypolicy.policy/psp.flannel.unprivileged created
clusterrole.rbac.authorization.k8s.io/flannel created
clusterrolebinding.rbac.authorization.k8s.io/flannel created
serviceaccount/flannel created
configmap/kube-flannel-cfg created
daemonset.apps/kube-flannel-ds-amd64 created
daemonset.apps/kube-flannel-ds-arm64 created
daemonset.apps/kube-flannel-ds-arm created
daemonset.apps/kube-flannel-ds-ppc64le created
daemonset.apps/kube-flannel-ds-s390x created
[/simterm]
Wait a minute and check nodes again:
[simterm]
root@ip-10-0-0-102:~# kubectl get nodes
NAME                                       STATUS   ROLES    AGE     VERSION
ip-10-0-0-102.eu-west-3.compute.internal   Ready    master   3m26s   v1.15.2
[/simterm]
STATUS == Ready, Okay.
Attaching the Worker Node
On the Worker node create a /etc/kubernetes/node.yml file with the JoinConfiguration:
---
apiVersion: kubeadm.k8s.io/v1beta1
kind: JoinConfiguration
discovery:
  bootstrapToken:
    token: "rat2th.qzmvv988e3pz9ywa"
    apiServerEndpoint: "10.0.0.102:6443"
    caCertHashes:
      - "sha256:ce983b5fbf4f067176c4641a48dc6f7203d8bef972cb9d2d9bd34831a864d744"
nodeRegistration:
  name: ip-10-0-0-186.eu-west-3.compute.internal
  kubeletExtraArgs:
    cloud-provider: aws
Join this node to the cluster:
[simterm]
root@ip-10-0-0-186:~# kubeadm join --config /etc/kubernetes/node.yml
[preflight] Running pre-flight checks
        [WARNING IsDockerSystemdCheck]: detected "cgroupfs" as the Docker cgroup driver. The recommended driver is "systemd". Please follow the guide at https://kubernetes.io/docs/setup/cri/
        [WARNING SystemVerification]: this Docker version is not on the list of validated versions: 19.03.1. Latest validated version: 18.09
[preflight] Reading configuration from the cluster...
[preflight] FYI: You can look at this config file with 'kubectl -n kube-system get cm kubeadm-config -oyaml'
[kubelet-start] Downloading configuration for the kubelet from the "kubelet-config-1.15" ConfigMap in the kube-system namespace
[kubelet-start] Writing kubelet configuration to file "/var/lib/kubelet/config.yaml"
[kubelet-start] Writing kubelet environment file with flags to file "/var/lib/kubelet/kubeadm-flags.env"
[kubelet-start] Activating the kubelet service
[kubelet-start] Waiting for the kubelet to perform the TLS Bootstrap...
...
[/simterm]
Go back to the Master, check nodes one more time:
[simterm]
root@ip-10-0-0-102:~# kubectl get nodes
NAME                                       STATUS   ROLES    AGE     VERSION
ip-10-0-0-102.eu-west-3.compute.internal   Ready    master   7m37s   v1.15.2
ip-10-0-0-186.eu-west-3.compute.internal   Ready    <none>   27s     v1.15.2
[/simterm]
Load Balancer creation
And the last thing is to run a web-service, let’s use a simple NGINX container and to place a LoadBalancer Service:
kind: Service
apiVersion: v1
metadata:
  name: hello
spec:
  type: LoadBalancer
  selector:
    app: hello
  ports:
    - name: http
      protocol: TCP
      # ELB's port
      port: 80
---
apiVersion: apps/v1
kind: Deployment
metadata:
  name: hello
spec:
  replicas: 1
  selector:
    matchLabels:
      app: hello
  template:
    metadata:
      labels:
        app: hello
    spec:
      containers:
        - name: hello
          image: nginx
Apply it:
[simterm]
root@ip-10-0-0-102:~# kubectl apply -f elb-example.yml
service/hello created
deployment.apps/hello created
[/simterm]
Check Deployment:
[simterm]
root@ip-10-0-0-102:~# kubectl get deploy -o wide
NAME    READY   UP-TO-DATE   AVAILABLE   AGE   CONTAINERS   IMAGES   SELECTOR
hello   1/1     1            1           22s   hello        nginx    app=hello
[/simterm]
[simterm]
root@ip-10-0-0-102:~# kubectl get rs -o wide
NAME              DESIRED   CURRENT   READY   AGE   CONTAINERS   IMAGES   SELECTOR
hello-5bfb6b69f   1         1         1       39s   hello        nginx    app=hello,pod-template-hash=5bfb6b69f
[/simterm]
Pod:
[simterm]
root@ip-10-0-0-102:~# kubectl get pod -o wide
NAME                    READY   STATUS    RESTARTS   AGE   IP           NODE                                       NOMINATED NODE   READINESS GATES
hello-5bfb6b69f-4pklx   1/1     Running   0          62s   10.244.1.2   ip-10-0-0-186.eu-west-3.compute.internal   <none>           <none>
[/simterm]
And Services:
[simterm]
root@ip-10-0-0-102:~# kubectl get svc -o wide
NAME         TYPE           CLUSTER-IP      EXTERNAL-IP                                                              PORT(S)        AGE   SELECTOR
hello        LoadBalancer   10.100.102.37   aa5***295.eu-west-3.elb.amazonaws.com   80:30381/TCP   83s   app=hello
kubernetes   ClusterIP      10.100.0.1      <none>                                                                   443/TCP        17m   <none>
[/simterm]
Check an ELB in the AWS Console:

Instances – here is our Worker node:

Let’s recall how it’s working:
- AWS ELB will route traffic to the Worker Node (
NodePortService) - on the Worker node via a
NodePortservice it will be routed to the Pod’s port (TargetPort) - on the Pod with the
TargetPorttraffic will be routed to a container’s port (containerPort)
In the LoadBalancer description above we see the next setting:
Port Configuration
80 (TCP) forwarding to 30381 (TCP)
Check the Kubernetes cluster services:
[simterm]
root@ip-10-0-0-102:~# kk describe svc hello
Name:                     hello
Namespace:                default
Labels:                   <none>
Annotations:              kubectl.kubernetes.io/last-applied-configuration:
                            {"apiVersion":"v1","kind":"Service","metadata":{"annotations":{},"name":"hello","namespace":"default"},"spec":{"ports":[{"name":"http","po...
Selector:                 app=hello
Type:                     LoadBalancer
IP:                       10.100.102.37
LoadBalancer Ingress:     aa5***295.eu-west-3.elb.amazonaws.com
Port:                     http  80/TCP
TargetPort:               80/TCP
NodePort:                 http  30381/TCP
Endpoints:                10.244.1.2:80
...
[/simterm]
Наш NodePort: http 30381/TCP
You can send a request directly to the Node.
Find a Worker node’s address:
[simterm]
root@ip-10-0-0-102:~# kk get node | grep -v master
NAME                                       STATUS   ROLES    AGE   VERSION
ip-10-0-0-186.eu-west-3.compute.internal   Ready    <none>   51m   v1.15.2
[/simterm]
And connect to the 30381 port:
[simterm]
root@ip-10-0-0-102:~# curl ip-10-0-0-186.eu-west-3.compute.internal:30381
<!DOCTYPE html>
<html>
<head>
<title>Welcome to nginx!</title>
...
[/simterm]
Check if ELB is working:
[simterm]
root@ip-10-0-0-102:~# curl aa5***295.eu-west-3.elb.amazonaws.com
<!DOCTYPE html>
<html>
<head>
<title>Welcome to nginx!</title>
...
[/simterm]
A pod’s logs:
[simterm]
root@ip-10-0-0-102:~# kubectl logs hello-5bfb6b69f-4pklx
10.244.1.1 - - [09/Aug/2019:13:57:10 +0000] "GET / HTTP/1.1" 200 612 "-" "curl/7.58.0" "-"
[/simterm]
AWS Load Balancer – no Worker Node added
While I tried to setup this cluster and ELB faced with the issue when Worker Nodes wasn’t added to an AWS LoadBalancer when creating a LoadBalancer Kubernetes service.
In such a case try to check if the ProviderID (--provider-id) is present in a node’s settings:
[simterm]
root@ip-10-0-0-102:~# kubectl describe node ip-10-0-0-186.eu-west-3.compute.internal | grep ProviderID
ProviderID:                  aws:///eu-west-3a/i-03b04118a32bd8788
[/simterm]
If there is no ProviderID add it using the kubectl edit node <NODE_NAME> as a ProviderID: aws:///eu-west-3a/<EC2_INSTANCE_ID>:

But it must be set when you are joining a node using /etc/kubernetes/node.yml file with the JoinConfiguration with the cloud-provider: aws is set.
Done.
Useful links
Common
AWS
- Kubernetes Cloud Controller Manager
- Cloud Providers
- How to create a k8s cluster with kubeadm on Azure
- Setting up the Kubernetes AWS Cloud Provider
- Using Kubeadm to Add New Control Plane Nodes with AWS Integration
- Kubernetes Cluster Setup with AWS Cloud Provider
- Kubernetes on AWS
- Rancher: AWS Cloud Provider
LoadBalancer, network
- Services of type LoadBalancer and Multiple Ingress Controllers
- Kubernetes and AWS ELB — What to do when you reach the Security Group limit in AWS
- Using Kubernetes LoadBalancer Services on AWS
- Deploy an app behind a Load Balancer on Kubernetes
- Load Balancing and Reverse Proxying for Kubernetes Services
- How to Add Load Balancers to Kubernetes Clusters
- AWS ALB Ingress Controller for Kubernetes
![]()