
Let’s proceed with our AWS Elastic Kubernetes Service, EKS.
Previous parts:
- Kubernetes: part 1 – architecture and main components overview
- Kubernetes: part 2 – a cluster set up on AWS with AWS cloud-provider and AWS LoadBalancer
- Kubernetes: part 3 – AWS EKS overview and manual EKS cluster set up.
In the previous – Kubernetes: part 3 – AWS EKS overview and manual EKS cluster set up – part we started an EKS cluster.
kubectl is working, all good.
But when my team’s backend developer performed the aws eks update-kubeconfig command to configure the kubectl tool on his macOS and made the first attempt to connect to this cluster – he got the next error:
[simterm]
root@ip-10-0-42-255:~# kubectl get nodes
error: You must be logged in to the server (Unauthorized)
[/simterm]
Both users – mine, as I created this cluster using my own IAM user, and our backend developer – have FullAdmin grants on their AWS accounts – what can be wrong here?
Well, let’s dive a bit into EKS and AWS authentication and authorization process.
In this topic will we speak about:
- authentication vs authorization
- modules and authentification process in AWS EKS with
aws-iam-authenticatorand AWS AIM
And in the next part – we will see what is RBAC in Kubernetes and how it is used for users authorization.
Contents
Authentication vs Authorization
At first – let’s quickly check the difference between a user’s authentification vs authorization.
Authentication
Authentification is a process when a client has to prove a server that he is who he claims to be.
For example, after we create an EKS cluster – we started Worker Nodes instances. They have to make a call to the EKS’ API-server to connect to the cluster.
During that – the API server has to have an ability to check what is the client asking him to act as a Worker Node and it has permissions for this.
For this Kubernetes has authentication modules or authenticators: when API server receives a request from clients, whether it a client like a kubectl tool, a new Worker Node, or just an HTTP-request made with curl – Kubernetes will ask one of its configured authenticators to validate this client.
All available modules can be found in the documentation, but for now, we are interesting in one that is used in the AWS Elastic Kubernetes Service – the aws-iam-authenticator which is used with AWS IAM to check users.
Authorization
After our client will pass the authentification process – Kubernreets has to check if this user can perform exactly an action called by the client, for example – if it has permissions to execute kubectl get pods command.
If recall AWS IAM policies – we can see permissions that are granted for a particular API-calls, for example:

Here in the Action, we are setting permissions for some user who will use this policy. If this user will try to execute the “s3:DeleteObject” call – AWS will decline it as this request wasn’t specified in the policy for this user (and the whole AWS is working via API-calls in the same way as it is in the Kubernetes).
Similarly to the authentification process – Kubernetes has authorization modules or authorisers, for example – Attribute-based access control (ABAC) and Role-based access control (RBAC).
Kubernetes will pass a user who already was validated with an authentication module to an authorization module to check for its permissions and after that API server will decide if it has to perform an exaction requested by the client.
See the documentation here – Controlling Access to the Kubernetes API.
In the post below we will see how the authentification process is working in AWS EKS with AWS IAM and in the next one – will speak about the authorization and RBAC in Kubernetes.
AWS EKS Authentication and Authorization
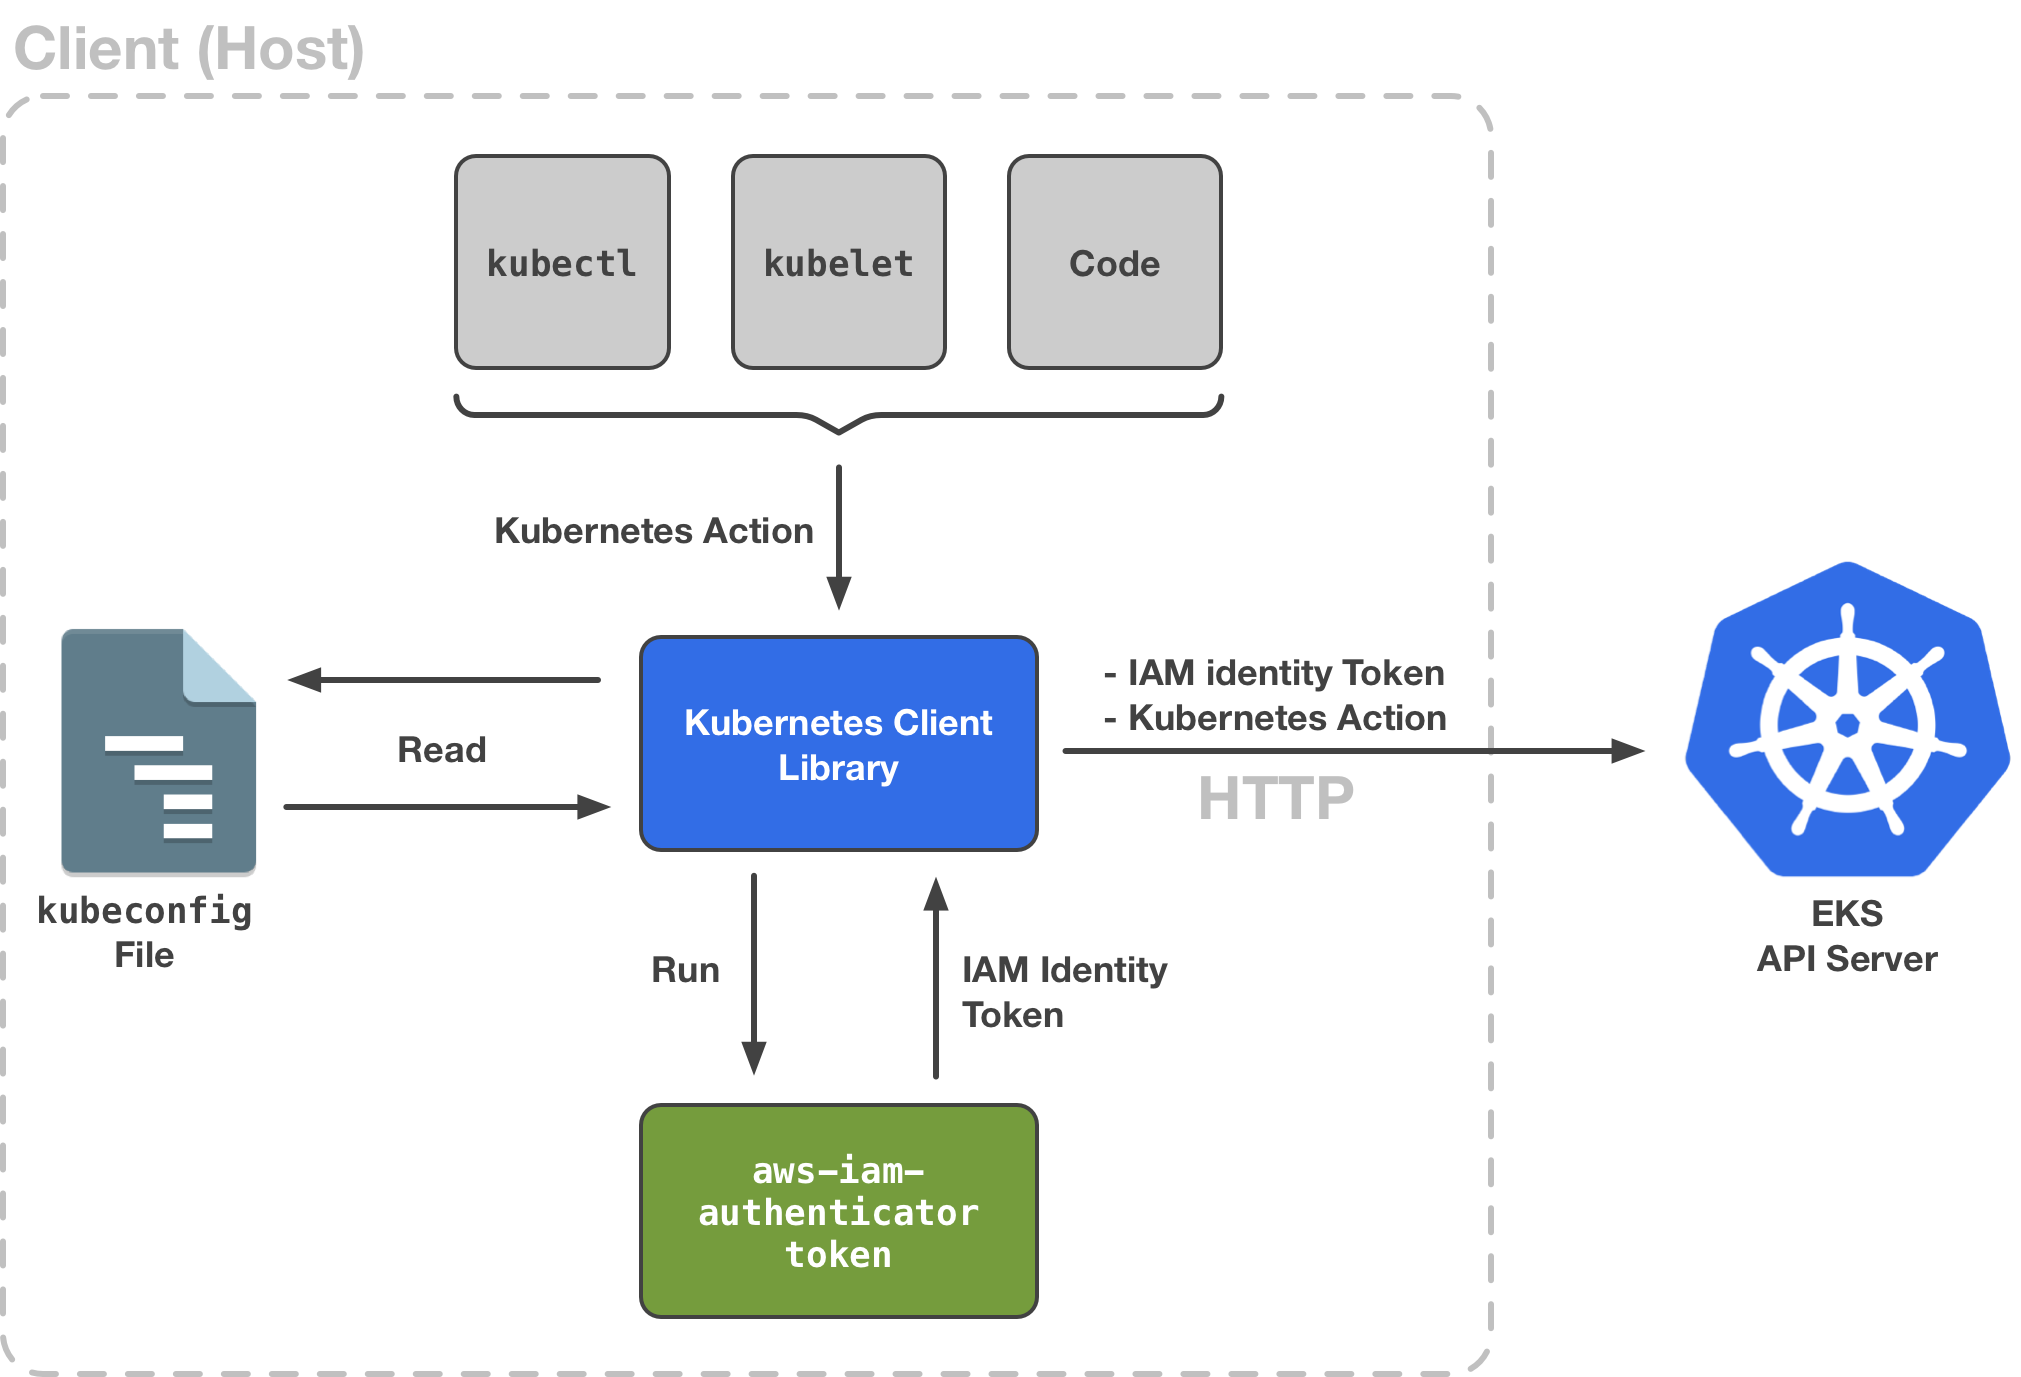
The process is greatly described in the picture below:

AWS EKS IAM Authentication
For the authentification AWS EKS uses web-tokens – see the Webhook Token Authentication: a client will pass specially formatted token which includes a user’s identificator.
In the case of AWS EKS, this identification can be an IAM-user’s or IAM-role’s ARN (Amazon Resource Name).
Kubernetes authenticator in its turn will pass the identificator extracted from this token to the AWS IAM service to check if the user specified in the token is really the one he is clams to be by using the AWS IAM Authenticator service which is running on the EKS Control Plane.
E.g. the process is:
- a client makes q requests to an API server passing an access-token with the user’s identificator
- API servers pass this token to another Kubernetes Control Plane’s service –
aws-iam-authenticator aws-iam-authenticatorasks AWS IAM service and passes this identificator to check if this is valid user and do he has permissions to access the EKS cluster- AWS IAM makes internal authentification check by using a secret key tied with the ACCESS_KEY passed in a token as a user’s identificator
- AWS IAM makes internal authorization check by checking IAM policies tied to this user – a user without API calls to
eks::*resources must be declined
aws-iam-authenticatorgoes back to the Kubernetes cluster to check viaaws-authConfigMap (will see it soon in the AWS EKS aws-auth ConfigMap) – do this user has permissions to access this clusteraws-iam-authenticatorreturns approve/decline response to the API server- API server in its turn will or perform actions requested by the user – or will return the “You must be logged in to the server (Unauthorized)” message
Note: previously the AWS cloud-provider was used instead of the aws-iam-authenticator, check the Kubernetes: part 2 – a cluster set up on AWS with AWS cloud-provider and AWS LoadBalancer post for details.
The aws-iam-authenticator itself can be used on both sides – just a server’s side it is started as aws-iam-authenticator server, and on the client – aws-iam-authenticator token -i:
But in my current case, the client (kubectl) as configured by issuing the aws eks update-kubeconfig command and uses AWS CLI instead of the aws-iam-authenticator as on the picture above(see more at AWS CLI vs aws-iam-authenticator).
kubectl authentification
Let’s use the kubectl on a local workstation as a client to see the whole process.
So, kubectl first will check the ~/.kube/config file where it will take an EKS cluster’s API-server URL:
...
server: https://715***834.sk1.us-east-2.eks.amazonaws.com
...
Next, take a look at the next part of the config file, especially we are interested in the exec and particularly – in the command and args:
...
    exec:
      apiVersion: client.authentication.k8s.io/v1alpha1
      args:
      - --region
      - us-east-2
      - eks
      - get-token
      - --cluster-name
      - mobilebackend-dev-eks-0-cluster
      command: aws
...
Which describes the command to be used to get a token for EKS authentification by using the AWS CLI command – aws eks get-token.
It will be interesting to play a bit with the WS API authentification, some quickly googled examples can be found in the Developer Guide for AWS S3, and if will have time – maybe will try to do the whole work just by using the curl utility, as under the hood AWS CLI just issues an API-requests to the AWS core in the same way as we can see it in the kubectl and Kubernetes API-endpoint.
Now – let’s use the command specified about in the command section and let’s pass arguments which are set in the args:
[simterm]
$ aws --profile arseniy --region us-east-2 eks get-token --cluster-name mobilebackend-dev-eks-0-cluster
{"kind": "ExecCredential", "apiVersion": "client.authentication.k8s.io/v1alpha1", "spec": {}, "status": {"expirationTimestamp": "2019-08-31T10:27:24Z", "token": "k8s-aws-v1.aHR...zEy"}}
[/simterm]
“token”: “k8s-aws-v1.aHR…zEy” – here is our token.
You can check its content on the https://www.base64decode.org (insert a token’s content after the first “_” symbol).
Here is what we got in the case above:
Action=GetCallerIdentity&Version=2011-06-15&X-Amz-Algorithm=AWS4-HMAC-SHA256&X-Amz-Credential=AKI***D4Q%2F20190831%2Fus-east-1%2Fsts%2Faws4_request&X-Amz-Date=20190831T092243Z&X-Amz-Expires=0&X-Amz-SignedHeaders=host%3Bx-k8s-aws-id&X-Amz-Signature=ff2***f7f
The Amz-Credential=AKI***D4Q field contains our user’s ACCESS_KEY taken from the arseny AWS CLI profile (will speak about profiles in the AWS profiles):
[simterm]
$ cat ~/.aws/credentials | grep -B1 -A2 AKI***D4Q
[arseniy]
aws_access_key_id = AKI***D4Q
aws_secret_access_key = q0I***jvj
[/simterm]
So:
- we are passing the ACCESS_KEY
- by using the ACCESS_KEY – can get a user’s ARN
- by using this ARN,
aws-iam-authenticatoron EKS Control Plane will check if this is valid user and if he can access our cluster (see the AWS EKS aws-auth ConfigMap)
Let’s check our ACCESS_KEY:
[simterm]
$ aws --profile arseniy  iam list-access-keys --user-name arseniy
{
    "AccessKeyMetadata": [
        {
            "UserName": "arseniy",
            "AccessKeyId": "AKI***D4Q",
...
[/simterm]
The AWS account where this key is used:
[simterm]
$ aws --profile arseniy sts get-access-key-info --access-key-id AKI***D4Q
{
    "Account": "534***385"
}
[/simterm]
And the user’s ARN in this account:
[simterm]
$ aws --profile arseniy iam get-user --user-name arseniy
{
    "User": {
        "Path": "/",
        "UserName": "arseniy",
        "UserId": "AID***JU6",
        "Arn": "arn:aws:iam::534***385:user/arseniy",
...
[/simterm]
All good.
AWS CLI vs aws-iam-authenticator
In the same way instead of the AWS CLI, we can use the aws-iam-authenticator to obtain a token, to make our process absolutely the same as per picture above.
You can install it on the Arch Linux for the AUR:
[simterm]
$ yaourt -S aws-iam-authenticator-bin
[/simterm]
And get your token:
[simterm]
$ aws-iam-authenticator token -i mobilebackend-dev-eks-0-cluster
{"kind":"ExecCredential","apiVersion":"client.authentication.k8s.io/v1alpha1","spec":{},"status":{"expirationTimestamp":"2019-08-31T10:38:41Z","token":"k8s-aws-v1.aHR***ODU"}}
[/simterm]
You can also manually edit your kubectl‘s config to set aws-iam-authenticator instead of the AWS CLI.
So, replace the next part:
...
    exec:
      apiVersion: client.authentication.k8s.io/v1alpha1
      args:
      - --region
      - us-east-2
      - eks
      - get-token
      - --cluster-name
      - mobilebackend-dev-eks-0-cluster
      command: aws
...
With the next one:
...
    exec:
      apiVersion: client.authentication.k8s.io/v1alpha1
      args:
        - token
        - -i
        - mobilebackend-dev-eks-0-cluster
      command: aws-iam-authenticator
      env:
      - name: AWS_PROFILE
        value: arseniy
...
Check access:
[simterm]
$ kubectl auth can-i get pods
yes
[/simterm]
So, we saw that kubectl just gets a token by using a command specified in its ~/.kube/conf config by using or AWS CLI (/usr/bin/aws) or with the /usr/bin/aws-iam-authenticator.
AWS profiles
Let’s take a look at the env section in our ~/.kube/config:
...
      command: aws
      env:
      - name: AWS_PROFILE
        value: arseniy
Here we are setting an AWL CLI profile’s name which will be used to get a token, check the AWS: CLI named profiles post for details.
So:
kubectlreads~/.kube/config- gets an API Server URL
- a command to use to get a token (
commandиargs) - an AWS CLI’s user profile to be used
- requests AWS to obtain a token
- sends this token to the EKS API server and passes this token
Let’s check.
Get the token:
[simterm]
$ export AWS_PROFILE=arseniy
$ aws-iam-authenticator token -i mobilebackend-dev-eks-0-cluster
{"kind":"ExecCredential","apiVersion":"client.authentication.k8s.io/v1alpha1","spec":{},"status":{"expirationTimestamp":"2019-08-31T11:00:15Z","token":"k8s-aws-v1.aHR***Y2E"}}
[/simterm]
Check it – get a user’s ARN:
[simterm]
$ aws-iam-authenticator token -verify -i mobilebackend-dev-eks-0-cluster -t $token&{ARN:arn:aws:iam::534***385:user/arseniy CanonicalARN:arn:aws:iam::534***385:user/arseniy AccountID:534***385 UserID:AID***JU6 SessionName:}
[/simterm]
For simplicity – save the token to the $token:
[simterm]
$ token="k8s-aws-v1.aHR***Y2E"
[/simterm]
And use the curl to connect to the API Server:
[simterm]
$ curl -X GET https://715***834.sk1.us-east-2.eks.amazonaws.com/api --insecure --header "Authorization: Bearer $token"
{
  "kind": "APIVersions",
  "versions": [
    "v1"
  ],
  "serverAddressByClientCIDRs": [
    {
      "clientCIDR": "0.0.0.0/0",
      "serverAddress": "ip-172-16-49-148.us-east-2.compute.internal:443"
    }
  ]
}
[/simterm]
All works here.
In the same way kubectl will perform its own requests to the EKS.
By the way, you can see all those requests in the CloudWatch Logs if you enabled them for your EKS cluster.
For example, the authentification logs can be found – surprise – in the authentificator-*** logs:

heptio-authenticator-aws vs aws-iam-authenticator
At first, I was surprised – why I’m seeing the heptio-authenticator-aws service in the logs if AWS documentation tells about the aws-iam-authenticator? Check the Managing Cluster Authentication.
But the answer is simple: before the 4.0 version aws-iam-authenticator was called as heptio-authenticator-aws.
See the v0.3.0 and v0.4.0-alpha.1 tags.
Okay, so we already checked how the authentification is working from the client-side – what about AWS EKS then?
AWS EKS aws-auth ConfigMap
Then, the “authentification magic” happens here: now the aws-iam-authenticator has to:
- ask the AWS IAM service – if it has such a user and do it has permissions, e.g. must perform the authentification
- after this
aws-iam-authenticatorhas to pass this user to the Kubernetes API-server, and then Kubernetes will perform the user’s authorization – do this user has permissions to access our cluster and which commands it can use – here theaws-authConfigMap will be used
If go back to the Kubernetes: part 2 – a cluster set up on AWS with AWS cloud-provider and AWS LoadBalancer post – we created a ConfigMap there which is looks now as the next:
apiVersion: v1
kind: ConfigMap
metadata:
  name: aws-auth
  namespace: kube-system
data:
  mapRoles: |
    - rolearn: arn:aws:iam::534***385:role/mobilebackend-dev-eks-0-wn-stack-NodeInstanceRole-15NNFZK6WW4IG
      username: system:node:{EC2PrivateDNSName}
      groups:
        - system:bootstrappers
        - system:nodes
Here in the arn:aws:iam::534***385:role/mobilebackend-dev-eks-0-wn-stack-NodeInstanceRole-15NNFZK6WW4IG line we added the role ARN which is used as the Instance Role for EC2 with our Worker Nodes which will be checked for permissions.
Adding a new user to the cluster’s ConfigMap
Finally, let’s go back to the very beginning of this post: why another IAM-ser got the “You must be logged in to the server (Unauthorized)” error?
Well, it’s kind of obvious from what we saw in the ConfigMap – because there is no such a user and thus – Kubernetes can’t check its permissions (actually – because this user has.
Check the aws-iam-authenticator‘s documentation:
...
  # each mapUsers entry maps an IAM role to a static username and set of groups
  mapUsers:
...
Update your ConfigMap – add a user’s ARN, its login and set its group as system:masters:
apiVersion: v1
kind: ConfigMap
metadata:
  name: aws-auth
  namespace: kube-system
data:
  mapRoles: |
    - rolearn: arn:aws:iam::534***385:role/mobilebackend-dev-eks-0-wn-stack-NodeInstanceRole-15NNFZK6WW4IG
      username: system:node:{EC2PrivateDNSName}
      groups:
        - system:bootstrappers
        - system:nodes
  mapUsers: |
    - userarn: arn:aws:iam::534***385:user/yaroslav
      username: yaroslav
      groups:
        - system:masters
Apply the changes:
[simterm]
$ kubectl apply -f aws-auth-cm.yaml
configmap/aws-auth configured
[/simterm]
Check on the cluster – find the ConfigMap:
[simterm]
$ kubectl -n kube-system get cm
NAME                                 DATA   AGE
aws-auth                             2      2d
...
[/simterm]
And check its content:
[simterm]
$ kubectl -n kube-system describe cm aws-auth
Name:         aws-auth
Namespace:    kube-system
Labels:       <none>
Annotations:  kubectl.kubernetes.io/last-applied-configuration:
                {"apiVersion":"v1","data":{"mapRoles":"- rolearn: arn:aws:iam::534***385:role/mobilebackend-dev-eks-0-wn-stack-NodeInstanceRole-15NNFZK...

Data
====
mapRoles:
----
- rolearn: arn:aws:iam::534***385:role/mobilebackend-dev-eks-0-wn-stack-NodeInstanceRole-15NNFZK6WW4IG
  username: system:node:{EC2PrivateDNSName}
  groups:
    - system:bootstrappers
    - system:nodes

mapUsers:
----
- userarn: arn:aws:iam::534***385:user/yaroslav
  username: yaroslav
  groups:
    - system:masters

Events:  <none>
[/simterm]
Done – our user arn:aws:iam::534***385:user/yaroslav now is able to perform any actions in the cluster.
“root” aka Cluster creator
The final thing I’d like to speak about is the Creator user: the IAM entry, which was used to create a cluster will become its super-admin.
But the problem is that you are not able to see anywhere – that’s why I was confused – why the arn:aws:iam::534***385:user/arseniy user had full access to the cluster, while the arn:aws:iam::534***385:user/yaroslav – hasn’t.
But still – you can find the Creator by checking the CloudTrail by the CreateCluster API-call to the AWS:

The Support’s answer about any way to see the “root” user was the next:
At this time, the IAM entity that creates the cluster becomes the first cluster administrator. This entity is passed to
the master nodes and is not visible from theaws-authConfigMap. This is similar to the root user for your AWS account
in that it has the system:masters permission.
Useful links
- Kubernetes Client Authentication on Amazon EKS
- How auth works in EKS with IAM Users
- Managing Users or IAM Roles for your Cluster
- How do I provide access to other users and roles after cluster creation in Amazon EKS?
![]()