![]()
Currently, I’m setting up a new EKS cluster. Among other things, I’m running ExternalDNS on it, which uses a Kubernetes ServiceAccount to authenticate to AWS in order to be able to make changes to the domain zone in Route53.
However, I forgot to configure the Identity Provider in AWS IAM and ExternalDNS threw an error:
level=error msg=”records retrieval failed: failed to list hosted zones: WebIdentityErr: failed to retrieve credentials\ncaused by: InvalidIdentityToken: No OpenIDConnect provider found in your account for https://oidc.eks.us-east-1.amazonaws.com/id/FDF***F2F\n\tstatus code: 400
So I began to remember about OIDC, then about authentication in Kubernetes in general, and decided to dig into how it all works again because there were quite interesting changes in the latest versions of EKS/Kubernetes.
Contents
What is OpenID Connect and Identity Provider
OpenID Connect (OIDC) is a protocol that allows services to authenticate another service or user based on Identity Tokens, which are JSON Web Tokens (JWT).
The JWT is signed by the Identity Provider (IDP) and contains information about the user or service.
In our case, AWS Elastic Kubernetes Service is the Identity Provider, and AWS is the Service Provider. That is, EKS authenticates users and tells Amazon that this user can be trusted to perform some actions in AWS.
So the main thing to realize when you’re setting up Identity Providers in AWS IAM is that you’re not setting up some separate AWS Service called “Identity Providers”, but you’re setting up AWS IAM to say “Hey, trust the dude with this URL ”, that is, you configure Trust relations between your Identity Provider (EKS, GitHub, GitLab, Google, etc) and Service Provider (AWS).
To draw an analogy, it is if you came to passport control at the airport somewhere in Amsterdam with your international passport, and you were believed to be you because the border service of the Netherlands (Service Provider) trusts the government of your country (Identity Provider), who issued you this passport (JWT).
AWS EKS and IAM Role
Ok, so how does a Kubernetes Pod in EKS access an AIM role?
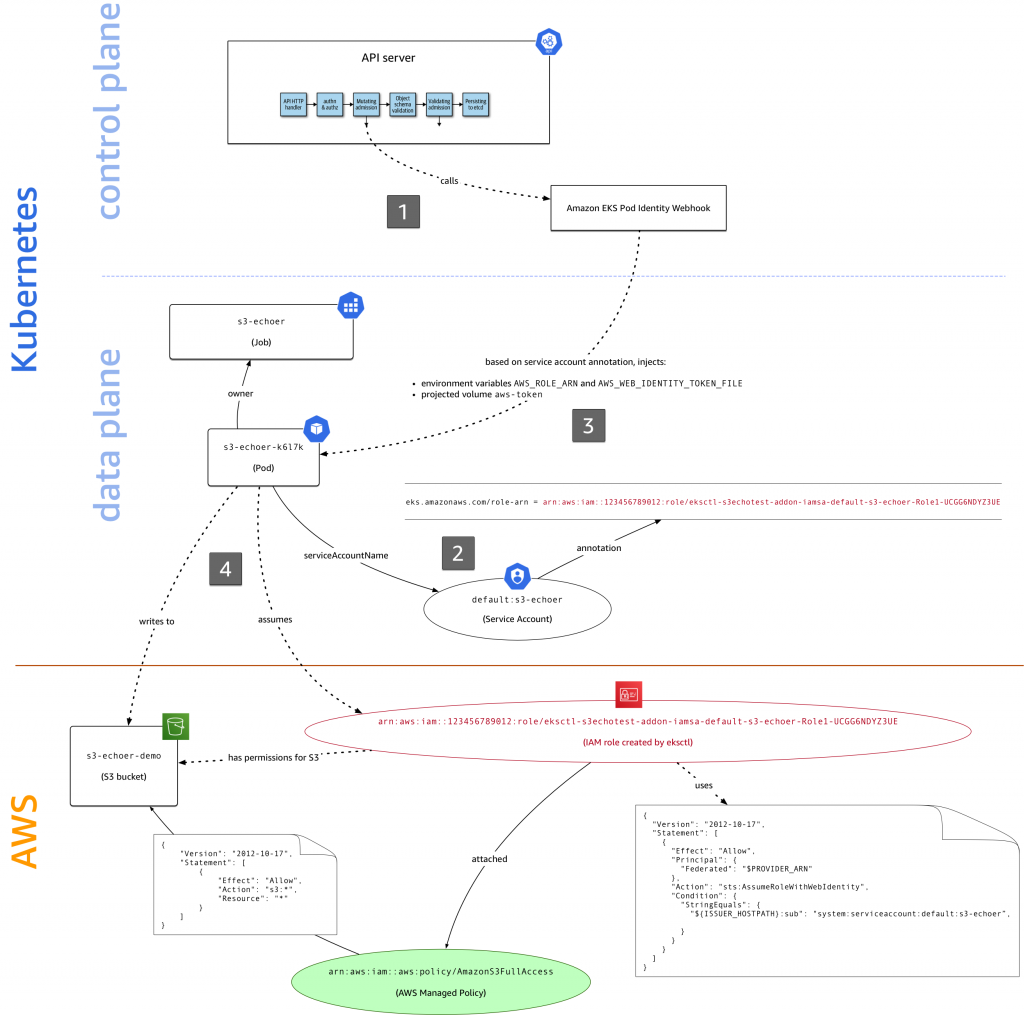
We’ll come back to this topic in more detail at the end, in the AWS IAM Roles for Kubernetes ServiceAccounts, but for now, let’s look at the overall picture of the process:
- we create a ServiceAccount for the Kubernetes Pod, in the
annotationsof this ServiceAccount we specify an ARN of an IAM role that this Pod should use for authentication in AWS (authorization, that is, checking what actions you can perform in AWS, will be performed at the level of AWS itself in the IAM using an IAM Policy that is connected to your IAM Role) - EKS generates a JWT token, which indicates that the “sender” of this token is indeed a valid EKS user, and EKS confirms this with its certificate
- a process from the Pod uses this token to authenticate to AWS IAM and execute the AssumeRole operation
- and already on behalf of this IAM Role, this process of the Pod performs the necessary actions with the AWS API
That is, in this process are involved a Kubernetes ServiceAccount, the AWS AIM, and JWT tokens.
Let’s see all of them one by one in action, and we will start with ServiceAccounts and JWT in EKS because, since the writing of Kubernetes: ServiceAccounts, JWT-tokens, authentication, and RBAC authorization, the process has changed a little.
EKS ServiceAccounts, and Projected Volumes
If earlier, when creating a ServiceAccount, a static Kubernetes Secret was created, which contained three fields – namespace, ca.crt, and actually token, now it is all generated dynamically for each Pod and ServiceAccount.
Let’s take a look at what we currently have in the Pod with ExternalDNS:
[simterm]
$ kk -n kube-system get pod external-dns-85587d4b76-2flhg -o yaml
...
    env:
    - name: AWS_DEFAULT_REGION
      value: us-east-1
    - name: AWS_STS_REGIONAL_ENDPOINTS
      value: regional
    - name: AWS_ROLE_ARN
      value: arn:aws:iam::492***148:role/eks-dev-1-26-EksExternalDnsRoleB9A571AF-1CFSB6BBQDGSZ
    - name: AWS_WEB_IDENTITY_TOKEN_FILE
      value: /var/run/secrets/eks.amazonaws.com/serviceaccount/token
...
    volumeMounts:
    - mountPath: /var/run/secrets/kubernetes.io/serviceaccount
      name: kube-api-access-qdgjr
      readOnly: true
    - mountPath: /var/run/secrets/eks.amazonaws.com/serviceaccount
      name: aws-iam-token
      readOnly: true
...
  serviceAccount: external-dns
  serviceAccountName: external-dns
...
  volumes:
  - name: aws-iam-token
    projected:
      defaultMode: 420
      sources:
      - serviceAccountToken:
          audience: sts.amazonaws.com
          expirationSeconds: 86400
          path: token
  - name: kube-api-access-qdgjr
    projected:
      defaultMode: 420
      sources:
      - serviceAccountToken:
          expirationSeconds: 3607
          path: token
      - configMap:
          items:
          - key: ca.crt
            path: ca.crt
          name: kube-root-ca.crt
      - downwardAPI:
          items:
          - fieldRef:
              apiVersion: v1
              fieldPath: metadata.namespace
            path: namespace
...
[/simterm]
So, in the volumeMounts we can see two volumes – kube-api-access-qdgjr and aws-iam-token . We will return to aws-iam-token later, but for now, let’s take a look on the volumes.projected for the kube-api-access-qdgjr.
ServiceAccount Tokens
Starting with version 1.22, Kubernetes has two types of tokens – the Long Live and Time-Bound.
Long Live is already considered as deprecated and should not be used, although it is possible to do them with a Secret with the type: kubernetes.io/service-account-token, which is the same type of token used for ServiceAccounts before:
apiVersion: v1
kind: ServiceAccount
metadata:
  name: test-sa
---
apiVersion: v1
kind: Secret
metadata:
  name: test-secret
  annotations:
    kubernetes.io/service-account.name: test-sa
type: kubernetes.io/service-account-token
Time Bound tokens are generated by the Kubernetes TokenRequest API, they have a limited lifetime, are valid only for a specific Pod and ServiceAccount, and are connected to a Pod using Projected Volumes and serviceAccountToken.
Kubernetes API JWT authentification
Let’s look at the content of the catalog /var/run/secrets/kubernetes.io/serviceaccount:
[simterm]
$ kk exec -ti pod/test-pod -- ls -l /var/run/secrets/kubernetes.io/serviceaccount
total 0
lrwxrwxrwx    1 root     root            13 Jul  5 09:37 ca.crt -> ..data/ca.crt
lrwxrwxrwx    1 root     root            16 Jul  5 09:37 namespace -> ..data/namespace
lrwxrwxrwx    1 root     root            12 Jul  5 09:37 token -> ..data/token
[/simterm]
Here we have three files that are created from Projected Volumes, in which we saw three sources, each with its own path:
serviceAccountToken: contains the token received from kube-apiserver using the TokenRequest API and used by the Pod to authenticate to the Kubernetes API. Has a limited lifetime, and is valid only for that particular Pod and its ServiceAccountpath: token
configMap: takes the contents of thekube-root-ca.crtConfigMap, used by the Pod to make sure it connects to the right Kubernetes APIpath: ca.crt
downwardAPI: receives from the API information about themetadata.namespacepath: namespace
Now, let’s see what is in the token itself – it has also changed.
Get the token:
[simterm]
$ token=`kubectl -n kube-system exec external-dns-85587d4b76-2flhg -- cat /var/run/secrets/kubernetes.io/serviceaccount/token`
[/simterm]
And look at its content using jwt-cli or on the website https://jwt.io :
[simterm]
$ jwt decode $token

Token header
------------
{
  "alg": "RS256",
  "kid": "64aacc8aa986bf6161312dfdfeba00e63ed64f9d"
}

Token claims
------------
{
  "aud": [
    "https://kubernetes.default.svc"
  ],
  "exp": 1720254790,
  "iat": 1688718790,
  "iss": "https://oidc.eks.us-east-1.amazonaws.com/id/FDF***F2F",
  "kubernetes.io": {
    "namespace": "kube-system",
    "pod": {
      "name": "external-dns-85587d4b76-2flhg",
      "uid": "d59b56f1-fa01-4a0f-8897-1933926e4d42"
    },
    "serviceaccount": {
      "name": "external-dns",
      "uid": "38c8f023-60bf-416e-b6c2-d37939ac3c06"
    },
    "warnafter": 1688722397
  },
  "nbf": 1688718790,
  "sub": "system:serviceaccount:kube-system:external-dns"
}
[/simterm]
Here:
aud(audience): for whom this token is intended – the recipient must identify himself with this name, otherwise the token must be rejectedexp(expiration time): “expiration time” of this token – after its expiration, the token must be rejectediat(issued at): time of the creation of the token, from which it will be countedexpiss(issuer): The OIDC Issuer URL of our cluster – it’s the same Identity Provider URL that we will use later when will configure AWS IAMkubernetes.io: here we see the UID of the Pod and related ServiceAccount – that’s why if the Pod or its ServiceAccount is recreated, this token will become invalid because the UIDs will changesub(subject): a “username” of this token – will be checked against AWS IAM to authorize AWS API actions
Using this token, from the Pod we can authenticate to the API of our Kubernetes cluster.
Create a manifest with a Pod with the cURL utility:
---
apiVersion: v1
kind: Pod
metadata:
  name: test-pod
spec:
  containers:
    - name: curl
      image: curlimages/curl
      command: ['sleep', '36000']
  restartPolicy: Never
Create it in a cluster:
[simterm]
$ kubectl apply -f test-pod.yaml
pod/test-pod created
[/simterm]
Connect to it, create environment variables and run a request to the Kubernetes API:
[simterm]
$ kubectl exec -ti test-pod -- sh
~ $ SERVICEACCOUNT=/var/run/secrets/kubernetes.io/serviceaccount
~ $ TOKEN=$(cat ${SERVICEACCOUNT}/token)
~ $ CACERT=${SERVICEACCOUNT}/ca.crt
~ $ curl --cacert ${CACERT} --header "Authorization: Bearer ${TOKEN}" -X GET https://kubernetes.default.svc/api
{
  "kind": "APIVersions",
  "versions": [
    "v1"
  ],
  "serverAddressByClientCIDRs": [
    {
      "clientCIDR": "0.0.0.0/0",
      "serverAddress": "ip-172-16-110-147.ec2.internal:443"
    }
  ]
}
[/simterm]
Whereas without a token we will follow the Russian warship we will get a 403 response:
[simterm]
~ $ curl --cacert ${CACERT} -X GET https://kubernetes.default.svc/api
{
  "kind": "Status",
  "apiVersion": "v1",
  "metadata": {},
  "status": "Failure",
  "message": "forbidden: User \"system:anonymous\" cannot get path \"/api\"",
  "reason": "Forbidden",
  "details": {},
  "code": 403
}
[/simterm]
Okay, we seem to have figured out the authentication in the Kubernetes API. Next, let’s take a look at AWS.
AWS IAM Roles for Kubernetes ServiceAccounts
To work with AWS API, Kubernetes Pod uses the IRSA model – IAM Role for Service Accounts.
While you can still use the ACCESS/SECRET approach via environment variables, or attach a required IAM Role to the EC2 WorkerNode as an EC2 IAM Instance Role, working through IRSA allows you to issue rights to work with AWS for a specific Pod, rather than grant access to a Role for all Pods on that EC2 -instance.
In the case of ACCESS/SECRET for the Pod, your keys are static, and firstly, they can be compromised (stolen), secondly, you need to keep them somewhere and transfer them to Deployment/StatefulSet, etc during the creation of your workload. whereas IRSA uses dynamic credentials that are generated when a Pod requests an IAM role, and you don’t need to store them or worry about them leaking.
Assume a Role with AWS CLI
So, Kubernetes Pod will do the AssumeRole operation to get a Role, so let’s remember how AssumeRole works with AWS CLI – then we can better imagine how it works in EKS with its Pods.
Describe an IAM Policy that allows access to S3 buckets:
{
    "Version": "2012-10-17",
    "Statement": [
        {
            "Effect": "Allow",
            "Action": [
                "s3:ListAllMyBuckets",
                "s3:GetBucketLocation"
            ],
            "Resource": "*"
        }
    ]
}
Create it:
[simterm]
$ aws iam create-policy --policy-name irsa-test --policy-document file://irsa-policy.json
{
    "Policy": {
        "PolicyName": "irsa-test",
        ...
        "Arn": "arn:aws:iam::492***148:policy/irsa-test",
        ...
    }
}
[/simterm]
Describe a Trusted Policy for the future IAM Role – who will be able to perform the sts:AssumeRole request of this role to the AWS API:
{
  "Version": "2012-10-17",
  "Statement": [
    {
      "Sid": "",
      "Effect": "Allow",
      "Principal": {
        "AWS": "arn:aws:iam::492***148:root"
      },
      "Action": "sts:AssumeRole"
    }
  ]
}
Here in the Principal "arn:aws:iam::492***148:root" we set that any valid user of this AWS account can perform the "Action": "sts:AssumeRole".
Create the Role, and connect this policy:
[simterm]
$ aws iam create-role --role-name irsa-test-role --assume-role-policy-document file://irsa-trust.json
{
    "Role": {
        "Path": "/",
        "RoleName": "irsa-test-role",
        "RoleId": "AROAXFIUAIGSBE2Q2WORF",
        "Arn": "arn:aws:iam::492***148:role/irsa-test-role",
        "CreateDate": "2023-07-05T11:05:37Z",
        "AssumeRolePolicyDocument": {
            "Version": "2012-10-17",
            "Statement": [
                {
                    "Sid": "",
                    "Effect": "Allow",
                    "Principal": {
                        "AWS": "arn:aws:iam::492***148:root"
                    },
                    "Action": "sts:AssumeRole"
                }
            ]
        }
    }
}
[/simterm]
And add a Policy to the Role that allows you to execute requests to S3:
[simterm]
$ aws iam attach-role-policy --role-name irsa-test-role --policy-arn arn:aws:iam::492****148:policy/irsa-test
[/simterm]
Now, with the AWS CLI, check whether we can assume this role:
[simterm]
$ aws sts assume-role --role-arn arn:aws:iam::492***148:role/irsa-test-role --role-session-name TestIrsa
{
    "Credentials": {
        "AccessKeyId": "ASI***GU3",
        "SecretAccessKey": "g5N***xhR",
        "SessionToken": "Fwo***g==",
        "Expiration": "2023-07-05T12:25:54Z"
    },
    "AssumedRoleUser": {
        "AssumedRoleId": "AROAXFIUAIGSBE2Q2WORF:TestIrsa",
        "Arn": "arn:aws:sts::492***148:assumed-role/irsa-test-role/TestIrsa"
    }
}
[/simterm]
“It works!” (c)
What happens here?
- the AWS CLI makes a request to the AWS STS
- STS checks whether a user (who has AWS ACCESS/SECRET user keys in the
~/.aws/credentials) can perform the API requeststs:AssumeRole(and as we configured thePrincipal "arn:aws:iam::492***148:root"in the Trust Policy of this Role, so it can) - if the check is passed, the STS creates temporary access credentials for this role – the
AWS_ACCESS_KEY_ID,AWS_SECRET_ACCESS_KEY, andAWS_SESSION_TOKEN, and returns them to the AWS CLI
Next, using this data, we can perform actions on behalf of this IAM role:
[simterm]
$ export AWS_ACCESS_KEY_ID=ASI***YHO
$ export AWS_SECRET_ACCESS_KEY=WPN***ZiN
$ export AWS_SESSION_TOKEN=Fwo***Vo=
[/simterm]
Let’s check the user now:
[simterm]
$ aws sts get-caller-identity
{
    "UserId": "AROAXFIUAIGSBE2Q2WORF:TestIrsa",
    "Account": "492***148",
    "Arn": "arn:aws:sts::492***148:assumed-role/irsa-test-role/TestIrsa"
}
[/simterm]
And let’s see if we have access to buckets:
[simterm]
$ aws s3 ls
2023-02-01 13:29:34 amplify-staging-112927-deployment
2023-02-02 17:40:56 amplify-dev-174045-deployment
...
[/simterm]
Okay, that’s now clear too.
Next, let’s see how it happens in an EKS cluster.
AssumeRole as a ServiceAccount
First, we will configure an Identity Provider in IAM, will create a ServiceAccount, and an IAM Role that we will use, will check it, and then will see how it works.
Get the OpenID Connect provider URL:
[simterm]
$ aws eks describe-cluster --name eks-dev-1-26-cluster --query "cluster.identity.oidc.issuer" --output text
https://oidc.eks.us-east-1.amazonaws.com/id/FDF***F2F
[/simterm]
Go to AWS Console > IAM > Identity Providers, and add a new provider with the type OpenID Connect.
Specify the Provider URL, and click the Get thumbprint:

Using this thumbprint, in the future IAM will check whether the Issuer that we specify in the Provider URL really came to it.
In the Audience field, specify the sts.amazonaws.com – it’s who this IDP can contact.
Click on the Add provider, go to it, and copy its ARN:

Create a “trust policy” file – describe who will be able to perform the Assume role that we will create for our test Pod:
{
  "Version": "2012-10-17",
  "Statement": [
    {
      "Effect": "Allow",
      "Principal": {
        "Federated": "arn:aws:iam::492***148:oidc-provider/oidc.eks.us-east-1.amazonaws.com/id/FDF***F2F"
      },
      "Action": "sts:AssumeRoleWithWebIdentity",
      "Condition": {
        "StringEquals": {
          "oidc.eks.us-east-1.amazonaws.com/id/FDF***F2F:aud": "sts.amazonaws.com",
          "oidc.eks.us-east-1.amazonaws.com/id/FDF***F2F:sub": "system:serviceaccount:default:irsa-test-service-account"
        }
      }
    }
  ]
}
Here:
Federated: ARN of the Identity Provider that we createdAction: what action it will be able to performCondition: and under what conditions – ifsub, i.e. a “user” will be irsa-test-service-account ServiceAccount, and this “user” will contact sts.amazonaws.com
Create the IAM Role, and save its ARN:
[simterm]
$ aws iam create-role --role-name irsa-test --assume-role-policy-document file://irsa-trust.json
...
        "Arn": "arn:aws:iam::492***148:role/irsa-test",
...
[/simterm]
Let’s connect the same S3 Policy that we created at the beginning:
[simterm]
$ aws iam attach-role-policy --role-name irsa-test --policy-arn arn:aws:iam::492***148:policy/irsa-test
[/simterm]
Describe a ServiceAccount, in its annotations specify the IAM Role ARN of the Role that was just created:
apiVersion: v1
kind: ServiceAccount
metadata:
  name: irsa-test-service-account
  namespace: default
  annotations:
    eks.amazonaws.com/role-arn: arn:aws:iam::492***148:role/irsa-test
And we add a testing Pod with the AWS CLI, that will use this serviceAccountName:
---
apiVersion: v1
kind: Pod
metadata:
  name: irsa-test-pod
spec:
  containers:
    - name: aws-cli
      image: amazon/aws-cli:latest
      command: ['sleep', '36000']
  restartPolicy: Never
  serviceAccountName: irsa-test-service-account
Deploy it:
[simterm]
$ kubectl apply -f irsa-sa.yaml
serviceaccount/irsa-test-service-account created
pod/irsa-test-pod created
[/simterm]
Connect to the Pod and try to list S3 baskets in the account:
[simterm]
sh-4.2# aws s3 ls
2023-02-01 11:29:34 amplify-staging-112927-deployment
2023-02-02 15:40:56 amplify-dev-174045-deployment
...
[/simterm]
And let’s make sure we’ve actually did it using the irsa-test role :
[simterm]
sh-4.2# aws sts get-caller-identity
{
    "UserId": "AROAXFIUAIGSM3R35H4WY:botocore-session-1688726924",
    "Account": "492***148",
    "Arn": "arn:aws:sts::492***148:assumed-role/irsa-test/botocore-session-1688726924"
}
[/simterm]
And now let’s figure out how it works.
IRSA and Amazon EKS Pod Identity webhook
Let’s look at our Pod as we did it at the very beginning of this post with the ExternalDNS Pod:
[simterm]
$ kubectl get pod/irsa-test-pod -o yaml
...
    - name: AWS_ROLE_ARN
      value: arn:aws:iam::492***148:role/irsa-test
    - name: AWS_WEB_IDENTITY_TOKEN_FILE
      value: /var/run/secrets/eks.amazonaws.com/serviceaccount/token
...
    volumeMounts:
    - mountPath: /var/run/secrets/kubernetes.io/serviceaccount
      name: kube-api-access-frc4n
      readOnly: true
    - mountPath: /var/run/secrets/eks.amazonaws.com/serviceaccount
      name: aws-iam-token
      readOnly: true
...
  volumes:
  - name: aws-iam-token
    projected:
      defaultMode: 420
      sources:
      - serviceAccountToken:
          audience: sts.amazonaws.com
          expirationSeconds: 86400
          path: token
  - name: kube-api-access-frc4n
    projected:
      defaultMode: 420
      sources:
      - serviceAccountToken:
          expirationSeconds: 3607
          path: token
      - configMap:
          items:
          - key: ca.crt
            path: ca.crt
          name: kube-root-ca.crt
      - downwardAPI:
          items:
          - fieldRef:
              apiVersion: v1
              fieldPath: metadata.namespace
            path: namespace
[/simterm]
We have already seen what is in the /var/run/secrets/kubernetes.io/serviceaccount/token which is created from the Projected Volume kube-api-access-frc4n, now let’s look at the /var/run/secrets/eks.amazonaws.com/serviceaccount/token.
It uses the same type serviceAccountToken to which it is passed the audience: sts.amazonaws.com. As a result, we have a JWT token for authentication in AWS:
[simterm]
$ token=`kubectl exec -ti pod/irsa-test-pod -- cat /var/run/secrets/eks.amazonaws.com/serviceaccount/token`
$ jwt decode $token
...
Token claims
------------
{
  "aud": [
    "sts.amazonaws.com"
  ],
  "exp": 1688813222,
  "iat": 1688726822,
  "iss": "https://oidc.eks.us-east-1.amazonaws.com/id/FDF***F2F",
  "kubernetes.io": {
    "namespace": "default",
    "pod": {
      "name": "irsa-test-pod",
      "uid": "cc040630-1e85-4339-9699-7106c2b37a9b"
    },
    "serviceaccount": {
      "name": "irsa-test-service-account",
      "uid": "65b197d7-1609-433c-825e-b423f622978b"
    }
  },
  "nbf": 1688726822,
  "sub": "system:serviceaccount:default:irsa-test-service-account"
}
[/simterm]
We see all the same fields:
aud: must match the audience of our Identity Provider in AWS AIM (otherwise we will receive an error “An error occurred (InvalidIdentityToken) when calling the AssumeRoleWithWebIdentity operation: Incorrect token audience ” – I made a mistake the first time when adding IDP – specified sts.amazon.com in Audience instead of sts.amazonaws.com )iss: IAM will check from who the token came, and whether it can trust that sourcesub: will be used in IAM Role Trusted Policy – recall theCondition.StringEqualsin the fileirsa-trust.json
That is, with this token, we can contact AWS STS and receive temporary credentials, which we can use to perform a request for sts:AssumeRoleWithWebIdentity.
Let’s check it to see in action?
Use the AWS CLI and assume-role-with-web-identity:
[simterm]
sh-4.2# token=`cat /var/run/secrets/eks.amazonaws.com/serviceaccount/token`
sh-4.2# aws sts assume-role-with-web-identity --role-session-name "test-irsa" --role-arn arn:aws:iam::492***148:role/irsa-test --web-identity-token $token
{
    "Credentials": {
        "AccessKeyId": "ASI***PUU",
        "SecretAccessKey": "Y/Z***KQW",
        "SessionToken": "IQo***A==",
        "Expiration": "2023-07-07T12:54:30+00:00"
    },
    "SubjectFromWebIdentityToken": "system:serviceaccount:default:irsa-test-service-account",
    "AssumedRoleUser": {
        "AssumedRoleId": "AROAXFIUAIGSM3R35H4WY:test-irsa",
        "Arn": "arn:aws:sts::492***148:assumed-role/irsa-test/test-irsa"
    },
    "Provider": "arn:aws:iam::492***148:oidc-provider/oidc.eks.us-east-1.amazonaws.com/id/FDF***F2F",
    "Audience": "sts.amazonaws.com"
}
[/simterm]
Wow! It’s a magic!
So what happens when we create a ServiceAccount with an IAM Role ARN in the annotations?
It is well described in the Introducing fine-grained IAM roles for service accounts:
So:
- when creating a Pod with a ServiceAccount that has an IAM Role specified, the Amazon EKS Pod Identity webhook creates environment variables
AWS_ROLE_ARNandAWS_WEB_IDENTITY_TOKEN_FILE, and adds a projected volumeaws-iam-tokenwith a generated JWT token - when running a process inside a Pod, this process (AWS CLI, CDK, SDK, whatever) uses environment variables:
AWS_ROLE_ARN– to know which IAM Role to assume- and
AWS_WEB_IDENTITY_TOKEN_FILE– to know where to get a token for authentication in AWS
That is when we called aws s3 ls and did not pass any parameters to it – it simply took them from the environment:
[simterm]
sh-4.2# env | grep AWS_
AWS_ROLE_ARN=arn:aws:iam::492***148:role/irsa-test
AWS_WEB_IDENTITY_TOKEN_FILE=/var/run/secrets/eks.amazonaws.com/serviceaccount/token
AWS_DEFAULT_REGION=us-east-1
AWS_REGION=us-east-1
AWS_STS_REGIONAL_ENDPOINTS=regional
[/simterm]
That’s all, folks!
Useful links
- What is OpenID Connect
- RFC 6749: The OAuth 2.0 Authorization Framework
- SAML vs. OpenID (OIDC)
- What’s the magic of OIDC identity providers?
- AssumeRoleWithWebIdentity WHAT?! Solving the Github to AWS OIDC InvalidIdentityToken Failure Loop
- IAM roles for service accounts
- Projected Service Account Token
- Introducing fine-grained IAM roles for service accounts
- How to use trust policies with IAM roles
- Creating a role for web identity or OpenID Connect Federation (console)
- BIG change in K8s 1.24 about ServiceAccounts and their Secrets
- Service Account Tokens in Kubernetes v1.24
- Understanding service accounts and tokens in Kubernetes
- Configure Service Accounts for Pods
- Managing Service Accounts
![]()