 Kustomize is a configuration management tool for Kubernetes that allows you to use common sets of manifests that can be changed for each specific environment/cluster, and can be an alternative to (or complement) Helm templates.
The general concept of Kustomize is “where, what, and how”:
- “where” is a base manifest, for example
deployment.yaml - “what” – what exactly in the manifest need to change, for example, a number of pods (replicas) in a deployment
- “how” – Kustomize configuration files –
kustomization.yaml, describing how exactly to make a change
Contents
Kustomize overview
As a simple example, let’s take a file kustomization.yaml with the following content:
resources:
- deployment.yaml
- service.yaml
namePrefix: dev-
namespace: development
commonLabels:
  environment: development
It describes that it needs to take the resources described in the files deployment.yaml and service.yaml, add the prefix dev- (namePrefix) to the name of each created resource, deploy them to the namespace development, and add labels environment: development.
See all options in the Customize Feature List.
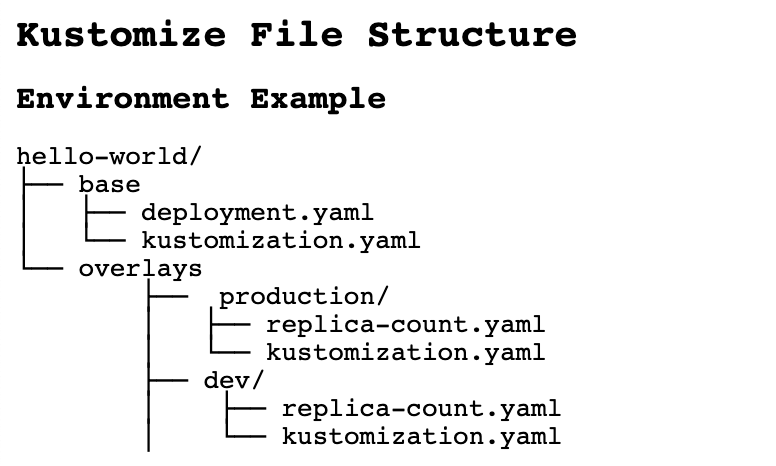
In addition, Kustomize is handy for creating configurations from common files but for different environments.
In this case, a directory overlays with its own kustomization.yaml file is used:
Since version 1.14, Kustomize is built into kubectl:
[simterm]
$ kubectl kustomize --help
Build a set of KRM resources using a 'kustomization.yaml' file. The DIR argument must be a path to a directory
containing 'kustomization.yaml', or a git repository URL with a path suffix specifying same with respect to the
repository root. If DIR is omitted, '.' is assumed.

Examples:
  # Build the current working directory
  kubectl kustomize
...
[/simterm]
And it can be used with the apply command in order to first build (build) a required manifest, and immediately send it to the Kubernetes API:
[simterm]
$ kubectl apply --help
...
  # Apply resources from a directory containing kustomization.yaml - e.g. dir/kustomization.yaml
  kubectl apply -k dir/
...
[/simterm]
Since version 1.16, it is also available in kubeadm.
Besides kuberctl apply, Kustomize can be used for:
kubectl get -k– get resources from a Kubernetes clusterkubectl describe -k– resource description in a Kubernetes clusterkubectl diff -k– compare locally generated manifest with a resource in the clusterkubectl delete -k– remove a resource from a cluster
Deploy with Kustomize
Create a test directory:
[simterm]
$ mkdir -p kustomize_example/base
$ cd kustomize_example/
[/simterm]
Create two files in the directory base – in one we’ll describe a Deployment, in the other – a Service:
[simterm]
$ vim -p base/deployment.yaml base/service.yaml
[/simterm]
In the deployment.yaml describe launch of a Pod with the nginxdemo container:
apiVersion: apps/v1
kind: Deployment
metadata:
  name: nginxdemo
spec:
  selector:
    matchLabels:
      app: nginxdemo
  template:
    metadata:
      labels:
        app: nginxdemo
    spec:
      containers:
        - name: nginxdemo
          image: nginxdemos/hello
          ports:
          - name: http
            containerPort: 80
            protocol: TCP
And file service.yaml with a Service for this Deployment:
apiVersion: v1
kind: Service
metadata:
  name: nginxdemo
spec:
  selector:
    app: nginxdemo
  ports:
  - name: http
    port: 80
Next, in the same directory base, create a kustomization.yaml, where we will describe resources – files, from which Kustomize will assemble our future manifest for deployment:
resources:
  - deployment.yaml
  - service.yaml
Build the manifest:
[simterm]
$ kubectl kustomize base/
apiVersion: v1
kind: Service
metadata:
  name: nginxdemo
spec:
  ports:
  - name: http
    port: 80
  selector:
    app: nginxdemo
---
apiVersion: apps/v1
kind: Deployment
metadata:
  name: nginxdemo
spec:
  selector:
    matchLabels:
      app: nginxdemo
  template:
    metadata:
      labels:
        app: nginxdemo
    spec:
      containers:
      - image: nginxdemos/hello
        name: nginxdemo
        ports:
        - containerPort: 80
          name: http
          protocol: TCP
[/simterm]
Or via kustomize itself :
[simterm]
$ kustomize build base/
apiVersion: v1
kind: Service
metadata:
  name: nginxdemo
spec:
...
[/simterm]
Or build and immediately deploy:
[simterm]
$ kubectl apply -k base/
service/nginxdemo created
deployment.apps/nginxdemo created
[/simterm]
Check:
[simterm]
$ kubectl get all -l app=nginxdemo
NAME                             READY   STATUS    RESTARTS   AGE
pod/nginxdemo-7f8f587c74-kbczf   1/1     Running   0          26s

NAME                                   DESIRED   CURRENT   READY   AGE
replicaset.apps/nginxdemo-7f8f587c74   1         1         1       26s
[/simterm]
Now let’s see how to set up this application for two environments – Dev and Prod.
Kustomize Overlays
Create directories overlays/dev and overlays/prod:
[simterm]
$ mkdir -p overlays/{dev,prod}
[/simterm]
We’ll get the following structure:
[simterm]
$ tree .
.
|-- base
|   |-- deployment.yaml
|   |-- kustomization.yaml
|   `-- service.yaml
`-- overlays
    |-- dev
    `-- prod
[/simterm]
In the directories dev and prod create separate kustomization.yaml files, in which specify bases:
bases:
- ../../base
If we’ll execute kustomize build overlays/dev/ now, we will get a manifest similar to the one we created earlier.
Kustomize features
namePrefix
To change the manifest, in the kustomization.yaml files for Dev and Prod add, for example, the namePrefix:
bases:
- ../../base

namePrefix: dev-
Check how it will look like now:
[simterm]
$ kustomize build overlays/dev/
apiVersion: v1
kind: Service
metadata:
  name: dev-nginxdemo
spec:
  ports:
  - name: http
    port: 80
  selector:
    app: nginxdemo
---
apiVersion: apps/v1
kind: Deployment
metadata:
  name: dev-nginxdemo
...
[/simterm]
The fields name now are prefixed with dev-.
patchesStrategicMerge
Next, let’s say we want to have 1 Pod on Dev, and 3 on Prod, i.e. change the replicas filed of the Deployment.
Let’s use the patchesStrategicMerge.
Create a patch file – overlays/dev/replicas.yaml. The kind and name fileds of the resource to be patched must match the resource from base:
apiVersion: apps/v1
kind: Deployment
metadata:
  name: nginxdemo
spec:
  replicas: 1
Similarly for Prod – file overlays/prod/replicas.yaml:
apiVersion: apps/v1
kind: Deployment
metadata:
  name: nginxdemo
spec:
  replicas: 3
In the files overlays/dev/kustomization.yaml and overlays/prod/kustomization.yaml add the patchesStrategicMerge:
bases:
- ../../base

namePrefix: dev-

patchesStrategicMerge:
- replicas.yaml
Run it:
[simterm]
$ kustomize build overlays/dev/
apiVersion: v1
kind: Service
metadata:
  name: dev-nginxdemo
spec:
  ports:
  - name: http
    port: 80
  selector:
    app: nginxdemo
---
apiVersion: apps/v1
kind: Deployment
metadata:
  name: dev-nginxdemo
spec:
  replicas: 1
...
[/simterm]
Deploy:
[simterm]
$ kubectl apply -k overlays/dev/
service/dev-nginxdemo created
deployment.apps/dev-nginxdemo created

$ kubectl apply -k overlays/prod/
service/prod-nginxdemo created
deployment.apps/prod-nginxdemo created
[/simterm]
And check:
[simterm]
$ kubectl get all -l app=nginxdemo
NAME                                  READY   STATUS    RESTARTS   AGE
pod/dev-nginxdemo-7f8f587c74-vh2gn    1/1     Running   0          37s
pod/nginxdemo-7f8f587c74-kbczf        1/1     Running   0          104m
pod/prod-nginxdemo-7f8f587c74-dpc76   1/1     Running   0          33s
pod/prod-nginxdemo-7f8f587c74-f5j4f   1/1     Running   0          33s
pod/prod-nginxdemo-7f8f587c74-zqg8z   1/1     Running   0          33s

NAME                                        DESIRED   CURRENT   READY   AGE
replicaset.apps/dev-nginxdemo-7f8f587c74    1         1         1       37s
replicaset.apps/nginxdemo-7f8f587c74        1         1         1       104m
replicaset.apps/prod-nginxdemo-7f8f587c74   3         3         3       33s
[/simterm]
configMapGenerator та secretGenerator
Kustomize can also generate new resources from templates.
Let’s take ConfgiMap for Grafana Loki alerts as an example.
Since the alerts are the same for both Dev and Prod, we can describe them with the configMapGenerator in the base/kustomization.yaml:
resources:
  - deployment.yaml
  - service.yaml

configMapGenerator:
- name: loki-ruler-alerts
  files:
  - loki-ruler-alerts.yaml
In the base directory, create the file itself loki-ruler-alers.yaml with the contents of ConfigMap:
groups:
  - name: systemd-alerts
    rules:
      - alert: Pod killed by OOM Killer
        expr: |
          sum(rate({job="systemd-journal"} |~ ".*OOM-killed.*" | regexp `pod=".*/(?P<pod>[a-zA-Z].*)".*` | pod!="" [15m])) by (pod, hostname) > 0.1
        for: 1s
        labels:
          severity: warning
        annotations:
          description: |-
            *OOM Killer detected in the WorkerNode's systemd-journal logs*
            WorkerNode: {{`{{ $labels.hostname }}`}}
Check it:
[simterm]
$ kustomize build base/
apiVersion: v1
data:
  loki-ruler-alerts.yaml: |
    groups:
      - name: systemd-alerts
        rules:
          - alert: Pod killed by OOM Killer
            expr: |
              sum(rate({job="systemd-journal"} |~ ".*OOM-killed.*" | regexp `pod=".*/(?P<pod>[a-zA-Z].*)".*` | pod!="" [15m])) by (pod, hostname) > 0.1
            for: 1s
            labels:
              severity: warning
            annotations:
              description: |-
                *OOM Killer detected in the WorkerNode's systemd-journal logs*
                WorkerNode: {{`{{ $labels.hostname }}`}}
kind: ConfigMap
metadata:
  name: loki-ruler-alerts-47678t7d89
---
apiVersion: v1
kind: Service
metadata:
  name: nginxdemo
...
[/simterm]
It is also possible to generate data from the command line.
For example, to add to the base/kustomization.yaml a new Kubernetes Secret, execute kustomize edit add secret:
[simterm]
$ cd base/
$ kustomize edit add secret nginx-password --from-literal=password=12345678
[/simterm]
Check:
$ cat kustomization.yaml
resources:
- deployment.yaml
- service.yaml

configMapGenerator:
- files:
  - loki-ruler-alerts.yaml
  name: loki-ruler-alerts
apiVersion: kustomize.config.k8s.io/v1beta1
kind: Kustomization
secretGenerator:
- literals:
  - password=12345678
  name: nginx-password
  type: Opaque
generatorOptions
If we apply the base/kustomization.yaml, then postfixes will be added to the names of ConfigMap and Secret:
[simterm]
$ kubectl apply -k base/
configmap/loki-ruler-alerts-47678t7d89 created
secret/nginx-password-72mh6dg77t created
service/nginxdemo unchanged
deployment.apps/nginxdemo unchanged
[/simterm]
47678t7d89 and 72mh6dg77t.
To change this behavior, add the generatorOptions with the option disableNameSuffixHash:
resources:
- deployment.yaml
- service.yaml

configMapGenerator:
- files:
  - loki-ruler-alerts.yaml
  name: loki-ruler-alerts

apiVersion: kustomize.config.k8s.io/v1beta1
kind: Kustomization
secretGenerator:
- literals:
  - password=12345678
  name: nginx-password
  type: Opaque

generatorOptions:
  disableNameSuffixHash: true
Deploy it:
[simterm]
$ kubectl apply -k base/
configmap/loki-ruler-alerts created
secret/nginx-password created
service/nginxdemo unchanged
deployment.apps/nginxdemo unchanged
[/simterm]
Now we have the names as we specified them in the template.
Helm && Kustomize
And an example of how we can use Helm and Kustomize together.
For example, when you have a chart fork and you don’t want to change the data in it.
Create a helm chart directory:
[simterm]
$ mkdir -p kustomize-helm
[/simterm]
Generate a chart in it:
[simterm]
$ helm create kustomize-helm
Creating kustomize-helm
[/simterm]
Get the structure of a standard chart:
[simterm]
$ tree .
.
|-- kustomize-helm
|   |-- Chart.yaml
|   |-- charts
|   |-- templates
|   |   |-- NOTES.txt
|   |   |-- _helpers.tpl
|   |   |-- deployment.yaml
|   |   |-- hpa.yaml
|   |   |-- ingress.yaml
|   |   |-- service.yaml
|   |   |-- serviceaccount.yaml
|   |   `-- tests
|   |       `-- test-connection.yaml
|   `-- values.yaml
`-- templates
[/simterm]
If we’ll execute helm template kustomize-helm, we will see the generated chart templates:
[simterm]
$ helm template kustomize-helm
---
# Source: kustomize-helm/templates/serviceaccount.yaml
apiVersion: v1
kind: ServiceAccount
metadata:
  name: release-name-kustomize-helm
  labels:
    helm.sh/chart: kustomize-helm-0.1.0
    app.kubernetes.io/name: kustomize-helm
    app.kubernetes.io/instance: release-name
    app.kubernetes.io/version: "1.16.0"
    app.kubernetes.io/managed-by: Helm
---
# Source: kustomize-helm/templates/service.yaml
apiVersion: v1
kind: Service
metadata:
  name: release-name-kustomize-helm
  labels:
    helm.sh/chart: kustomize-helm-0.1.0
    app.kubernetes.io/name: kustomize-helm
    app.kubernetes.io/instance: release-name
...
[/simterm]
Now, in order to not change the chart, but to create a Secret, in the kustomize-helm directory create a file kustomization.yaml, in which we’ll use resources with the file helm-all.yaml, that will be generated with helm template:
resources:
- helm-all.yaml

secretGenerator:
- literals:
  - password=12345678
  name: nginx-password
  type: Opaque
Run it:
[simterm]
$ cd kustomize-helm/
$ helm template . > helm-all.yaml && kustomize build .
apiVersion: v1
kind: ServiceAccount
metadata:
  labels:
    app.kubernetes.io/instance: release-name
    app.kubernetes.io/managed-by: Helm
    app.kubernetes.io/name: kustomize-helm
    app.kubernetes.io/version: 1.16.0
    helm.sh/chart: kustomize-helm-0.1.0
  name: release-name-kustomize-helm
---
apiVersion: v1
data:
  password: MTIzNDU2Nzg=
kind: Secret
metadata:
  name: nginx-password-72mh6dg77t
type: Opaque
---
apiVersion: v1
kind: Service
metadata:
  labels:
    app.kubernetes.io/instance: release-name
...
[/simterm]
Done.
![]()