![]() While preparing the infrastructure for migrating RTFM from the DigitalOcean server to AWS (see AWS: basic infrastructure setup for WordPress) I decided to also try AWS ALB mutual authentication (for some reason I thought this feature launched at the last re:Invent, at the end of 2024, but it’s actually been around since late 2023 – see Mutual authentication for Application Load Balancer reliably verifies certificate-based client identities).
While preparing the infrastructure for migrating RTFM from the DigitalOcean server to AWS (see AWS: basic infrastructure setup for WordPress) I decided to also try AWS ALB mutual authentication (for some reason I thought this feature launched at the last re:Invent, at the end of 2024, but it’s actually been around since late 2023 – see Mutual authentication for Application Load Balancer reliably verifies certificate-based client identities).
The idea is to allow connections to the ALB only from clients that pass authentication, and in the Cloudflare+AWS ALB case, Cloudflare will sign all its requests with a TLS certificate (see Cloudflare Authenticated Origin Pulls), and AWS ALB will verify them. – This way, access to the Load Balancer URL will only be possible for Cloudflare.
The inspiration for this idea came from the recent story about the TCP/IP: SYN flood attack on the RTFM server and Hacker News hug of death – when TCP connections were being opened directly to port 443 on the DigitalOcean server, bypassing Cloudflare.
True, in addition to mTLS I later decided to also add IP restrictions – configured ALB access only for Cloudflare addresses defined in AWS Security Rules, because mTLS is about authentication, while Security Rules are about network-level protection.
Although initially I was planning to use pure mTLS – it was interesting to see how it works in ALB, and I was too lazy to build automation for updating AWS Security Rules.
The example here was done on a test domain – so we’ll also add it to Cloudflare along the way, but both solutions are already working for rtfm.co.ua itself.
Why restrict access to the AWS Application Load Balancer in the first place:
- Cloudflare has many Security rules that block unwanted traffic – if requests go directly to the ALB, they’ll reach NGINX, and then some rules need to be duplicated there as well (which was my situation)
- cost during DDoS: when the blog lived on a DigitalOcean server with just a public IP for the droplet, requests to that IP didn’t affect cost (only extra traffic), but in AWS the number of connections to an ALB affects cost
P.S. And once again you try to write concisely – and end up with a lot of text 🙁
See also related posts:
- AWS: Basic Infrastructure Setup for WordPress
- AWS: Self-Managed EC2 NAT Gateway vs AWS Managed NAT
- AWS: Amazon Linux – Sending Email with Postfix via Gmail
- VictoriaMetrics: Basic Monitoring for AWS, Linux, NGINX, and PHP
Contents
AWS ALB cost and LCU
The cost of an AWS Load Balancer includes an hourly charge for the instance itself, the standard Data Transfer Charge, charges for allocated Public IPs, and separately – Load Balancer Capacity Units (LCU).
For Network Load Balancer there’s its own unit – Network Load Balancer Capacity Unit (NLCU), and for Gateway Load Balancer, accordingly, GLCU.
See Elastic Load Balancing pricing.
LCU is not a very intuitive unit, so a few words about it.
1 LCU equals:
- New connections: new connections to the ALB – 25 connections per second consume 1 LCU
- Active connections: every 3,000 active connections per minute (or 1,500 when using mTLS)
- Processed bytes: 1 LCU covers 1 GB of traffic per hour (or 0.4 GB for Lambda targets) – counted as ingress + egress combined
- Rule evaluations: checking 1,000 rules per second is one LCU
Rule evaluations refer to Listener rules:
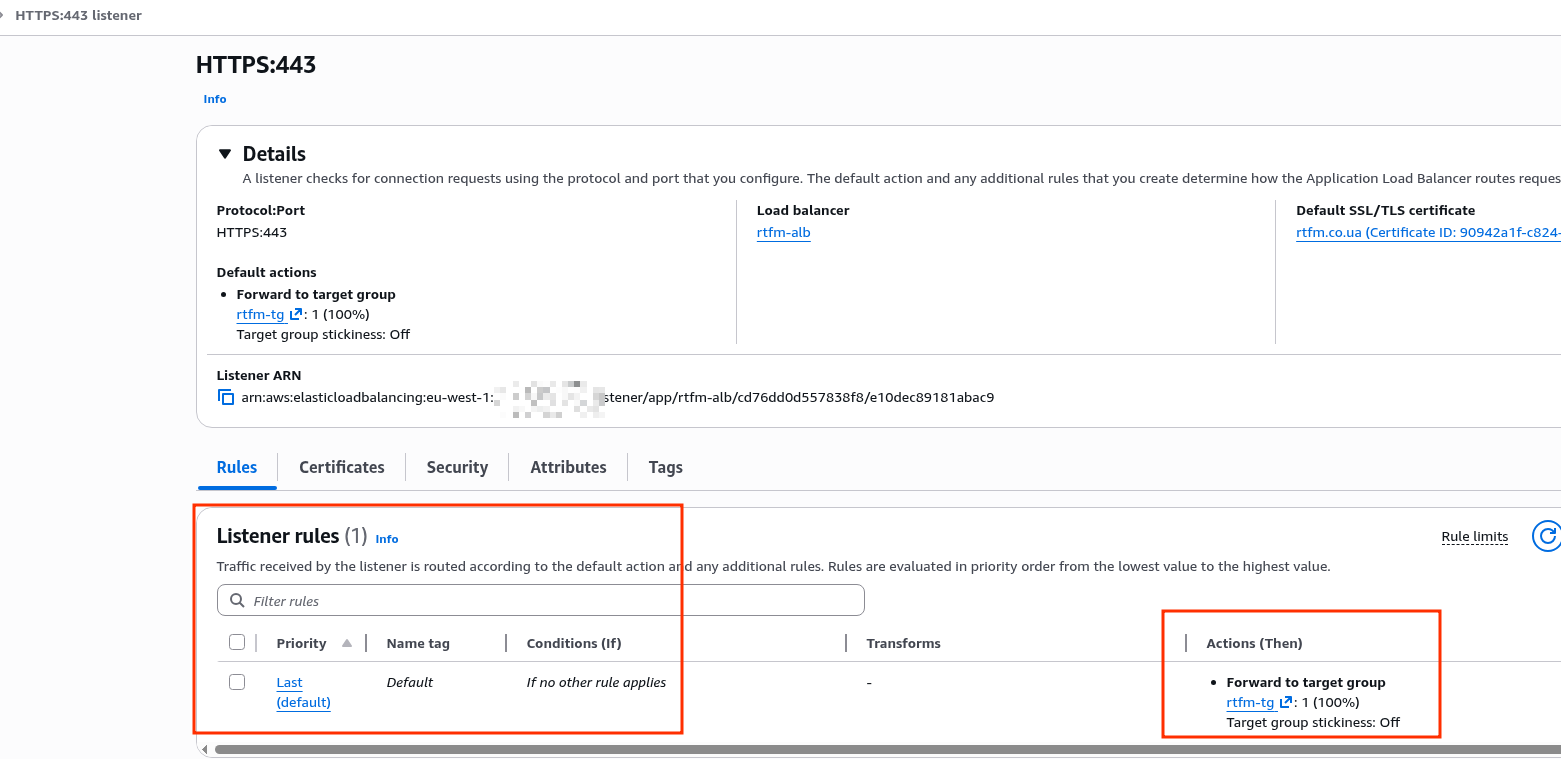
And if you have many rules like “IF path is /api/* THEN forward to target-group-api” – you pay for each evaluation for every new HTTP request.
When determining which of the above parameters to use for LCU billing, AWS takes whichever one hits its threshold first: meaning as soon as you have 26 requests per second, even if Processed bytes were only 10 megabytes – you’ll be charged 1 LCU based on New connections.
So in the event of a DDoS (and RTFM has had a few, though not severe ones) – we can easily rack up unexpected costs.
There’s a calculator – Load Balancer Capacity Unit Reservation Calculator – where you can estimate how much LCU a given load will cost.
AWS Load Balancer mTLS use cases
Actually, if you’re using ALB access restrictions via a Security Group with a list of only allowed IPs – then mTLS isn’t needed at all, because you’re already cutting connections at the AWS network level, before the request even reaches the Load Balancer.
What can genuinely be useful:
- service-to-service authentication:
- for example, we have an Internal ALB behind which various monitoring services live, like VictoriaLogs
- logs may contain sensitive information like tokens or even passwords, so access to this endpoint needs to be restricted
- VMAuth with password authentication is good, but mTLS adds another layer of protection (see VictoriaMetrics: VMAuth – proxy, authentication and authorization)
- mobile client authentication to an API:
- certificates are embedded in the clients (certificate pinning), which they use to access the API
- but keep in mind potential issues with certificate rotation – either in case of compromise or simply when the certificate expires
- IoT: we don’t have that (yet), but in general – a very useful use case
Configuring ALB mutual TLS with Cloudflare
First let’s look at the mTLS access restriction option, since it’s an interesting and useful feature.
Then we’ll add the AWS Security Rules approach with automated rule updates.
Configuring Cloudflare
This post was written before the RTFM migration, using a test domain, so let’s quickly go through the process of adding and configuring a domain in Cloudflare.
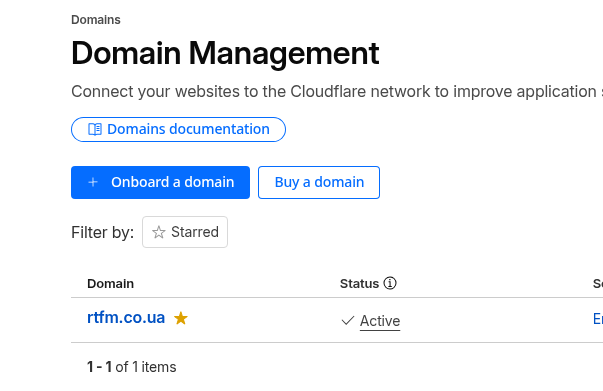
Adding a new domain to Cloudflare
Go to Domains, and click Onboard a domain:
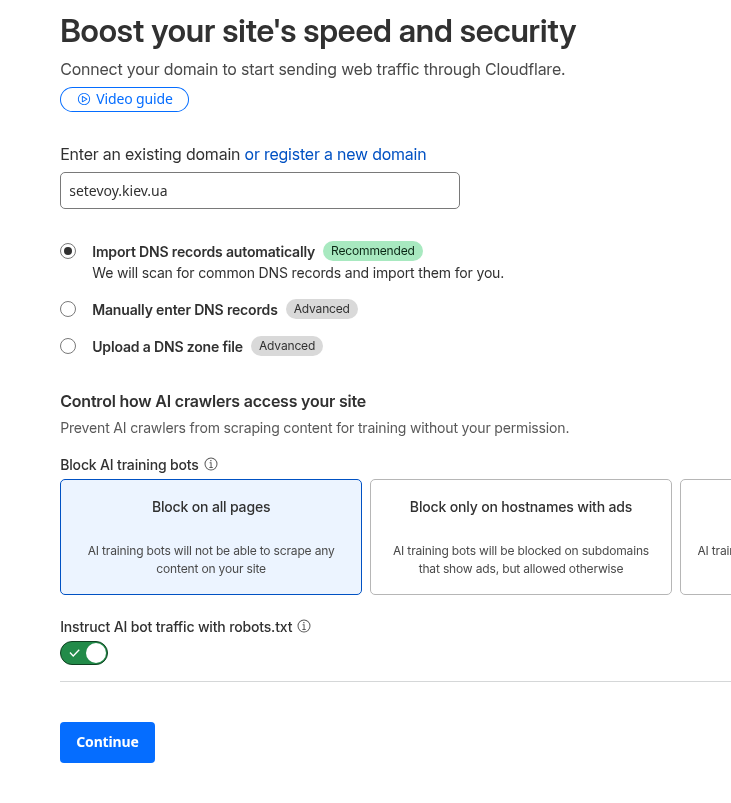
Enter the name, the rest of the settings can be left at defaults:
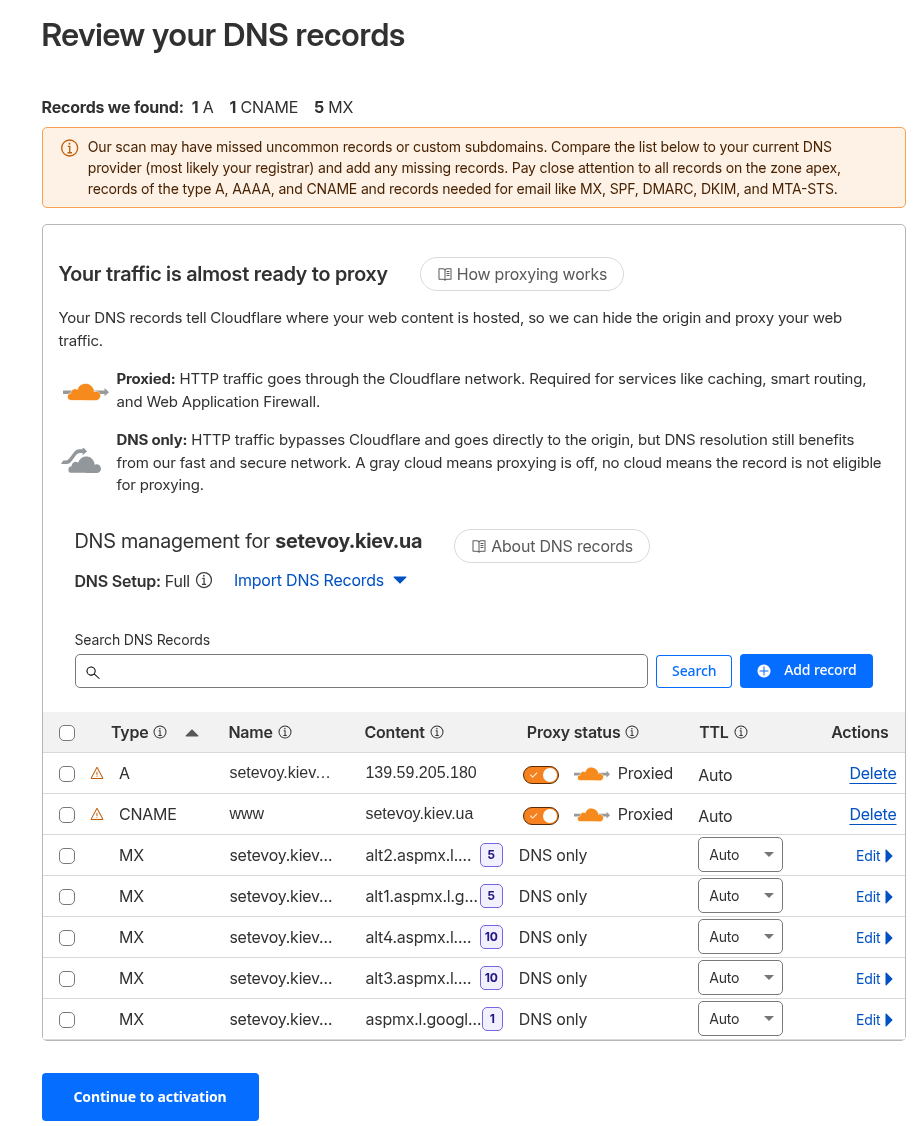
When importing records from AWS DNS, it missed a few Let’s Encrypt validation records, but that’s fine for now:
Get the list of new Name Servers:
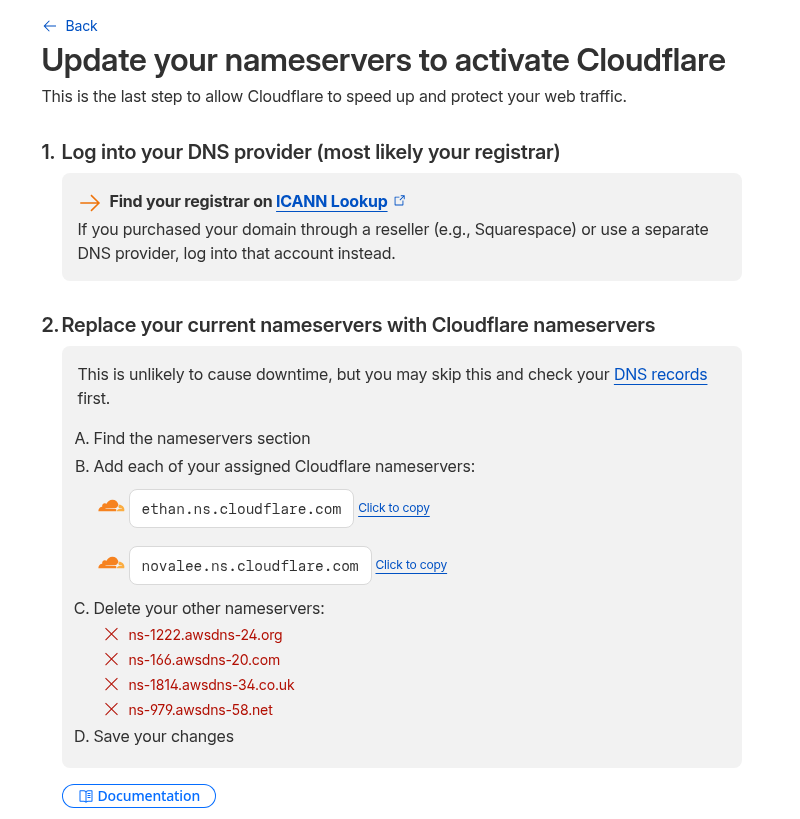
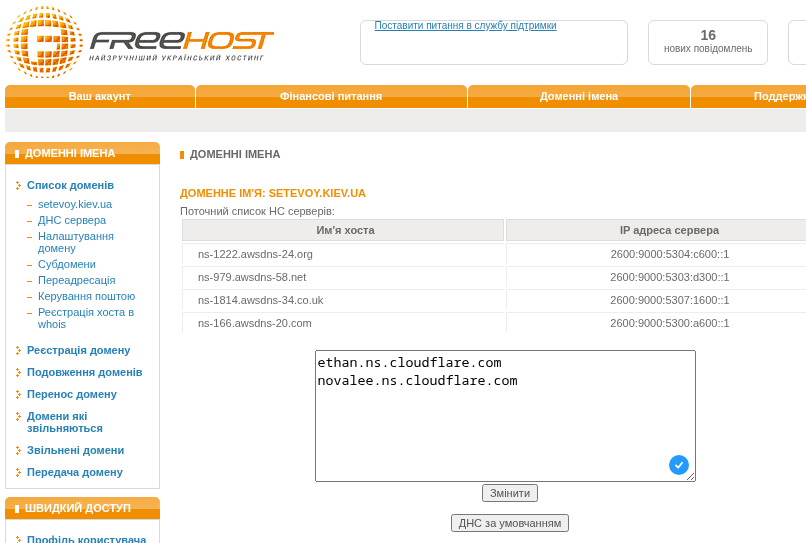
Update them at the domain registrar:
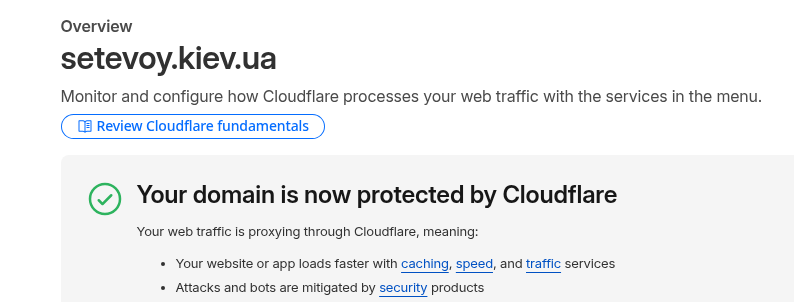
Wait for the update – time depends on the DNS zone administrator:

For the kiev.ua DNS zone this took about half an hour:
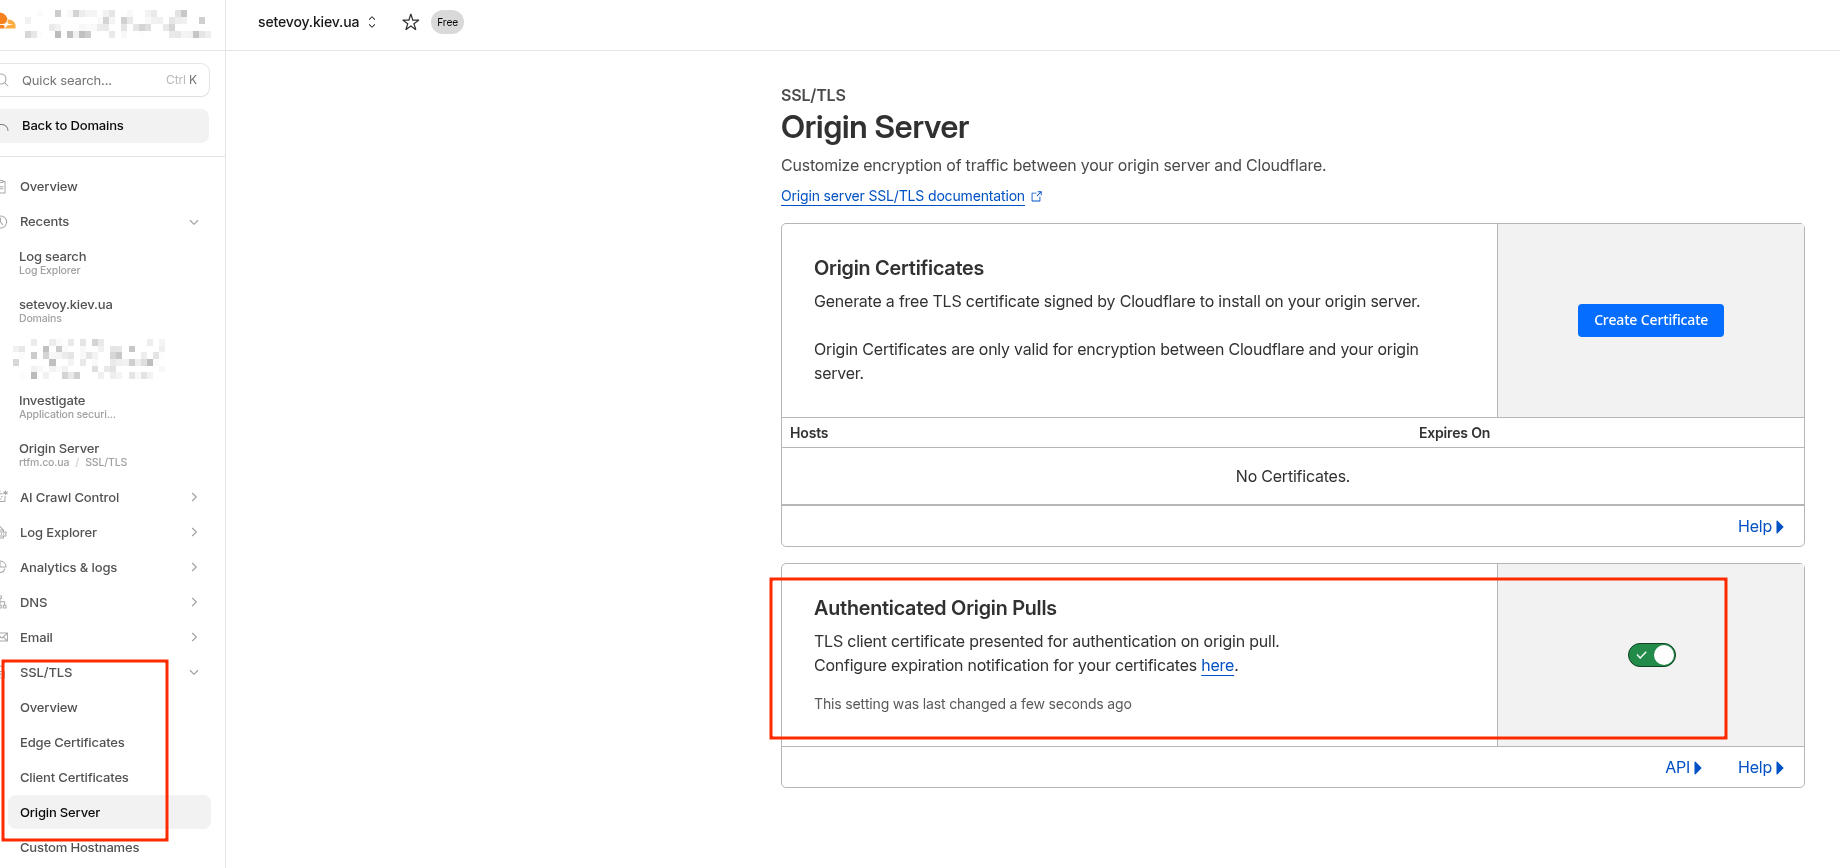
Go to SSL/TLS and enable the Authenticated Origin Pulls option.
Once we enable this option, Cloudflare will start attaching its client certificate to every new request to the origin – in our case, AWS ALB.
I really wanted to go into more detail about SSL/TLS handshake and keys/certificates here – but decided it would be out of scope for this post, especially since I once worked through the details in the post What is: SSL/TLS in detail (in Rus).
Although I might write a new post on the topic, especially now that TLS 1.3 is current, while my post covered TLS 1.2, which was relevant at the time.
Or you can read the already-mentioned Introducing mTLS for Application Load Balancer – it covers the basic TLS concepts pretty well.
So Cloudflare just passes the client certificate, and from there it’s up to the origin what to do with it – and in the next step we’ll configure the ALB to verify it.
For now just enable the option – it doesn’t cost extra (except that the LCU cost per Active connections will be 1,500 instead of 3,000), won’t add significant load to the ALB or extra traffic:
Add a CNAME record for the domain with the value == ALB URL:
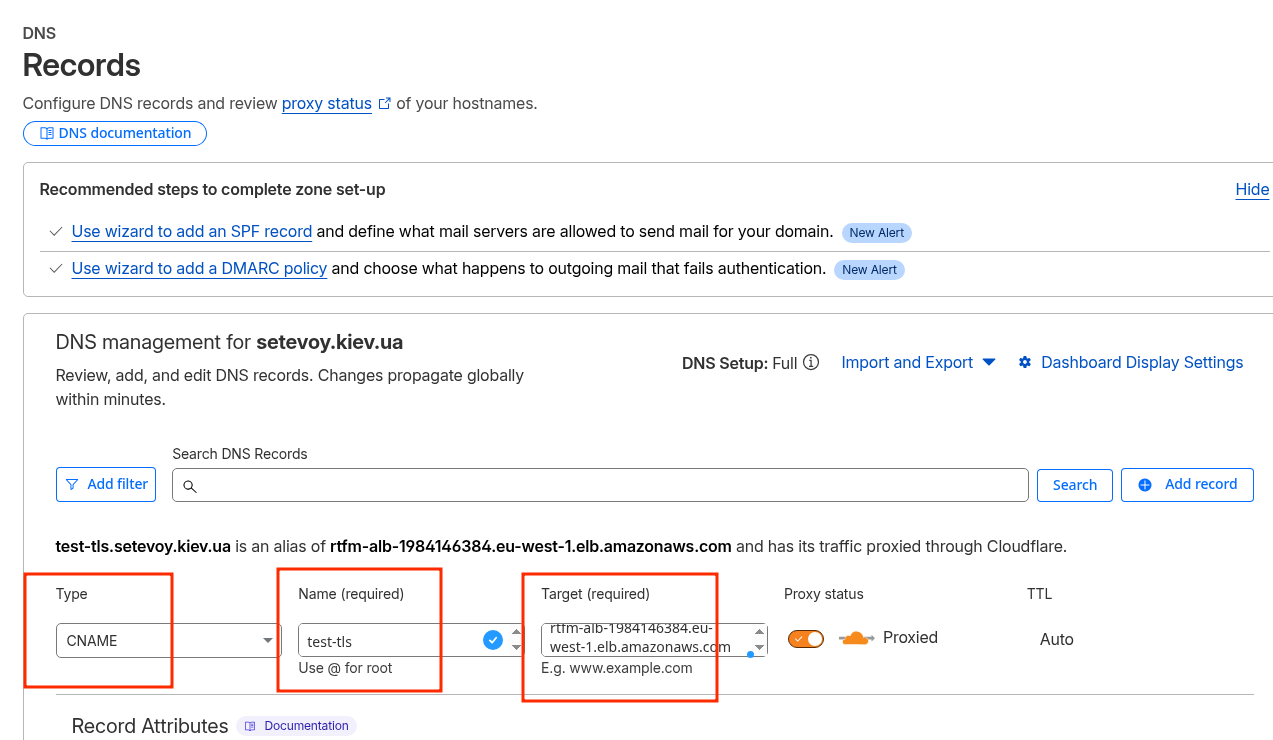
Verify that everything works now, because even though we enabled Authenticated Origin Pulls on Cloudflare, no verification is being performed on the ALB yet:
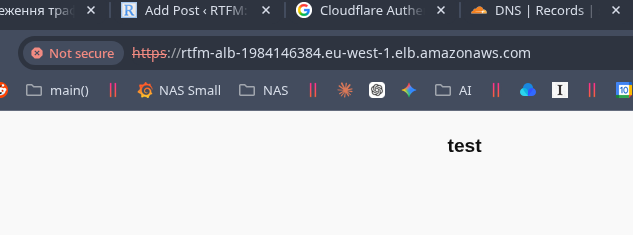
And a request directly to the ALB URL still works, just with an SSL error:
Configuring the Application Load Balancer
Now we need to configure client certificate verification from Cloudflare on our ALB.
Getting the Cloudflare Certificate Authority
The ALB will use the public Certificate Authority certificate from Cloudflare for verification – we need to add it to the Load Balancer’s Trust Store and then attach it to the ALB Listener.
Note that using a Trust Store also costs money – “$0.0056 per hour per Trust Store Associated with Application Load Balancer when using Mutual TLS“, which is ~$4 per month.
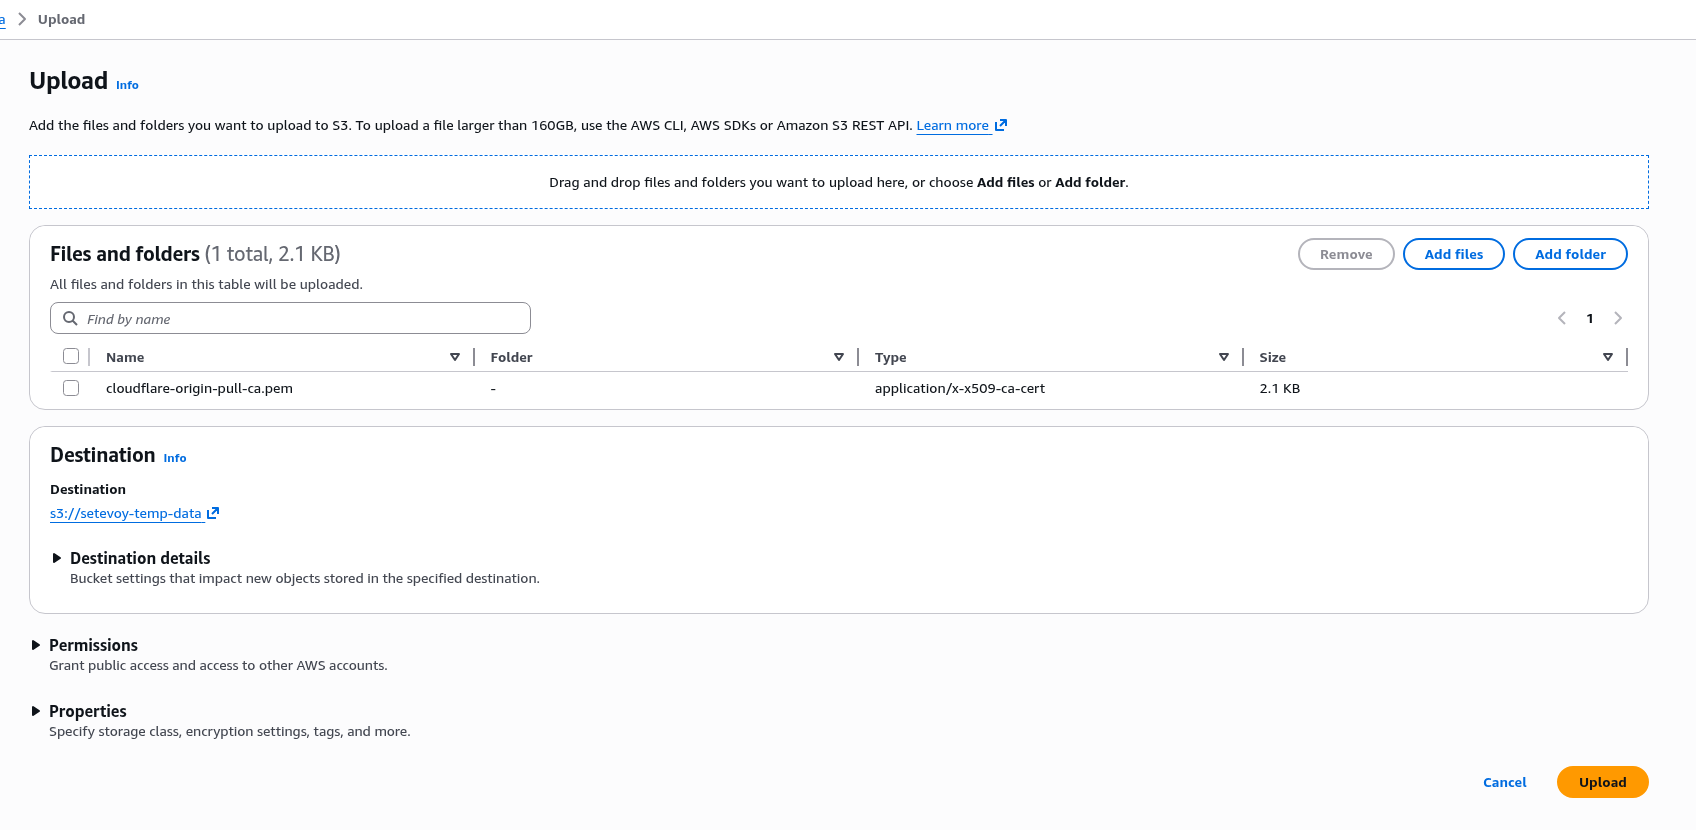
Download the certificate:
$ curl -o cloudflare-origin-pull-ca.pem https://developers.cloudflare.com/ssl/static/authenticated_origin_pull_ca.pem
The certificate is shared across all of Cloudflare – though there’s an option to upload your own and only pass verification with that one.
But for the case where we just want to block random Chinese bots, the Cloudflare certificate itself is sufficient.
Check the downloaded file:
$ file cloudflare-origin-pull-ca.pem
cloudflare-origin-pull-ca.pem: PEM certificate
Or peek inside it:
$ openssl x509 -in cloudflare-origin-pull-ca.pem -text -noout
Certificate:
    Data:
        Version: 3 (0x2)
        Serial Number: 6310029703491235425 (0x5791ba9556c22e61)
        Signature Algorithm: sha512WithRSAEncryption
        Issuer: C=US, O=CloudFlare, Inc., OU=Origin Pull, L=San Francisco, ST=California, CN=origin-pull.cloudflare.net
        Validity
            Not Before: Oct 10 18:45:00 2019 GMT
            Not After : Nov  1 17:00:00 2029 GMT
        Subject: C=US, O=CloudFlare, Inc., OU=Origin Pull, L=San Francisco, ST=California, CN=origin-pull.cloudflare.net
...
The important part here – Not After : Nov 1 17:00:00 2029:
- you can enable the “Allow expired client certificates” option in the ALB mTLS settings
- or simply add the new certificate to the Trust Store and remove the old one at the end of 2029
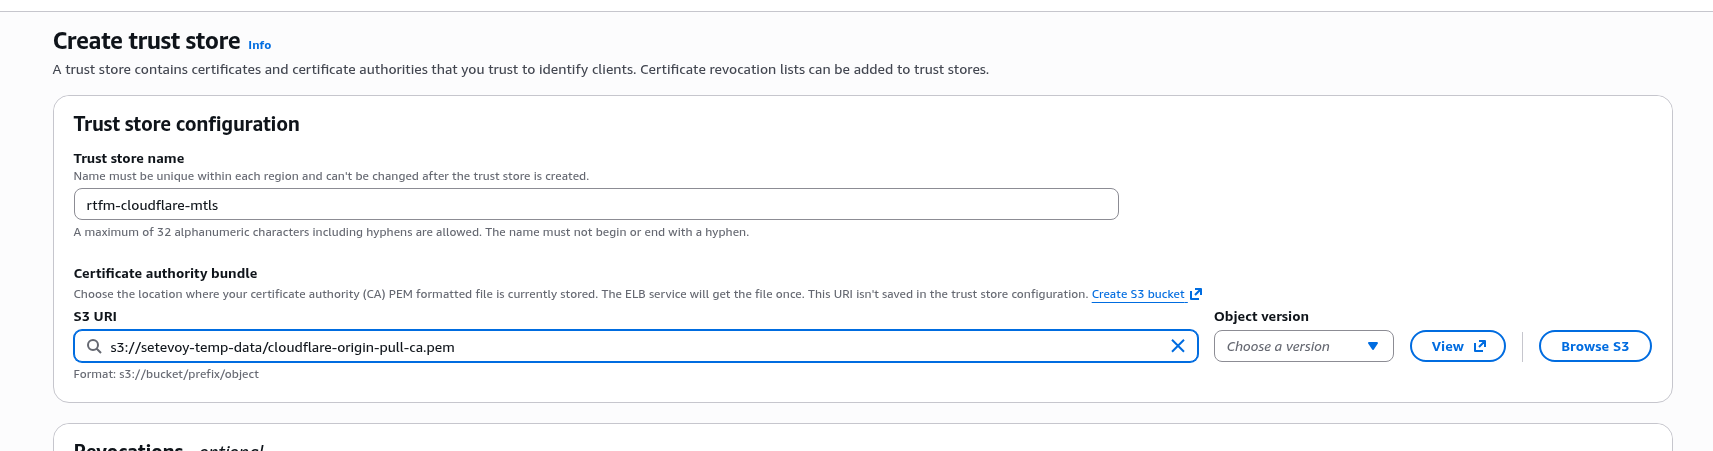
Creating a Trust Store
To add the certificate to the ALB, we need to create a Trust Store, but certificates can only be added to a Trust Store from AWS S3, so first upload it to some bucket of yours:
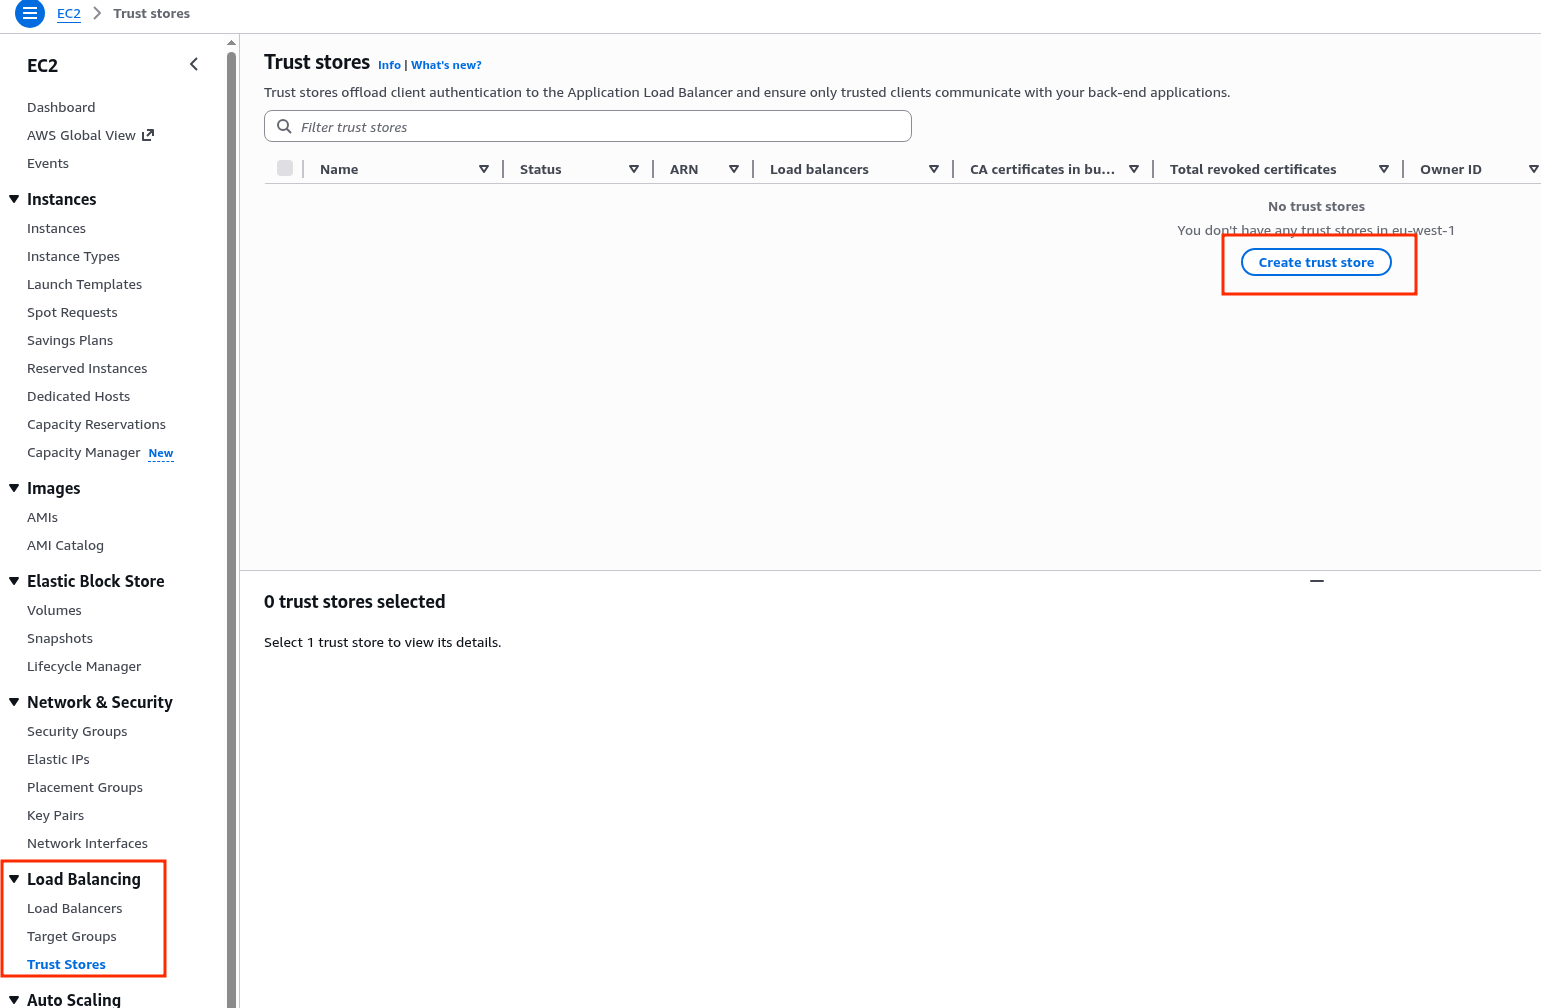
Go to EC2 > Load Balancing > Trust Stores, create a new one:
Specify the path to the certificate file in S3:
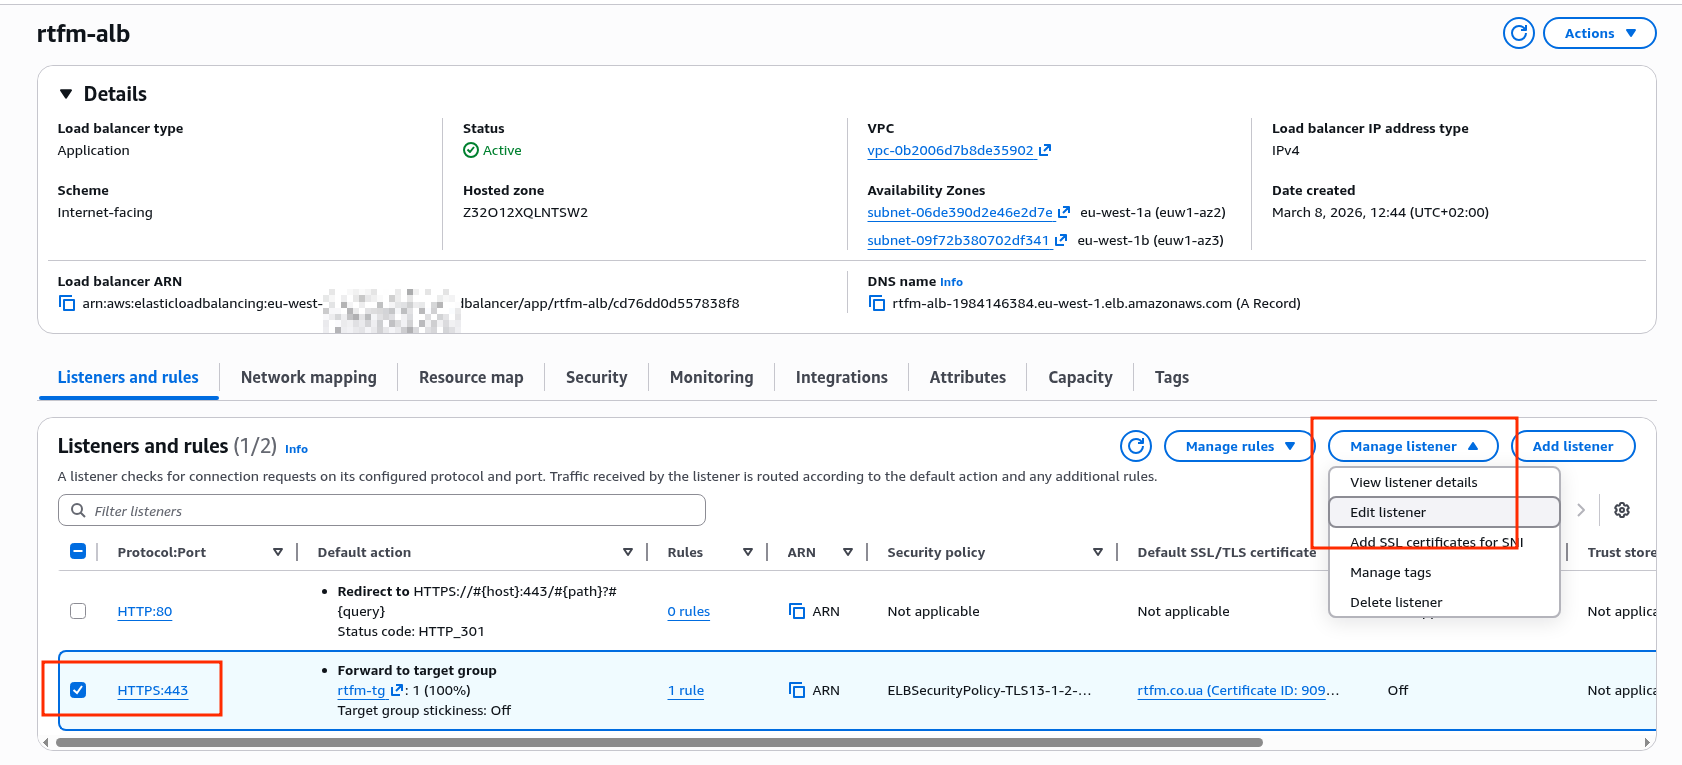
Configuring mTLS for the ALB Listener
Edit the HTTPS Listener – since mTLS logically happens there:
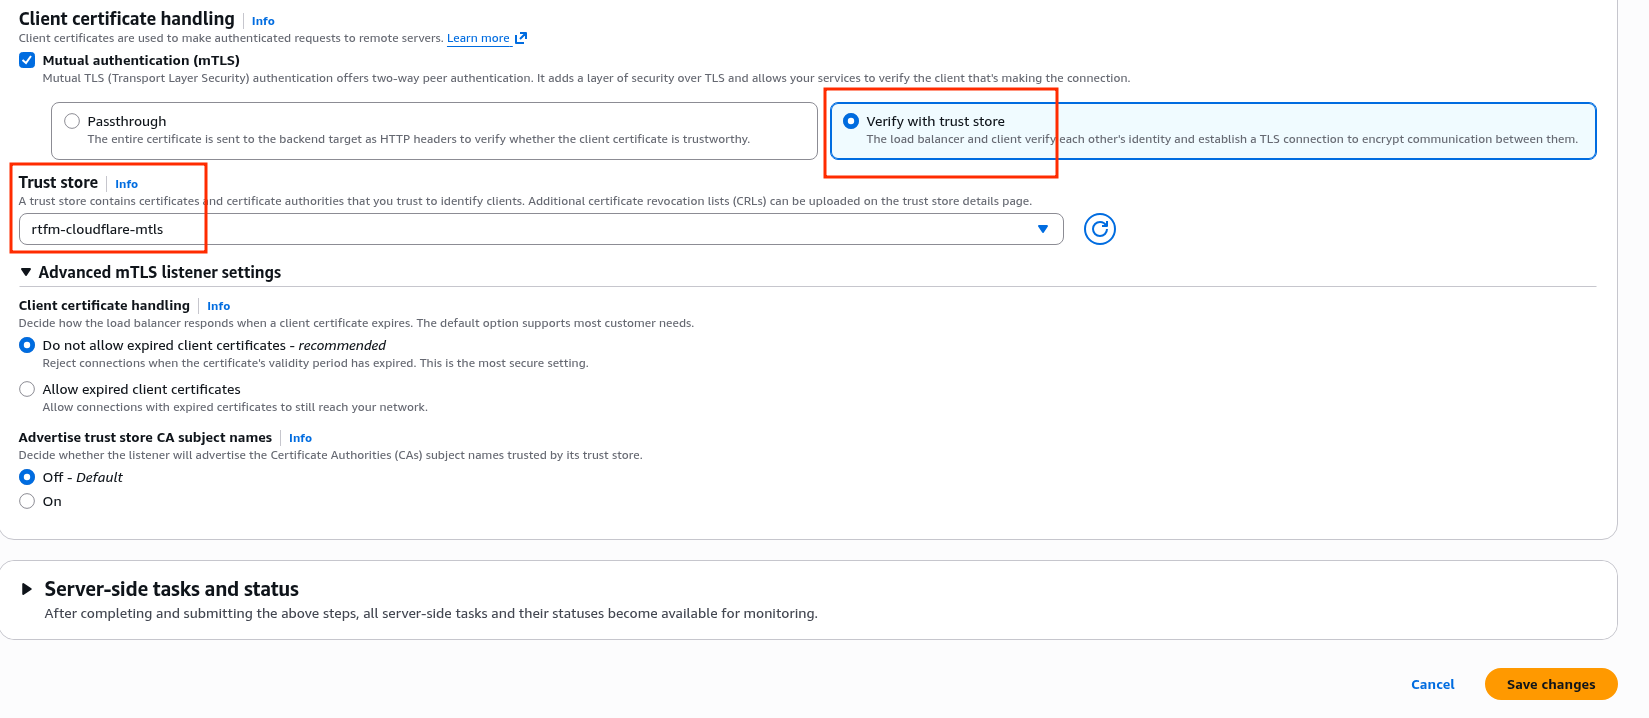
Enable the mTLS option, and there are two sub-options:
- Passthrough: pass the certificate to the targets in the Target Group – validation is done by the backend
- Verify with trust store: perform verification on the ALB itself using the certificate from the Trust Store – our case
Switch to “Verify with trust store”:
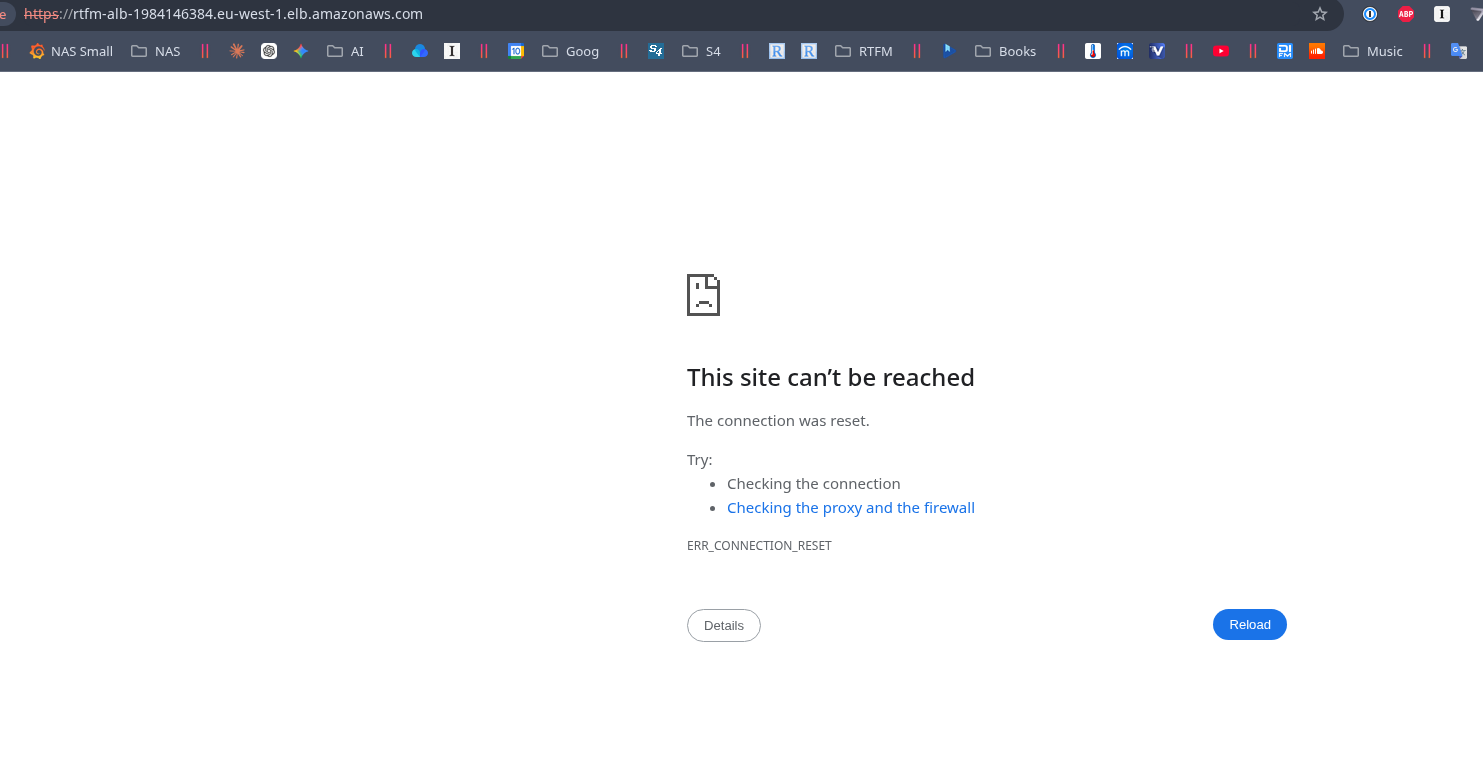
Now try a direct connection to the ALB URL:
$ curl -kI https://rtfm-alb-1984146384.eu-west-1.elb.amazonaws.com
curl: (56) Recv failure: Connection reset by peer
And in the browser:
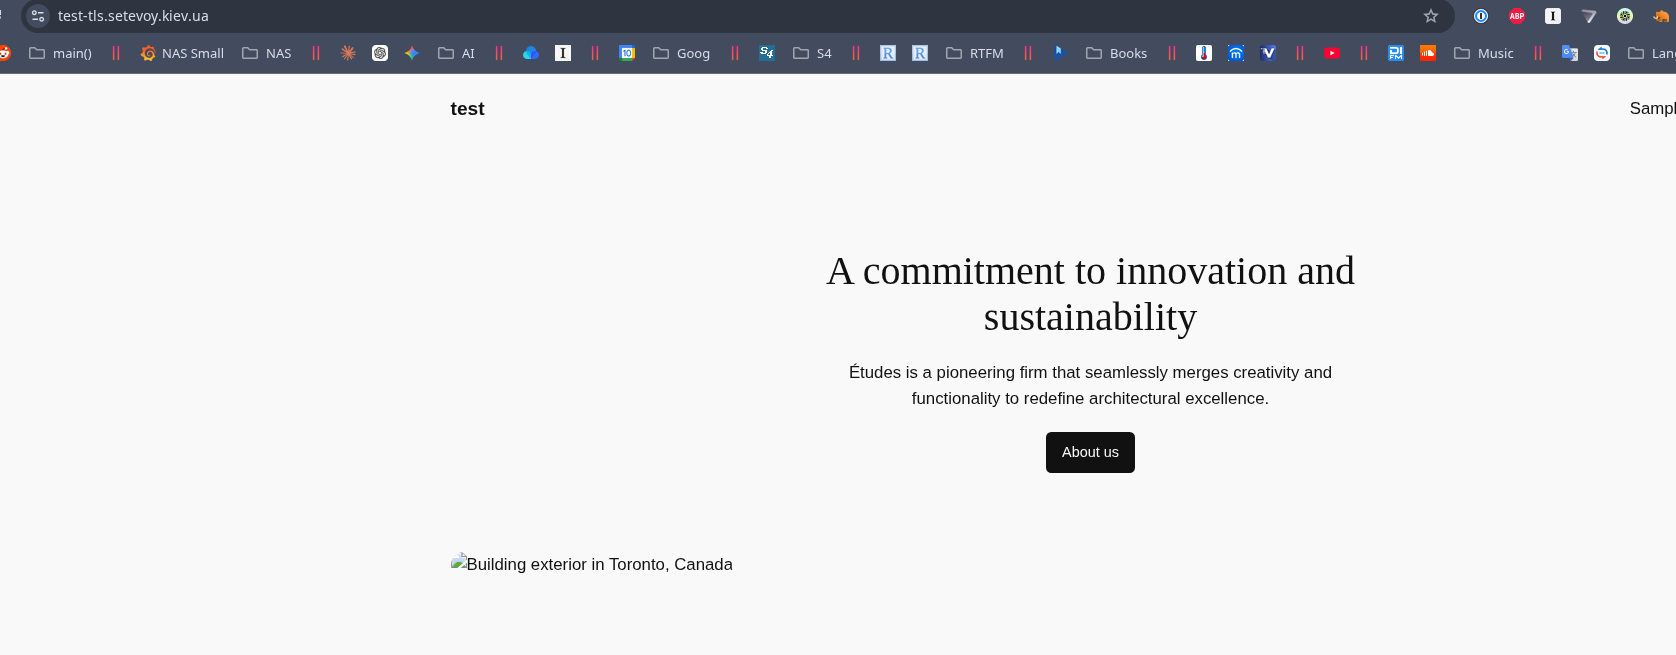
But through Cloudflare everything works:
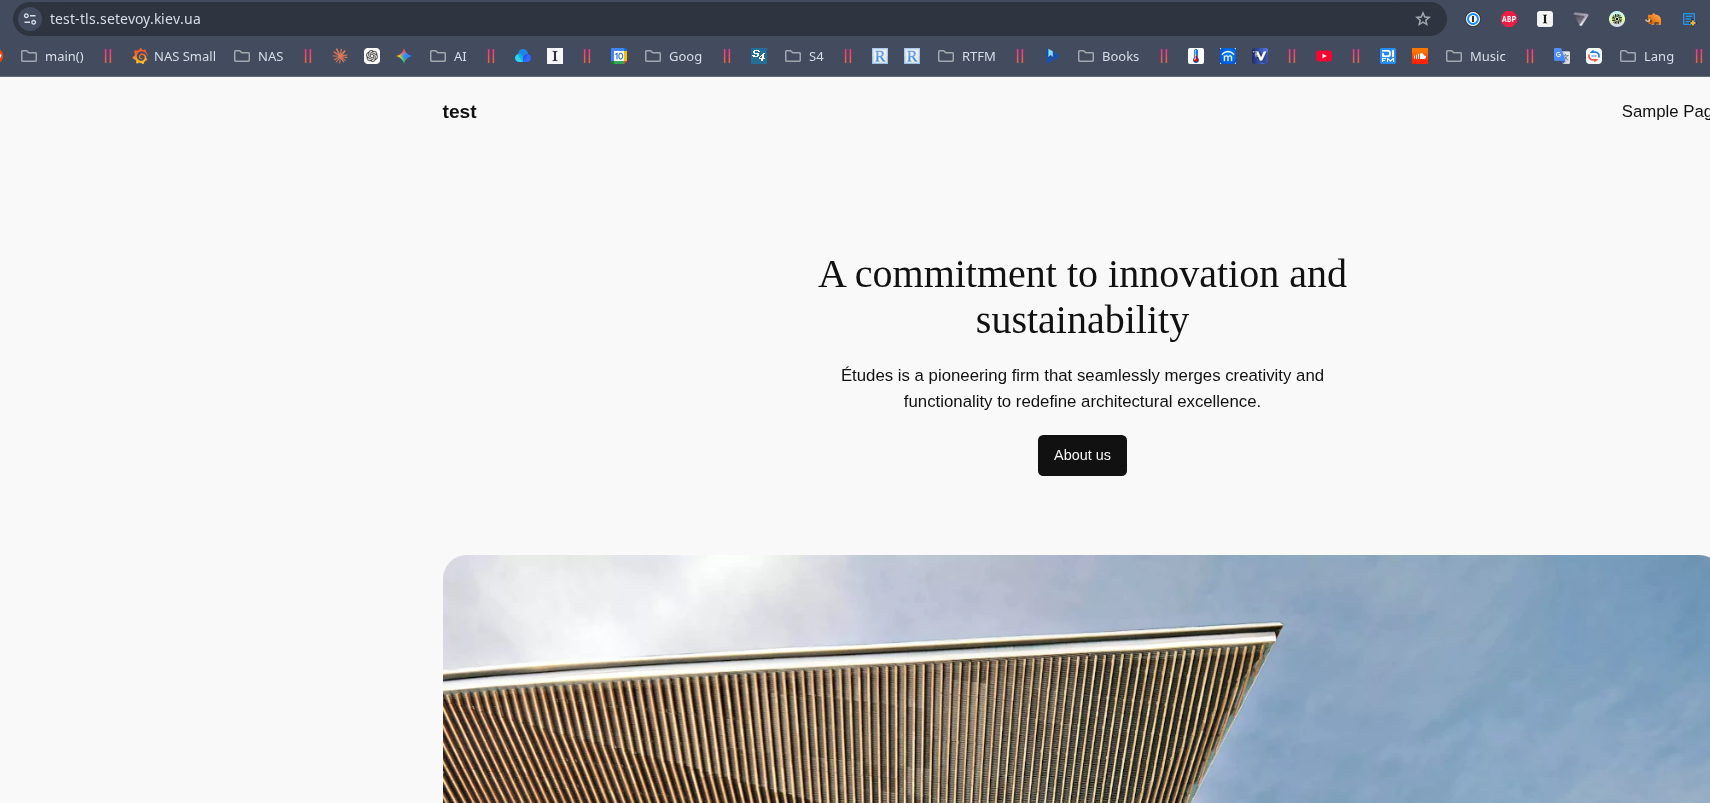
$ curl -I https://test-tls.setevoy.kiev.ua
HTTP/2 200
And rtfm.co.ua itself is already on this ALB with mTLS enabled.
Protection with AWS Security Group and Cloudflare IP ranges
But mTLS alone isn’t quite enough for full ALB protection:
- during a DDoS we’ll still be spending LCU on connections
- requests that don’t go through Cloudflare need to be filtered at the backend – in my case NGINX
So the most reliable approach is to restrict traffic at the AWS Security Group level attached to the Load Balancer: then no LCU will be spent at all, because packets won’t even reach the ALB.
There are ready-made Terraform modules, for example – cloudflare-security-group, but it only works with a single Security Group. There’s a more advanced option – cloudflare-sg-updater, which finds Security Groups by tags.
That said, personally I’m not a big fan of AWS Lambda, and at least for now I’m not using Terraform for RTFM, so I did it simply with a shell script using the AWS CLI.
Plenty of recent practice for remembering how to write scripts – see FreeBSD: Home NAS, part 15: backup automation – scripts, rsync, rclone.
The AWS CLI on Amazon Linux comes pre-installed, you just need to either configure an AWS profile or attach an EC2 Instance Profile with an IAM policy that grants permission to modify the Security Group.
One nuance to keep in mind if you’re writing the script yourself: IPs do change occasionally, even if rarely, and they need to be removed from the Security Group. But simply deleting all old entries and then adding new ones is not an option, because at that moment the ALB will lose its connection to Cloudflare.
So the script performs a comparison of old and new addresses and only removes those that are no longer in the latest update from Cloudflare.
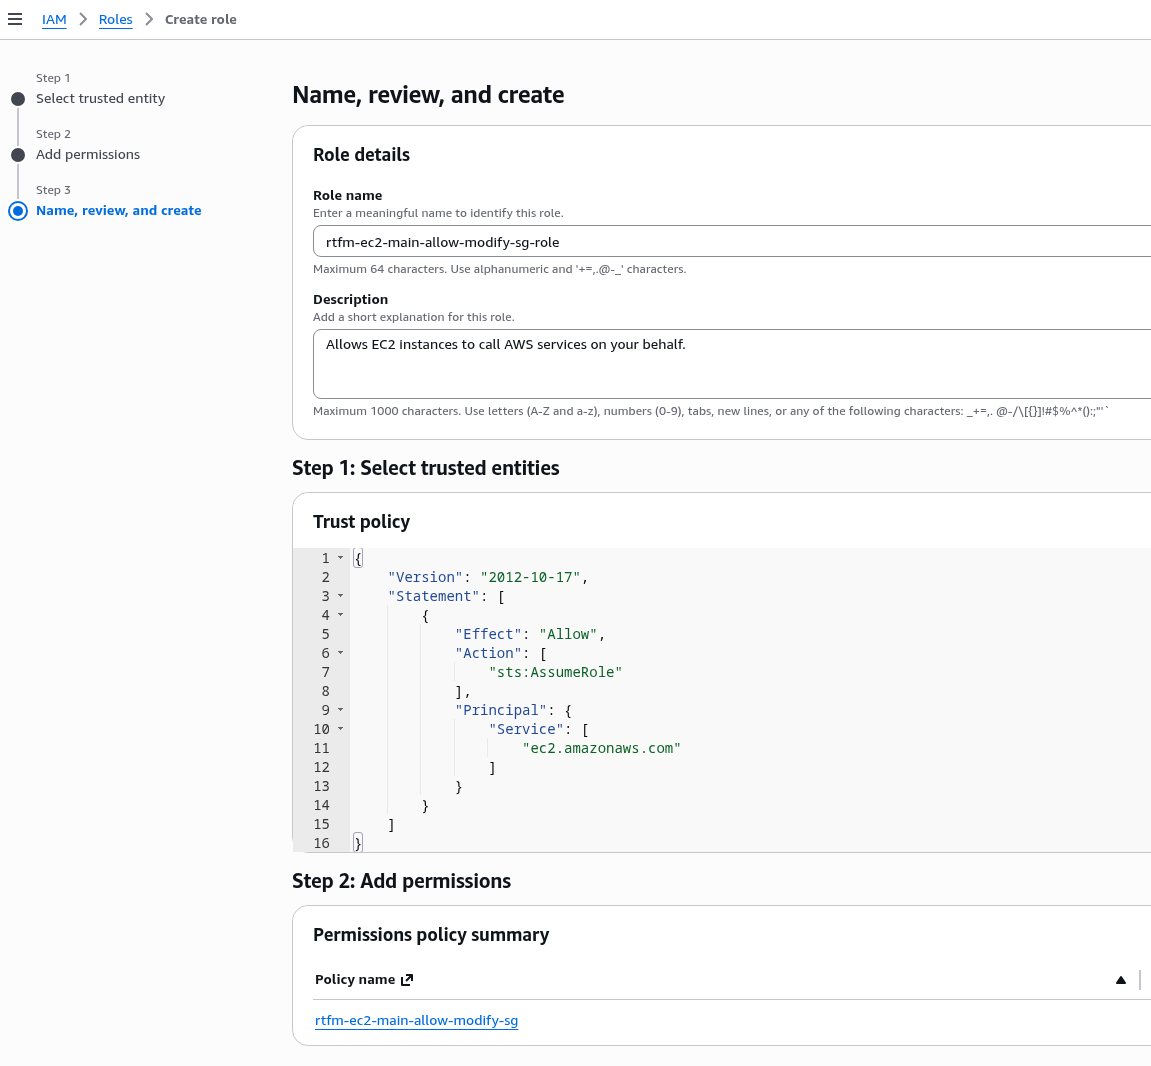
Creating an IAM Role for the EC2 Instance profile
Eventually an IAM Role will need to be added to the instance anyway, so instead of using an AWS CLI profile with keys, it’s better to set up access to edit the Security Group through an EC2 Instance profile from the start.
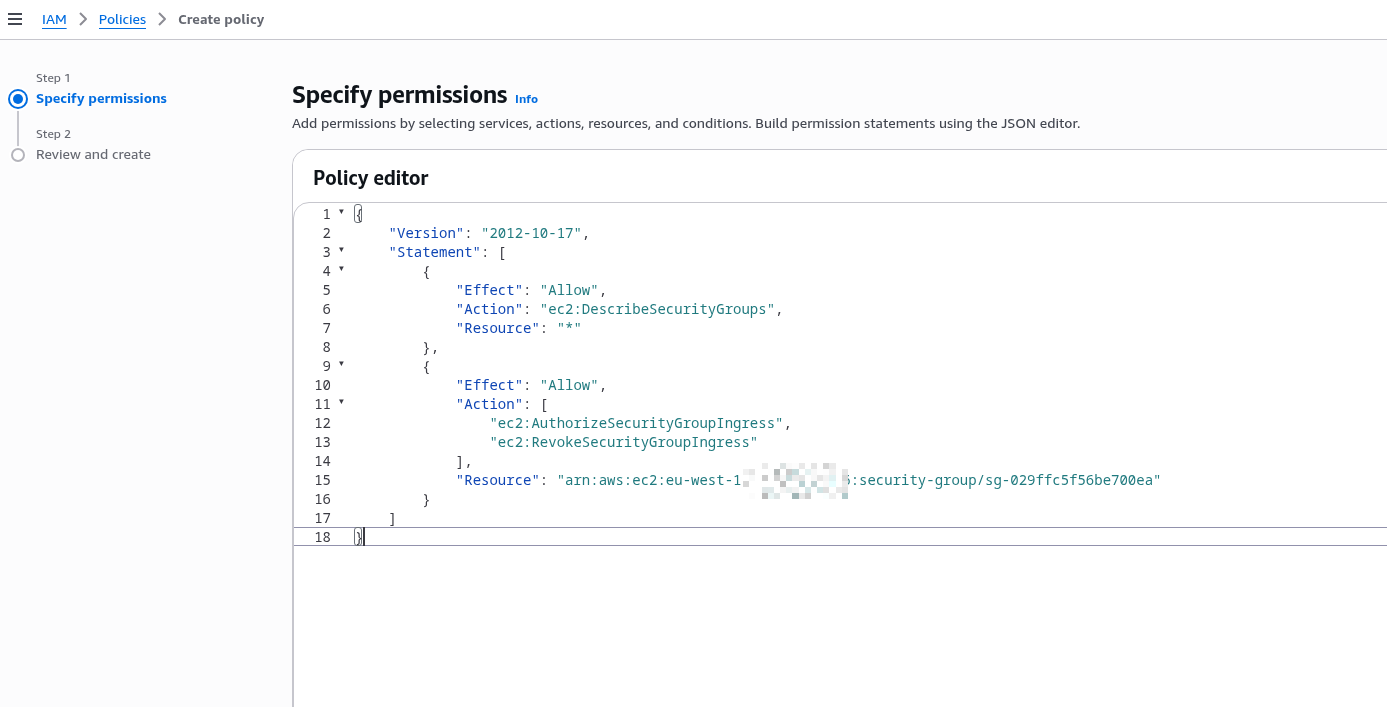
The role needs rights to run ec2:DescribeSecurityGroups, ec2:AuthorizeSecurityGroupIngress, and ec2:RevokeSecurityGroupIngress – let’s create a separate IAM Policy.
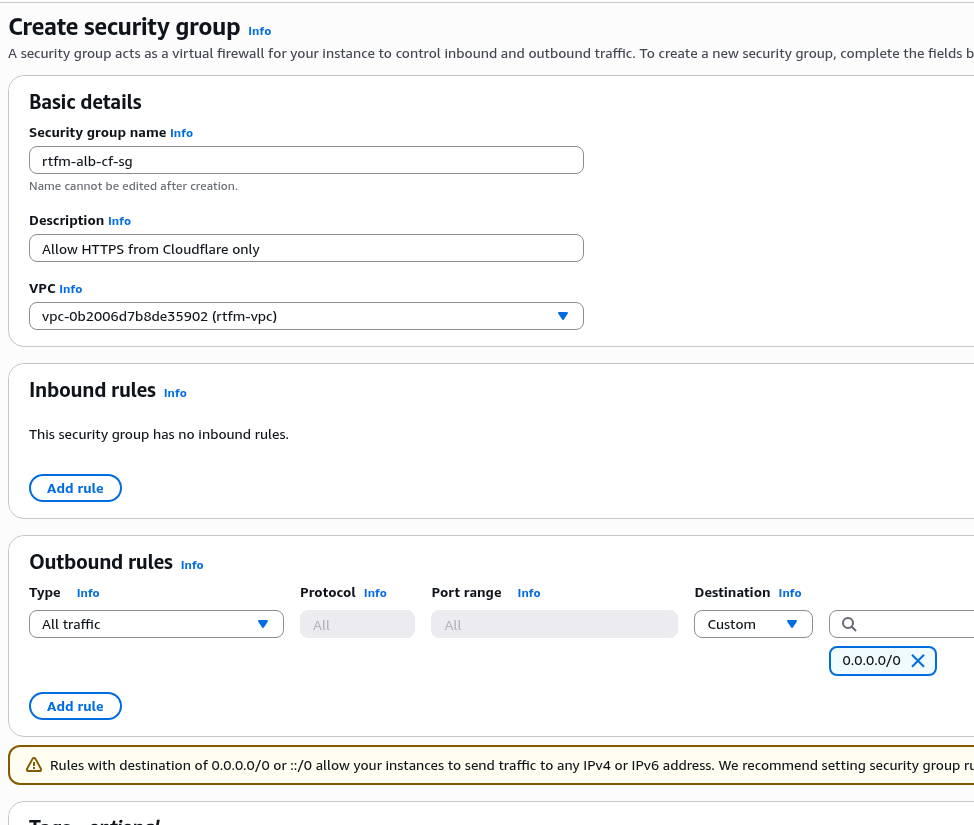
Create a new Security Group for the ALB – leave the Inbound rules empty, and in Outbound – keep the default “All to All”:
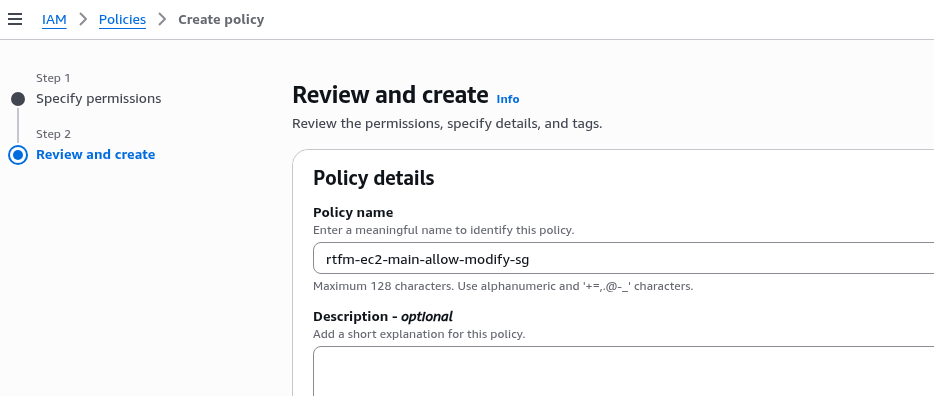
Create a new IAM Policy, restrict access to only this Security Group.
For ec2:DescribeSecurityGroups you can’t set a resource restriction since the rule is global for all SGs, so we describe it in two separate Statements – one with Resource: "*", and the second with the specific SG.
Apply a Resource restriction: specify access limited to a specific group, because the script will perform destructive actions – deleting rules, and for such actions it’s always better to limit the blast radius in case “something goes wrong”:
{
    "Version": "2012-10-17",
    "Statement": [
        {
            "Effect": "Allow",
            "Action": "ec2:DescribeSecurityGroups",
            "Resource": "*"
        },
        {
            "Effect": "Allow",
            "Action": [
                "ec2:AuthorizeSecurityGroupIngress",
                "ec2:RevokeSecurityGroupIngress"
            ],
            "Resource": "arn:aws:ec2:eu-west-1:ACCOUNT_ID:security-group/sg-029ffc5f56be700ea"
        }
    ]
}
Set the policy name and save:
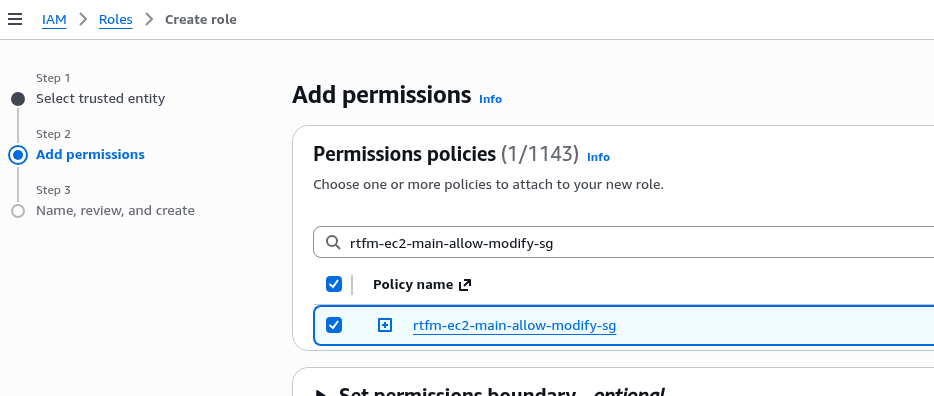
Create an IAM Role, in Use Case select EC2:

Attach the policy created above:
Set the role name and save (though the name chosen here isn’t ideal – because 100% more permissions will be added to this role down the line):
In Security > Modify IAM Role, attach the role to the EC2 – can be done without stopping the instance:

Attach our new role:

SSH into the instance, and verify that it now has access to, for example, ec2:DescribeSecurityGroups:
[ec2-user@ip-10-0-3-146 ~]$ aws ec2 describe-security-groups --group-ids sg-029ffc5f56be700ea
{
    "SecurityGroups": [
        {
            "GroupId": "sg-029ffc5f56be700ea",
            "IpPermissionsEgress": [
                {
                    "IpProtocol": "-1",
                    "UserIdGroupPairs": [],
                    "IpRanges": [
                        {
                            "CidrIp": "0.0.0.0/0"
                        }
                    ],
                    "Ipv6Ranges": [],
                    "PrefixListIds": []
                }
            ],
...
Shell script for updating the ALB Security Group
Add a script that will:
- fetch the current list of Cloudflare IP CIDRs (both IPv4 and IPv6)
- use the AWS CLI to get the current list of rules in the Security Group
- compare the new addresses with the Security Group values and add only those addresses not currently present
- same logic for removal – if an IP is no longer in Cloudflare’s current list, remove it from the Security Group
There’s only one Security Group, so it’s simply set at the top in the $SG_ID variable:
#!/bin/bash

# Update ALB security group with current Cloudflare IP ranges
SG_ID="sg-029ffc5f56be700ea"
PORT=443

# Fetch current Cloudflare IP ranges
CF_IPS=$(curl -s https://www.cloudflare.com/ips-v4; echo; curl -s https://www.cloudflare.com/ips-v6)

# Get current IPs from security group
CURRENT_IPS=$(aws ec2 describe-security-groups --group-ids $SG_ID --query "SecurityGroups[0].IpPermissions[?FromPort==\`$PORT\`].[IpRanges[].CidrIp, Ipv6Ranges[].CidrIpv6]" --output text)

# Add missing IPs
for IP in $CF_IPS; do
    if ! echo "$CURRENT_IPS" | grep -q "$IP"; then
        echo "Adding $IP"
        if echo "$IP" | grep -q ":"; then
            aws ec2 authorize-security-group-ingress --group-id $SG_ID --ip-permissions "[{\"IpProtocol\":\"tcp\",\"FromPort\":$PORT,\"ToPort\":$PORT,\"Ipv6Ranges\":[{\"CidrIpv6\":\"$IP\"}]}]"
        else
            aws ec2 authorize-security-group-ingress --group-id $SG_ID --protocol tcp --port $PORT --cidr $IP
        fi
    fi
done

# Remove IPs no longer in Cloudflare list
for IP in $CURRENT_IPS; do
    if ! echo "$CF_IPS" | grep -q "$IP"; then
        echo "Removing $IP"
        if echo "$IP" | grep -q ":"; then
            aws ec2 revoke-security-group-ingress --group-id $SG_ID --ip-permissions "[{\"IpProtocol\":\"tcp\",\"FromPort\":$PORT,\"ToPort\":$PORT,\"Ipv6Ranges\":[{\"CidrIpv6\":\"$IP\"}]}]"
        else
            aws ec2 revoke-security-group-ingress --group-id $SG_ID --protocol tcp --port $PORT --cidr $IP
        fi
    fi
done

echo "Done"
Set the script’s execute permissions:
[root@ip-10-0-3-146 ~]# chmod +x /opt/update-alb-sg/update-alb-sg-from-cloudflare.sh
Run it manually to verify:
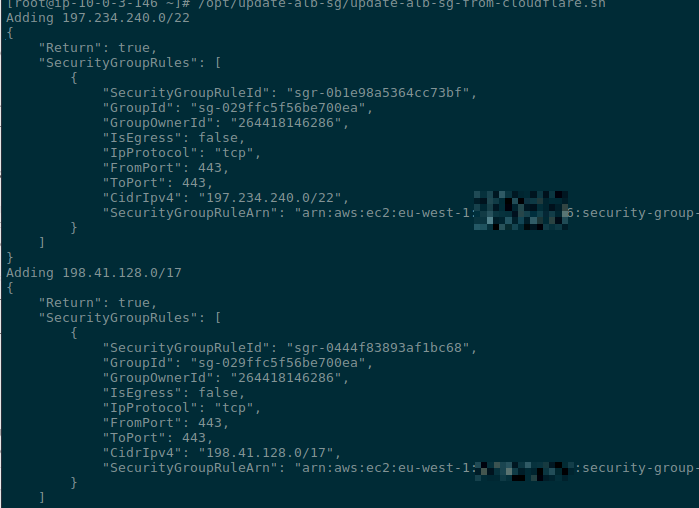
Check the Security Group:
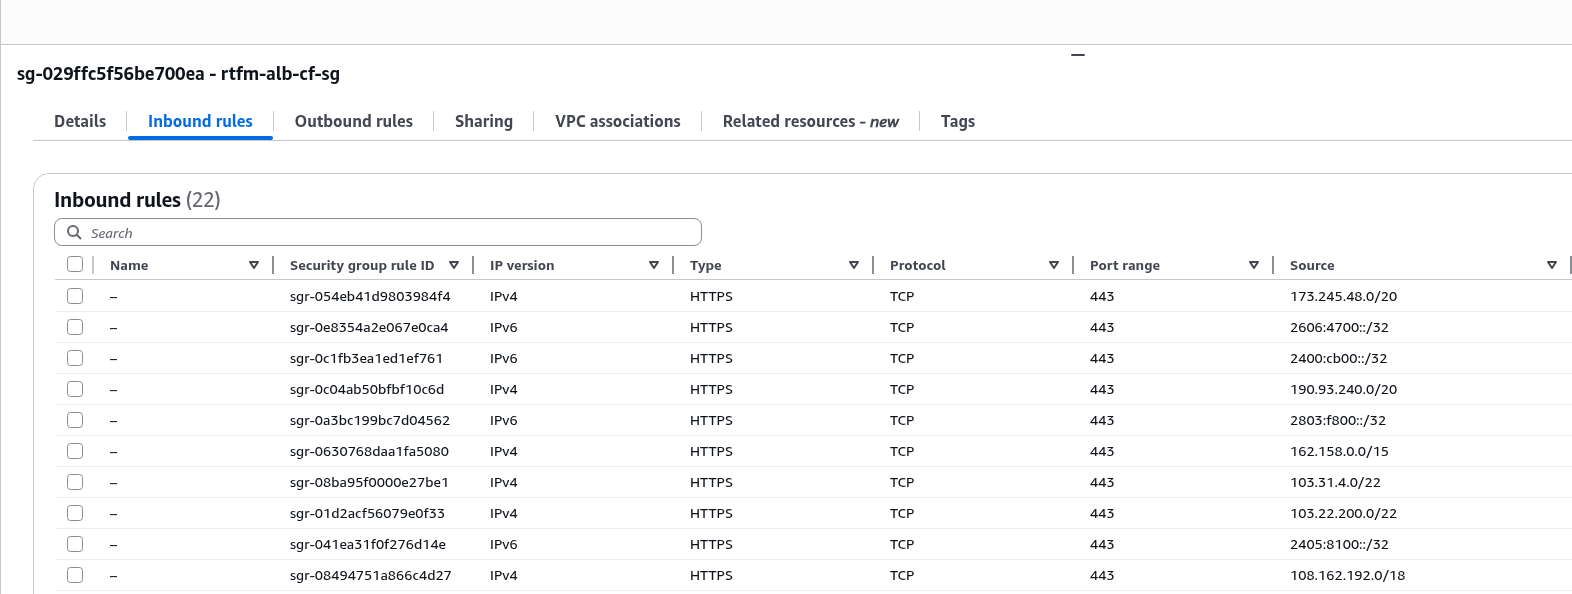
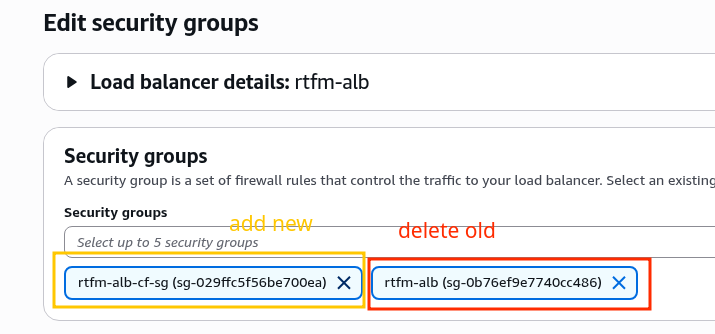
Replacing the Security Group on the ALB
Edit the Security Groups list for the Load Balancer:
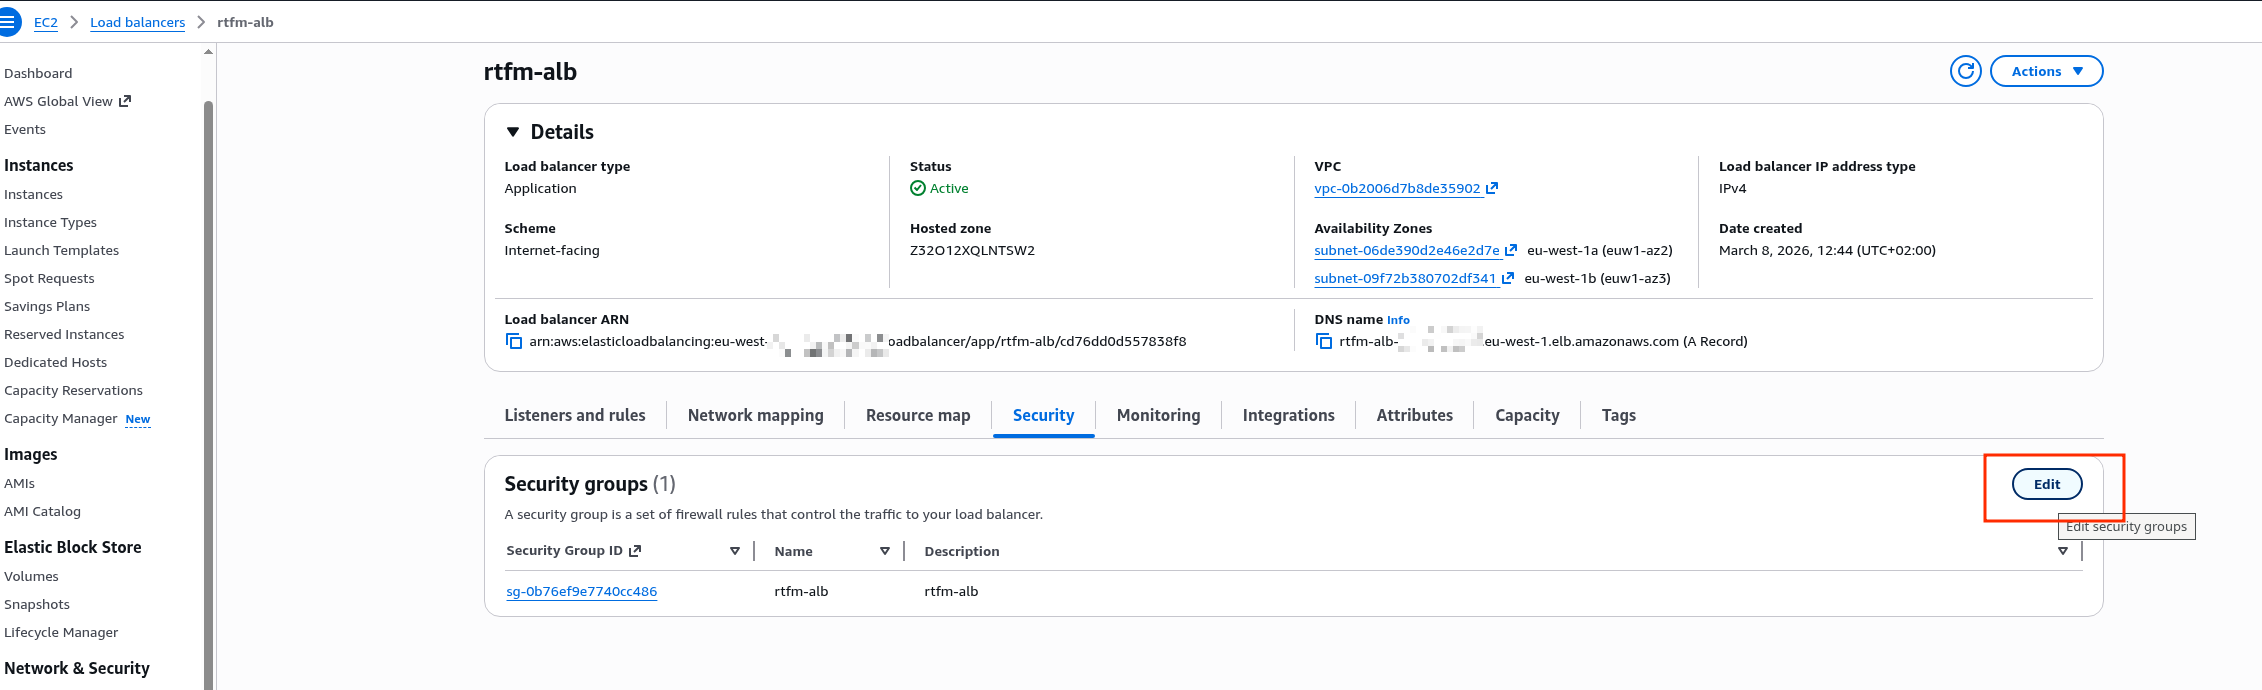
Add the new one, remove the old one:
Verify everything works:
$ curl -I https://rtfm.co.ua/
HTTP/2 200
But from home, direct access to the ALB is now blocked:
$ curl --connect-timeout 5 -kI rtfm-alb-1984146384.eu-west-1.elb.amazonaws.com
curl: (28) Connection timed out after 5002 milliseconds
Add it to cron.
Running from crontab
In Amazon Linux AL2023, the standard cron was removed – install it:
# yum install -y cronie
# systemctl enable crond
# systemctl start crond
Schedule it to run once a day, at 3am for example:
0 3 * * * /opt/update-alb-sg/update-alb-sg-from-cloudflare.sh >> /var/log/update-cf-sg.log 2>&1
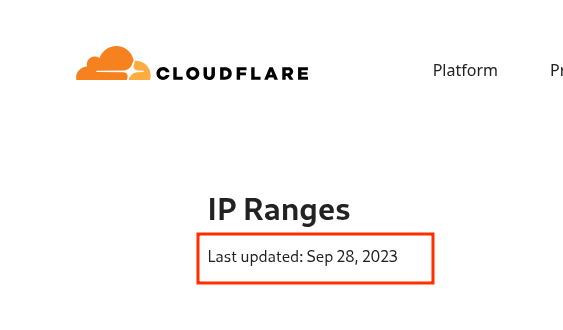
You can also subscribe to the Cloudflare changelog/RSS to receive notifications when IP ranges change.
But IP range changes are very rare – the last time was in 2023, see IP Ranges:
And that’s basically it.
Now we can sleep soundly: our “frontend” is Cloudflare with its Security rules, WAF, and DoS/DDoS protection, and on the “backend” we’re protected at the network level, L3/L4 – and the Load Balancer and EC2 are living peacefully.
See my post on TCP/IP: OSI and TCP/IP models, TCP packets, Linux sockets and ports and AWS’s own documentation – Network security.
P.S. AWS documentation is one of the things I genuinely love about it. I once had to work extensively with Azure – and this is a real problem there.
![]()