In the first part, we covered the basics of AWS OpenSearch Service in general and the types of instances for Data Nodes – AWS: Getting Started with OpenSearch Service as a Vector Store.
In the second part, we covered access, AWS: Creating an OpenSearch Service Cluster and Configuring Authentication and Authorization.
Now let’s write Terraform code to create a cluster, users, and indexes.
We will create the cluster in VPC and use the internal user database for authentication.
But in VPC, you can’t… Because – surprise! – AWS Bedrock requires OpenSearch Managed Cluster to be public, not in VPC.
The OpenSearch Managed Cluster you provided is not supported because it is VPC protected. Your cluster must be behind a public network.
I wrote to the AWS tech. support, and they said:
However, there is an ongoing product feature request (PFR) to have Bedrock KnowledgeBases support provisioned Open Search clusters in VPC.
And they suggest using Amazon OpenSearch Serverless, which we are actually running away from because the prices are ridiculous.
The second problem that arose when I started writing resources bedrockagent_knowledge_base is that it does not support storage_configuration with type == OPENSEARCH_MANAGED, only Serverless.
But Pull Request for this already exists, maybe someday they will approve it.
So, we will create an OpenSearch Managed Service cluster with three indexes – Dev/Staging/Prod.
The cluster will have three small data nodes, and each index will have 1 primary shard and 1 replica, because the project is small, and the data in our Production index on AWS OpenSearch Serverless, from which we want to migrate to AWS OpenSearch Service, is currently only 2 GiB, and is unlikely to grow significantly in the future.
It would be good to create the cluster in our own Terraform module to make it easier to create some test environments, as I did for AWS EKS, but there isn’t much time for that right now, so we’ll just use tf files with a separate prod.tfvars for variables.
Maybe later I’ll write separately about transferring it to our own module, because it’s really convenient.
In the next part, we’ll talk about monitoring, because our Production has already crashed once 🙂
Contents
Terraform files structure
The initial file and directory structure of the project is as follows:
$ tree .
.
├── README.md
└── terraform
    ├── Makefile
    ├── backend.tf
    ├── data.tf
    ├── envs
    │   └── prod
    │       └── prod.tfvars
    ├── locals.tf
    ├── outputs.tf
    ├── providers.tf
    ├── variables.tf
    └── versions.tf
In providers.tf – provider settings, currently only AWS, and through it we set the default tags:
provider "aws" {
  region = var.aws_region
  default_tags {
    tags = {
      component   = var.component
      created-by  = "terraform"
      environment = var.environment
    }
  }
}
In data.tf, we collect AWS Account ID, Availability Zones, VPC, and private subnets in which we will create a cluster in which we will eventually create a cluster:
data "aws_caller_identity" "current" {}

data "aws_availability_zones" "available" {
  state = "available"
}

data "aws_vpc" "eks_vpc" {
  id = var.vpc_id
}

data "aws_subnets" "private" {
  filter {
    name   = "vpc-id"
    values = [var.vpc_id]
  }

  tags = {
    subnet-type = "private"
  }
}
File variables.tf with our default variables, then we will add new ones:
variable "aws_region" {
  type    = string
}

variable "project_name" {
  description = "A project name to be used in resources"
  type        = string
}

variable "component" {
  description = "A team using this project (backend, web, ios, data, devops)"
  type        = string
}

variable "environment" {
  description = "Dev/Prod, will be used in AWS resources Name tag, and resources names"
  type        = string
}

variable "vpc_id" {
  type        = string
  description = "A VPC ID to be used to create OpenSearch cluster and its Nodes"
}
Pass the values of variables through a separate prod.tfvarsfile, then, if necessary, we can create a new environment through a file of the type envs/test/test.tfvars:
aws_region = "us-east-1"
project_name = "atlas-kb"
component = "backend"
environment = "prod"
vpc_id = "vpc-0fbaffe234c0d81ea"
dns_zone = "prod.example.co"
In Makefile, we simplify our local life:
############
### PROD ###
############

init-prod:
  terraform init -reconfigure -backend-config="key=prod/atlas-knowledge-base-prod.tfstate"

plan-prod:
  terraform plan -var-file=envs/prod/prod.tfvars

apply-prod:
  terraform apply -var-file=envs/prod/prod.tfvars

#destroy-prod:
#	terraform destroy -var-file=envs/prod/prod.tfvars
What files will be next?
We will also have AWS Bedrock, which will need to be configured for access – we will do this through its IAM Role, and I will not write about Bedrock here – because it is a separate topic, and Terraform does not yet support OPENSEARCH_MANAGED, so we did it manually, and then we will execute terraform import.
We will create indexes, users for our Backend API, and Bedrock IAM Role mappings in OpenSearch’s internal database through Terraform OpenSearch Provider to simplify OpenSearch Dashboards access.
Project planning
We can create a cluster from the Terraform resource aws_opensearch_domain, or we can use ready-made modules, such as the opensearch from @Anton Babenko.
Let’s take Anton’s module, because I use his modules a lot, and everything works great.
Creating a cluster
Examples – terraform-aws-opensearch/tree/master/examples.
Add a variable with cluster parameters to the variables.tf:
...

variable "cluser_options" {
  description = "A map of options to configure the OpenSearch cluster"
  type = object({
    instance_type                 = string
    instance_count                = number
    volume_size                   = number
    volume_type                   = string
    engine_version                = string
    auto_software_update_enabled  = bool
  })
}
And a value in prod.tfvars:
...

cluser_options = {
  instance_type                = "t3.small.search"
  instance_count               = 3
  volume_size                  = 50
  volume_type                  = "gp3"
  engine_version               = "OpenSearch_2.19"
  auto_software_update_enabled = true
}
t3.small.search instances are the most minimal and sufficient for us at this time, although there are limitations for t3, such as the AWS OpenSearch Auto-tune feature not being supported.
In general, t3 is not intended for production use cases. See also Operational best practices for Amazon OpenSearch Service, Current generation instance types, and Amazon OpenSearch Service quotas.
I set the version here to 2.9, but 3.1 was added just a few days ago – see Supported versions of Elasticsearch and OpenSearch.
We take three nodes so that the cluster can select a cluster manager node if one node fails, see Dedicated master node distribution, Learning OpenSearch from scratch, part 2: Digging deeper, and Enhance stability with dedicated cluster manager nodes using Amazon OpenSearch Service.
Contents of locals.tf:
locals {
  # 'atlas-kb-prod'
  env_name = "${var.project_name}-${var.environment}"
}
Most of the locals will be right here, but some that are very “local” to a particular code will be in the resource code files.
Add the file opensearcth_users.tf – for now, there is only a root user here, and the password is stored in AWS Parameter Store (instead of AWS Secrets Manager – “that’s just how it happened historically“):
############
### ROOT ###
############

# generate root password
# waiting for write-only: https://github.com/hashicorp/terraform-provider-aws/pull/43621
# then will update it with the ephemeral type
resource "random_password" "os_master_password" {
  length  = 16
  special = true
}

# store the root password in AWS Parameter Store
resource "aws_ssm_parameter" "os_master_password" {
  name        = "/${var.environment}/${local.env_name}-root-password"
  description = "OpenSearch cluster master password"
  type        = "SecureString"
  value       = random_password.os_master_password.result
  overwrite   = true
  tier        = "Standard"

  lifecycle {
    ignore_changes = [value]  # to prevent diff every time password is regenerated
  }
}

data "aws_ssm_parameter" "os_master_password" {
  name            = "/${var.environment}/${local.env_name}-root-password"
  with_decryption = true

  depends_on = [aws_ssm_parameter.os_master_password]
}
Let’s write the opensearch_cluster.tf file.
I left the config for VPC here for future reference and just as an example, although it will not be possible to transfer an already created cluster to VPC – you will have to create a new one, see Limitations in the documentation Launching your Amazon OpenSearch Service domains within a VPC:
module "opensearch" {
  source  = "terraform-aws-modules/opensearch/aws"
  version = "~> 2.0.0"

  # enable Fine-grained access control
  # by using the internal user database, we'll simply access to the Dashboards
  # for backend API Kubernetes Pods, will use Kubernetes Secrets with username:password from AWS Parameter Store
  advanced_security_options = {
    enabled                        = true
    anonymous_auth_enabled         = false
    internal_user_database_enabled = true

    master_user_options = {
      master_user_name     = "os_root"
      master_user_password = data.aws_ssm_parameter.os_master_password.value
    }
  }

  # can't be used with t3 instances
  auto_tune_options = {
    desired_state = "DISABLED"
  }

  # have three data nodes - t3.small.search nodes in two AZs
  # will use 3 indexes - dev/stage/prod with 1 shard and 1 replica each
  cluster_config = {
    instance_count           = var.cluser_options.instance_count
    dedicated_master_enabled = false
    instance_type            = var.cluser_options.instance_type

    # put both data-nodes in different AZs
    zone_awareness_config = {
      availability_zone_count = 2
    }

    zone_awareness_enabled = true
  }

  # the cluster's name
  # 'atlas-kb-prod'
  domain_name = "${local.env_name}-cluster"

  # 50 GiB for each Data Node
  ebs_options = {
    ebs_enabled = true
    volume_type = var.cluser_options.volume_type
    volume_size = var.cluser_options.volume_size
  }

  encrypt_at_rest = {
    enabled = true
  }

  # latest for today:
  # https://docs.aws.amazon.com/opensearch-service/latest/developerguide/what-is.html#choosing-version
  engine_version = var.cluser_options.engine_version

  # enable CloudWatch logs for Index and Search slow logs
  # TODO: collect to VictoriaLogs or Loki, and create metrics and alerts
  log_publishing_options = [
    { log_type = "INDEX_SLOW_LOGS" },
    { log_type = "SEARCH_SLOW_LOGS" },
  ]

  ip_address_type = "ipv4"

  node_to_node_encryption = {
    enabled = true
  }

  # allow minor version updates automatically
  # will be performed during off-peak windows
  software_update_options = {
    auto_software_update_enabled = var.cluser_options.auto_software_update_enabled
  }

  # DO NOT use 'atlas-vpc-ops' VPC and its private subnets
  # > "The OpenSearch Managed Cluster you provided is not supported because it is VPC protected. Your cluster must be behind a public network."
  # vpc_options = {
  #   subnet_ids = data.aws_subnets.private.ids
  # }

  # # VPC endpoint to access from Kubernetes Pods
  # vpc_endpoints = {
  #   one = {
  #     subnet_ids = data.aws_subnets.private.ids
  #   }
  # }

  # Security Group rules to allow access from the VPC only
  # security_group_rules = {
  #   ingress_443 = {
  #     type        = "ingress"
  #     description = "HTTPS access from VPC"
  #     from_port   = 443
  #     to_port     = 443
  #     ip_protocol = "tcp"
  #     cidr_ipv4   = data.aws_vpc.ops_vpc.cidr_block
  #   }
  # }

  # Access policy
  # necessary to allow access for AWS user to the Dashboards
  access_policy_statements = [
    {
      effect = "Allow"

      principals = [{
        type        = "*"
        identifiers = ["*"]
      }]

      actions = ["es:*"]
    }
  ]

  # 'atlas-kb-ops-os-cluster'
  tags = {
    Name        = "${var.project_name}-${var.environment}-os-cluster"
  }
}
Basically, everything is described in the comments, but in short:
- enable fine-grained access control and a local user database
- three data nodes, each with 50 gigabytes of disk space, in different Availability Zones
- enable logs in CloudWatch
create a cluster in private subnets- allow access for everyone in the Domain Access Policy
- well, that’s it for now… we can’t use Security Groups because we’re not in VPC, but how do we create an IP-based policy? We don’t know CIDR Bedrock
- or in the
principals.identifierswe could add a limit on our IAM Users + Bedrock AIM Role
Run creating the cluster and go to have some tea, as this process will take around 20 minutes.
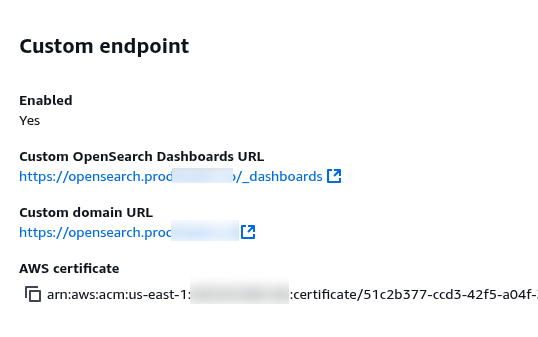
Custom endpoint configuration
After creating the cluster, check access to the Dashboards. If everything is OK, add a custom endpoint.
Note: Custom endpoints have their own quirks: in Terraform OpenSearch Provider, you need to use the custom endpoint URL, but in AWS Bedrock Knowledge Base, you need to use the default cluster URL.
To do this, we need to create a certificate in AWS Certificate Manager, and add a new record in Route53.
I expected a possible chicken-and-egg problem here, because Custom Endpoint settings depend on AWS ACM and a record in AWS Route53, and the record in AWS Route53 will depend on the cluster because it uses its endpoint.
But no, if you create a new cluster with the settings described below, everything is created correctly: first, the certificate in AWS ACM, then the cluster with Custom Endpoint, then the record in Route53 with CNAME to the cluster default URL.
Add a new local – os_custom_domain_name:
locals {
  # 'atlas-kb-prod'
  env_name = "${var.project_name}-${var.environment}"
  # 'opensearch.prod.example.co'
  os_custom_domain_name = "opensearch.${var.dns_zone}"
}
Add the Route53 zone data retrieval to data.tf:
...

data "aws_route53_zone" "zone" {
  name = var.dns_zone
}
Add certificate creation and Route53 entry to the opensearch_cluster.tf:
# TLS for the Custom Domain
module "prod_opensearch_acm" {
  source  = "terraform-aws-modules/acm/aws"
  version = "~> 6.0"

  # 'opensearch.example.co'
  domain_name = local.os_custom_domain_name
  zone_id     = data.aws_route53_zone.zone.zone_id

  validation_method = "DNS"
  wait_for_validation = true

  tags = {
    Name = local.os_custom_domain_name
  }
}

resource "aws_route53_record" "opensearch_domain_endpoint" {
  zone_id = data.aws_route53_zone.zone.zone_id
  name    = local.os_custom_domain_name
  type    = "CNAME"
  ttl     = 300
  records = [module.opensearch.domain_endpoint]
}

...
And in the module "opensearch", add the custom endpoint settings:
...
  domain_endpoint_options = {
    custom_endpoint_certificate_arn = module.prod_opensearch_acm.acm_certificate_arn
    custom_endpoint_enabled         = true
    custom_endpoint                 = local.os_custom_domain_name
    tls_security_policy             = "Policy-Min-TLS-1-2-2019-07"
  }
...
Run terraform init and terraform apply, check the settings:
And check access to the Dashboards.
Terraform Outputs
Let’s add some outputs.
For now, just for ourselves, but later we may use them in imports from other projects, see Terraform: terraform_remote_state – getting outputs from other state files:
output "vpc_id" {
  value = var.vpc_id
}

output "cluster_arn" {
  value = module.opensearch.domain_arn
}

output "opensearch_domain_endpoint_cluster" {
  value = "https://${module.opensearch.domain_endpoint}"
}

output "opensearch_domain_endpoint_custom" {
  value = "https://${local.os_custom_domain_name}"
}

output "opensearch_root_username" {
  value = "os_root"
}

output "opensearch_root_user_password_secret_name" {
  value = "/${var.environment}/${local.env_name}-root-password"
}
Creating OpenSearch Users
All that’s left now are users and indexes.
We will have two types of users:
- regular users from the OpenSearch internal database – for our Backend API in Kubernetes (actually, we later switched to IAM Roles, which are mapped to the Backend via EKS Pod Identities)
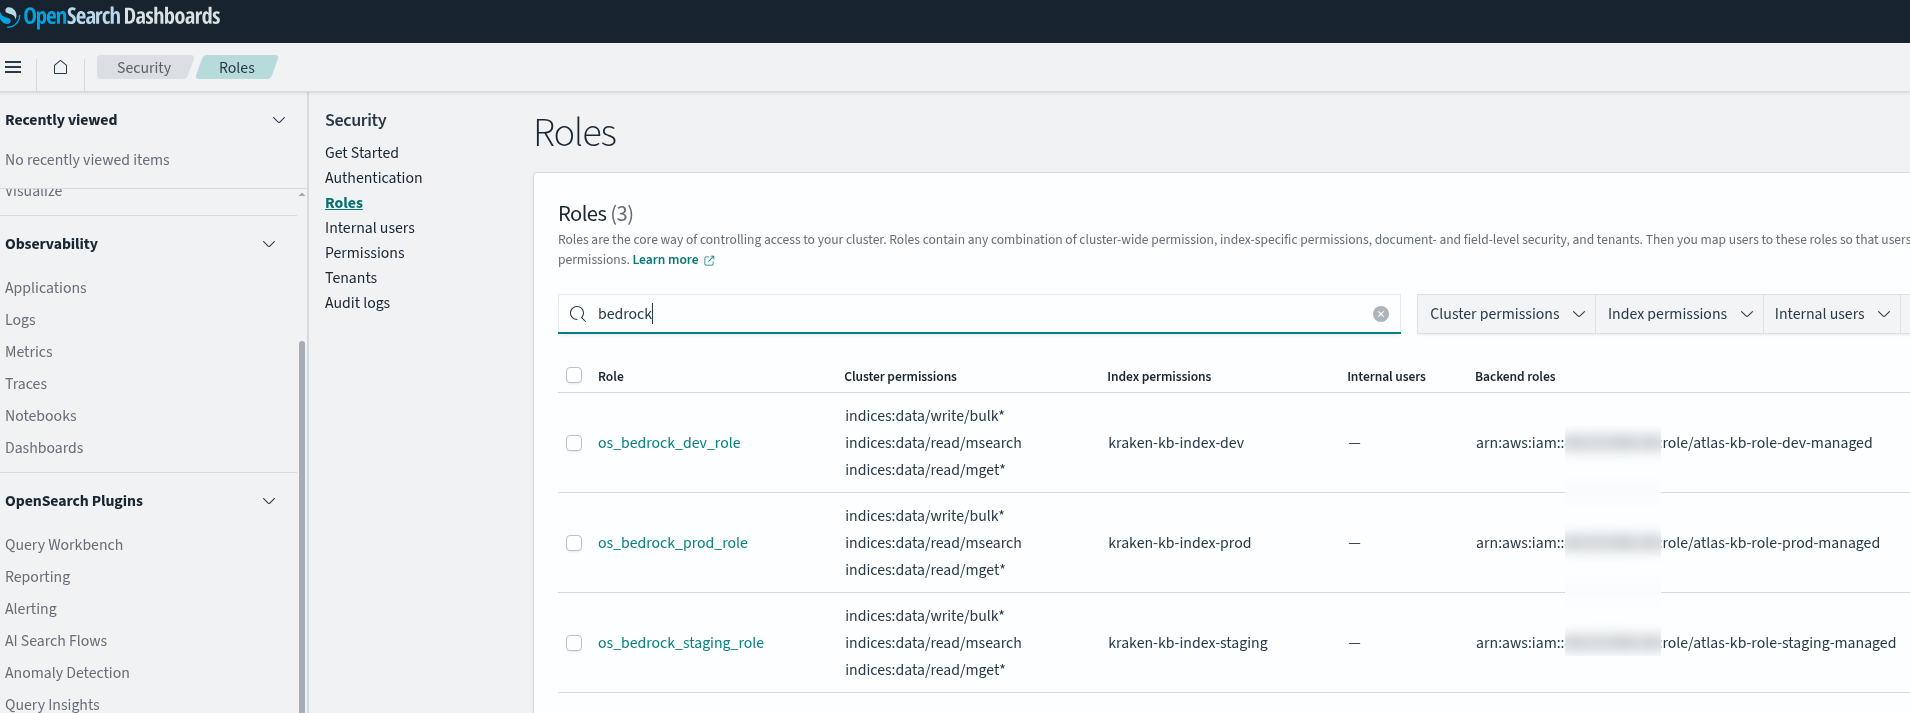
- and users (IAM Role) for Bedrock – there will be three Knowledge Bases, each with its own IAM Role, for which we will need to add an OpenSearch Role and map it to IAM roles
Let’s start with regular users.
Add a provider, in my case it is in the versions.tf file:
terraform {

  required_version = "~> 1.6"

  required_providers {
    aws = {
      source  = "hashicorp/aws"
      version = "~> 6.0"
    }
    opensearch = {
      source  = "opensearch-project/opensearch"
      version = "~> 2.3"
    }
  }
}
In the providers.tf file, describe access to the cluster:
...

provider "opensearch" {
  url         = "https://${local.os_custom_domain_name}"
  username    = "os_root"
  password    = data.aws_ssm_parameter.os_master_password.value
  healthcheck = false
}
Error: elastic: Error 403 (Forbidden)
Here is an important point about the url value in the provider configuration. I wrote about it above, and now I will show you how it looks.
First, in provider.url, I set it as outputs of the module, i.e. module.opensearch.domain_endpoint.
Because of this, I got a 403 error when I tried to create users:
...
opensearch_user.os_kraken_dev_user: Creating...
opensearch_role.os_kraken_dev_role: Creating...
╷
│ Error: elastic: Error 403 (Forbidden)
│
│   with opensearch_user.os_kraken_dev_user,
│   on opensearch_users.tf line 23, in resource "opensearch_user" "os_kraken_dev_user":
│   23: resource "opensearch_user" "os_kraken_dev_user" {
│
╵
╷
│ Error: elastic: Error 403 (Forbidden)
│
│   with opensearch_role.os_kraken_dev_role,
│   on opensearch_users.tf line 30, in resource "opensearch_role" "os_kraken_dev_role":
│   30: resource "opensearch_role" "os_kraken_dev_role" {
Thus, set the URL in the form of FQDN, which we did for Custom Endpoint, something like "url = https://opensearch.exmaple.com" – and everything works well.
Creating Internal Users
Now for the users themselves.
There will be three of them – dev, staging, prod, each with access to the corresponding index.
Here we will use opensearch_user.
If the cluster is created in VPC, a VPN connection is required so that the provider can connect to the cluster.
Add list() with a list of environments to the variables.tf:
...

variable "app_environments" {
  type        = list(string)
  description = "The Application's environments, to be used to created Dev/Staging/Prod DynamoDB tables, etc"
}
And the value in prod.tfvars:
...

app_environments = [
  "dev",
  "staging",
  "prod"
]
Internal database users
At first, I planned to just use local users, and wrote this option in this post – let it be. Next, I will show how we did it in the end – with IAM Users and IAM Roles.
In the file opensearch_users.tf, add three passwords, three users, and three roles to which we map users in loops – each role with access to its own index:
...

##############
### KRAKEN ###
##############

resource "random_password" "os_kraken_password" {
  for_each = toset(var.app_environments)
  length  = 16
  special = true
}

# store the root password in AWS Parameter Store
resource "aws_ssm_parameter" "os_kraken_password" {
  for_each = toset(var.app_environments)

  name        = "/${var.environment}/${local.env_name}-kraken-${each.key}-password"
  description = "OpenSearch cluster Backend Dev password"
  type        = "SecureString"
  value       = random_password.os_kraken_password[each.key].result
  overwrite   = true
  tier        = "Standard"

  lifecycle {
    ignore_changes = [value]  # to prevent diff every time password is regenerated
  }
}

# Create a user
resource "opensearch_user" "os_kraken_user" {
  for_each = toset(var.app_environments)

  username    = "os_kraken_${each.key}"
  password    = random_password.os_kraken_password[each.key].result
  description = "Backend EKS ${each.key} user"

  depends_on = [module.opensearch]
}

# And a full user, role and role mapping example:
resource "opensearch_role" "os_kraken_role" {
  for_each = toset(var.app_environments)

  role_name   = "os_kraken_${each.key}_role"
  description = "Backend EKS ${each.key} role"

  cluster_permissions = [
    "indices:data/read/msearch",
    "indices:data/write/bulk*",
   "indices:data/read/mget*"
  ]
  index_permissions {
    index_patterns  = ["kraken-kb-index-${each.key}"]
    allowed_actions = ["*"]
  }

  depends_on = [module.opensearch]
}
In cluster_permissions, we add permissions that are required for both the index level and the cluster level, because Bedrock did not work without them, see Cluster wide index permissions.
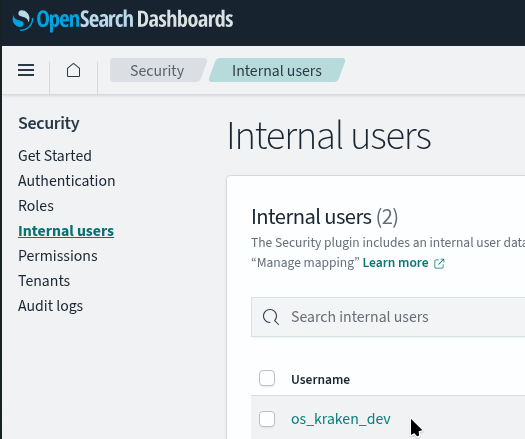
Deploy and check in Dashboards:
Adding IAM Users
The idea here is the same, except that instead of regular users with a login:password for authentication, IAM and its Users && Roles are used.
More on the role for Bedrock later, but for now, let’s add user mapping.
What we need to do is take a list of our Backend team users, give them an IAM Policy with access to OpenSearch, and then add mapping to a local role in the OpenSearch internal users database.
For now, we can use the local role all_access, although it would be better to write our own later. See Predefined roles and About the master user.
Add a new variable to the variables.tf:
...

variable "backend_team_users_arns" {
  type        = list(string)
}
Its value in the prod.tfvars:
...

backend_team_users_arns = [
  "arn:aws:iam::492***148:user/arseny",
  "arn:aws:iam::492***148:user/misha",
  "arn:aws:iam::492***148:user/oleksii",
  "arn:aws:iam::492***148:user/vladimir",
  "os_root"
]
Here, we had to mess around with the user os_root, because otherwise it would be removed from the role.
So, it’s better to make normal roles – but for MVP, it’s okay.
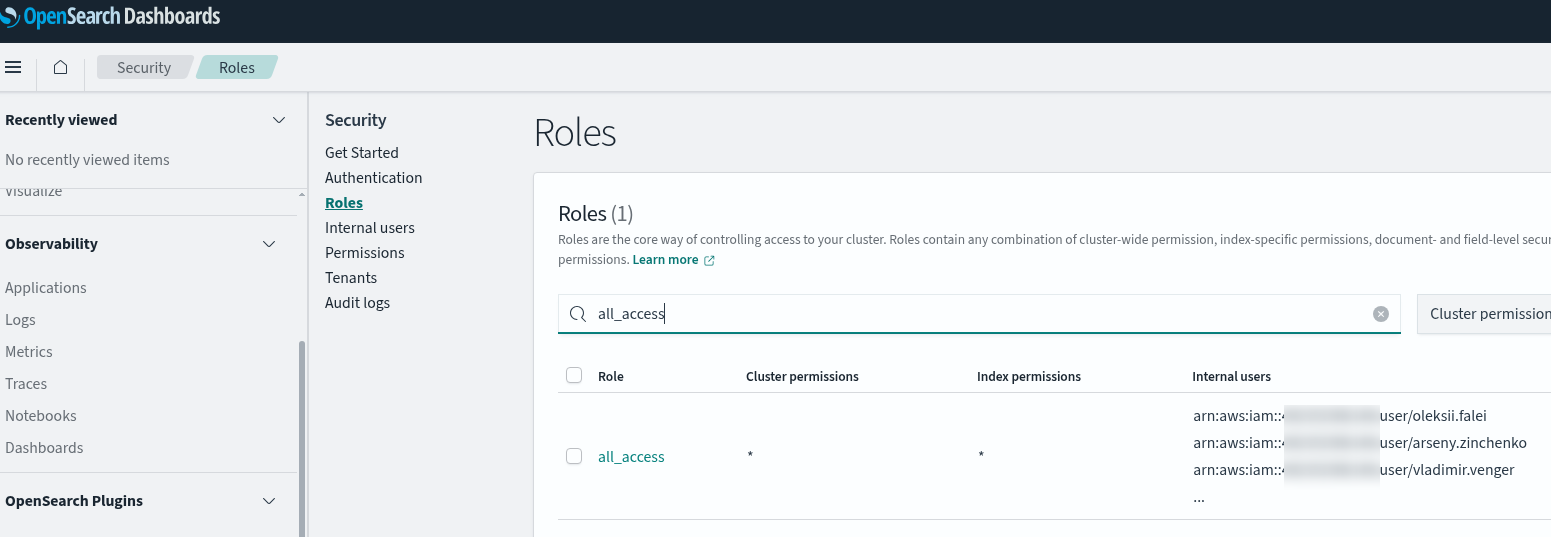
And we add the mapping of these IAM Users to the role all_access:
...

####################
### BACKEND TEAM ###
####################

resource "opensearch_roles_mapping" "all_access_mapping" {
  role_name = "all_access"

  users = var.backend_team_users_arns
}
Deploy, check the all_access role:
Note: ChatGPT stubbornly insisted on adding IAM Users to Backend Roles, but no, and this is clearly stated in the documentation – you need to add them to Users, see Additional master users.
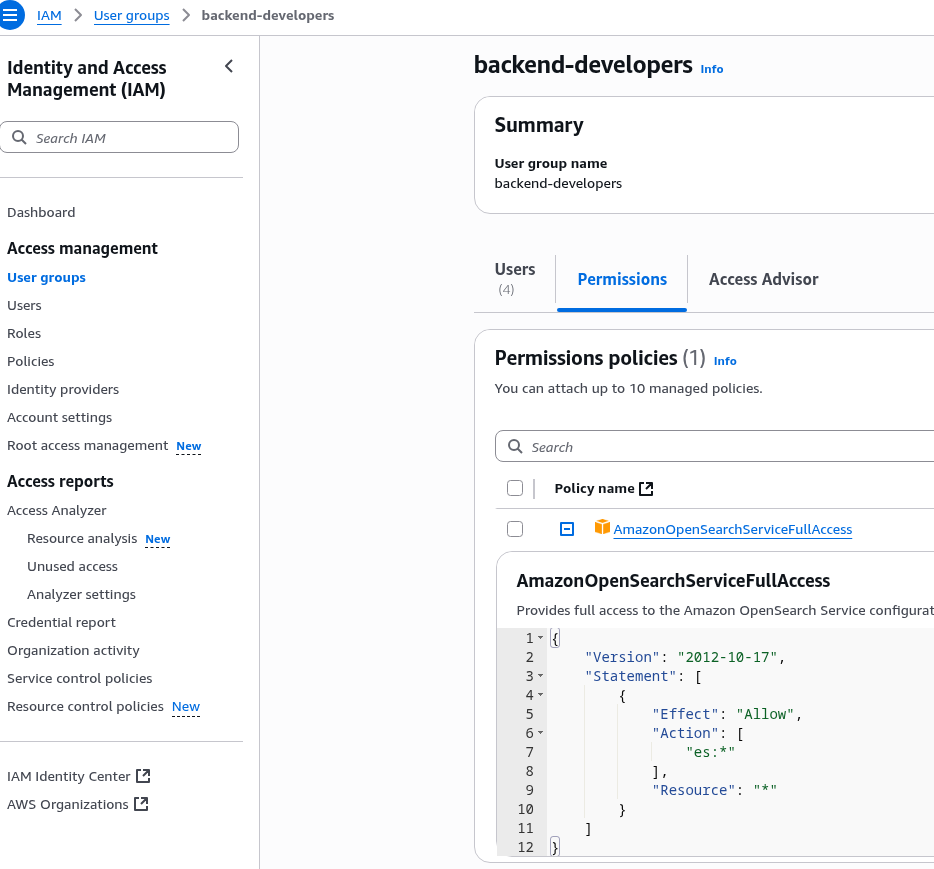
And for all the IAM Users we need to add an IAM policy with access.
Again, for MVP, we can simply take the AWS managed policy AmazonOpenSearchServiceFullAccess, which is connected to the IAM Group:
Creating AWS Bedrock IAM Roles and OpenSearch Role mappings
We already have Bedrock, now just need to create new IAM Roles and map them to OpenSearch Roles.
Add the iam.tf file – describe the IAM Role and IAM Policy (Identity-based Policy for access to OpenSearch), also in a loop for each of the var.app_environments:
#####################################
### MAIN ROLE FOR KNOWLEDGE BASE ###
#####################################

# grants permissions for AWS Bedrock to interact with other AWS services
resource "aws_iam_role" "knowledge_base_role" {
  for_each = toset(var.app_environments)
  name     = "${var.project_name}-role-${each.key}-managed"
  assume_role_policy = jsonencode({
    Version = "2012-10-17"
    Statement = [
      {
        Action = "sts:AssumeRole"
        Effect = "Allow"
        Principal = {
          Service = "bedrock.amazonaws.com"
        }
        Condition = {
          StringEquals = {
            "aws:SourceAccount" = data.aws_caller_identity.current.account_id
          }
          ArnLike = {
            # restricts the role to be assumed only by Bedrock knowledge base in the specified region
            "aws:SourceArn" = "arn:aws:bedrock:${var.aws_region}:${data.aws_caller_identity.current.account_id}:knowledge-base/*"
          }
        }
      }
    ]
  })
}

# IAM policy for Knowledge Base to access OpenSearch Managed
resource "aws_iam_policy" "knowledge_base_opensearch_policy" {
  for_each = toset(var.app_environments)
  name     = "${var.project_name}-kb-opensearch-policy-${each.key}-managed"
  policy = jsonencode({
    Version = "2012-10-17"
    Statement = [
      {
        Effect = "Allow"
        Action = [
          "es:*",
        ]
        Resource = [
          module.opensearch.domain_arn,
          "${module.opensearch.domain_arn}/*"
        ]
      }
    ]
  })
}

resource "aws_iam_role_policy_attachment" "knowledge_base_opensearch" {
  for_each   = toset(var.app_environments)
  role       = aws_iam_role.knowledge_base_role[each.key].name
  policy_arn = aws_iam_policy.knowledge_base_opensearch_policy[each.key].arn
}
Next, in the opensearch_users.tf, let’s create:
opensearch_role: withcluster_permissionsandindex_permissionsfor each indexlocalswith all the IAM Roles we created above- and
opensearch_roles_mappingfor eachopensearch_role.os_bedrock_roles, which we add to eachopensearch_roleviabackend_roles.
It looks something like this:
...

#################
#### BEDROCK ####
#################

resource "opensearch_role" "os_bedrock_roles" {
  for_each = toset(var.app_environments)
  role_name   = "os_bedrock_${each.key}_role"
  description = "Backend Bedrock KB ${each.key} role"

  cluster_permissions = [
    "indices:data/read/msearch",
    "indices:data/write/bulk*",
    "indices:data/read/mget*"
    ]

  index_permissions {
    index_patterns  = ["kraken-kb-index-${each.key}"]
    allowed_actions = ["*"]
  }

  depends_on = [module.opensearch]
}

# 'aws_iam_role' is defined in iam.tf
locals {
  knowledge_base_role_arns = {
    for env, role in aws_iam_role.knowledge_base_role :
    env => role.arn
  }
}

resource "opensearch_roles_mapping" "os_bedrock_role_mappings" {
  for_each  = toset(var.app_environments)
  role_name = opensearch_role.os_bedrock_roles[each.key].role_name

  backend_roles = [
    local.knowledge_base_role_arns[each.key]
  ]

  depends_on = [module.opensearch]
}
Actually, this is where I encountered Bedrock access errors, which forced me to add cluster_permissions:
The knowledge base storage configuration provided is invalid… Request failed: [security_exception] no permissions for [indices:data/read/msearch] and User [name=arn:aws:iam::492***148:role/kraken-kb-role-dev, backend_roles=[arn:aws:iam::492***148:role/kraken-kb-role-dev], requestedTenant=null]
Deploy, check:
Creating OpenSearch indexes
The provider already exists, so we’ll take the opensearch_index resource.
In locals, we write the index template – I just took it from the developers from the old configuration:
locals {
  # 'atlas-kb-prod'
  env_name = "${var.project_name}-${var.environment}"
  # 'opensearch.prod.example.co'
  os_custom_domain_name = "opensearch.${var.dns_zone}"

  # index mappings

  os_index_mappings = <<-EOF
    {
      "dynamic_templates": [
        {
          "strings": {
            "match_mapping_type": "string",
            "mapping": {
              "fields": {
                "keyword": {
                  "ignore_above": 8192,
                  "type": "keyword"
                }
              },
              "type": "text"
            }
          }
        }
      ],
      "properties": {
        "bedrock-knowledge-base-default-vector": {
          "type": "knn_vector",
          "dimension": 1024,
          "method": {
            "name": "hnsw",
            "engine": "faiss",
            "parameters": {
              "m": 16,
              "ef_construction": 512
            },
            "space_type": "l2"
          }
        },
        "AMAZON_BEDROCK_METADATA": {
          "type": "text",
          "index": false
        },
        "AMAZON_BEDROCK_TEXT_CHUNK": {
          "type": "text",
          "index": true
        }
      }
    }
EOF
}
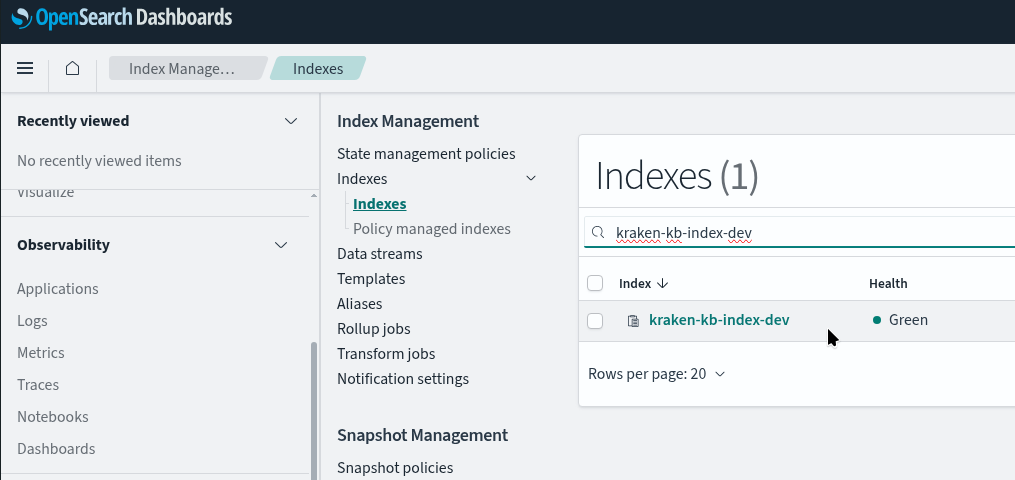
Create a file named opensearch_indexes.tf. Add the indexes themselves – here, I decided not to use a loop, but to create separate Dev/Staging/Prod files directly:
# Dev Index
resource "opensearch_index" "kb_vector_index_dev" {
  name = "kraken-kb-index-dev"

  # enable approximate nearest neighbor search by setting index_knn to true
  index_knn                      = true
  index_knn_algo_param_ef_search = "512"
  number_of_shards               = "1"
  number_of_replicas = "1"
  mappings                       = local.os_index_mappings

  # When new documents are ingested into the Knowledge Base,
  # OpenSearch automatically creates field mappings for new metadata fields under
  # AMAZON_BEDROCK_METADATA. Since these fields are created outside of TF resource definitions,
  # TF detects them as configuration drift and attempts to recreate the index to match its
  # known state.
  #
  # This lifecycle rule prevents unnecessary index recreation by ignoring mapping changes
  # that occur after initial deployment.
  lifecycle {
    ignore_changes = [mappings]
  }
}

...
Deploy, check:
That’s basically it.
Bedrock is already connected, everything is working.
But it took a little bit of effort.
And I’m sure it won’t be the last time 🙂
![]()
