 Each WorkerNode in a Kubernetes cluster can have a limited number of Pods running, and this limit is determined by three parameters:
- CPU: the total number of
requests.cpucannot be more than the number of CPUs on the Node - Memory: the total number of
requests.memorycannot be more than the Memory on the Node - IP: the total number of Pods cannot be more than the number of IP addresses in the node
And if the first two are kind of “soft limits” – because we can just do not set requests at all – then the limit by the number of IP addresses on a Node is more a “hard limit”, because each Pod that runs on a Node needs to be given its own address from the Secondary IP pool of its Node.
And the problem here is that these addresses are often used much before the Node runs out of CPU or Memory, and in this case, we find ourselves in a situation where our Node is underutilized, that is, we still could run Pods on it, but we can’t, because there are no free IPs for them.
For example, one of our t3.medium Nodes looks like this:
It has free CPUs, not all memory is requested, but Pods Allocation is already 100% – because only 17 Secondary IPs for Pods can be added to the t3.medium instance type, and they are all already used.
Contents
Maximum Secondary IP on AWS EC2
The number of additional (secondary) IPs on EC2 depends on the number of ENI (Elastic network Interface) and the number of IPs per interface, and these parameters depend on the type of EC2.
For example, t3.medium can have 3 interfaces, and each interface can have up to 6 IPs (see IP addresses per network interface per instance type):
That is, a total of 18 addresses, but minus 1 Private IP of the ENI instance itself, and 17 addresses will be available for Pods on such a Node.
Amazon VPC Prefix Assignment Mode
To solve the problem with the number of Secondary IPs on EC2, you can use VPC Prefix Assignment Mode – when a whole /28 block is attached to an interface instead of a single IP, see Assign prefixes to Amazon EC2 network interfaces.
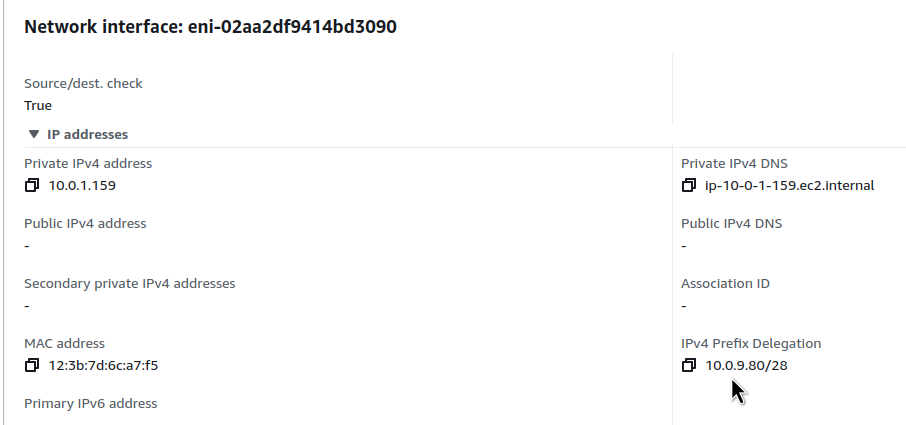
For example, we can create a new ENI and assign it a CIDR (Classless Inter-Domain Routing) prefix:
$ aws --profile work ec2 create-network-interface --subnet-id subnet-01de26778bea10395 --ipv4-prefix-count 1
Let’s check this ENI:
The only thing to keep in mind is that VPC Prefix Assignment Mode is only available for instances on the AWS Nitro System – the latest generation of AWS hypervisors that run T3, M5, C5, R5, etc. – See Instances built on the Nitro System.
What is: CIDR /28
Each IPv4 address consists of 32 bits divided into 4 octets (groups of 8 bits). These bits can be represented in binary (0 or 1) or in decimal (values between 0 and 255 for each octet). We will use 0 and 1 here.
The subnet mask /28 indicates that the first 28 bits of the IP address are reserved for the network identification – then 4 bits (32 total minus 28 reserved) remain to identify individual hosts in the network:
Knowing that we have 4 free bits, and each bit can have a value of 0 or 1, we can calculate the total number of combinations: 2 to the power of 4, or 2×2×2×2=16 – that is, there can be a total of 16 addresses in the /28 network, including both the network address (the first IP) and the broadcast address (the last IP), so there will be 14 addresses available for hosts.
So instead of connecting one Secondary IP to ENI, we connect 16 at once.
It is worth considering how many such blocks your VPC Subnet can have, as this will determine the number of WorkerNodes you can run.
Here it is easier to use utilities like ipcalc.
For example, my Private Subnets have a prefix of /20, and if we divide this entire network into blocks of /28, we will have 256 subnets and 3584 addresses:
$ ipcalc 10.0.16.0/20 /28
...
Subnets:   256
Hosts:     3584
Or you can use an online calculator – ipcalc.
VPC Prefix та AWS EKS VPC CNI
Okay – we have seen how we can allocate a block of addresses to an interface that is connected to EC2.
What’s next? How do we get a separate address for the Pod we are running in Kubernetes from this pool of addresses?
This is done by the VPC Container Networking Interface (CNI) Plugin, which consists of two main components:
- L-IPAM daemon (IPAMD): responsible for creating and connecting ENI to EC2 instances, assigning address blocks to these interfaces, and “warming up” IP prefixes to speed up Pods launch (we’ll talk about this in the
WARM_PREFIX_TARGET,WARM_IP_TARGETandMINIMUM_IP_TARGETpart) - CNI plugin: is responsible for configuring network interfaces on the node – both ethernet and virtual, and communicates with IPAMD via RPC (Remote Procedure Call)
How exactly this is implemented is perfectly described in the Amazon VPC CNI plugin increases pods per node limits > How it works blog:
So the process looks like this:
- Kubernetes Pod at startup makes a request to the IPAMD for an IP allocation
- IPAMD checks the available addresses, if there are free addresses, it allocates one for the Pod
- if there are no free addresses in the prefixes connected to ES2, then IPAMD makes a request to connect a new prefix to the ENI
- if a new prefix cannot be added to the existing ENI – a request is made to connect a new ENI
- if the Node already has the maximum number of ENIs, then the Pod’s request for the new IP is failed
- if a new prefix is added (to an existing or new ENI), then the IP for the Pod is selected from it
- if a new prefix cannot be added to the existing ENI – a request is made to connect a new ENI
WARM_PREFIX_TARGET, WARM_IP_TARGET and MINIMUM_IP_TARGET
See WARM_PREFIX_TARGET, WARM_IP_TARGET and MINIMUM_IP_TARGET.
To configure the allocation of prefixes to Nodes and IPs of VPCs, CNI has three additional options – WARM_PREFIX_TARGET, WARM_IP_TARGET, and MINIMUM_IP_TARGET:
WARM_PREFIX_TARGET: how many connected/28prefixes to keep “in reserve”, i.e. they will be connected to ENI, but the addresses from them are not yet usedWARM_IP_TARGET: how many minimum IP addresses to connect when creating a NodeMINIMUM_IP_TARGET: how many minimum IP addresses to keep “in reserve”
When using VPC Prefix Assignment Mode, you cannot set all three parameters to zero – at least either WARM_PREFIX_TARGET or WARM_IP_TARGET must be set to at least 1.
If WARM_IP_TARGET and/or MINIMUM_IP_TARGET are specified, they will take precedence over WARM_PREFIX_TARGET, i.e. the value from WARM_PREFIX_TARGET will be ignored.
Subnet CIDR reservations
Documentation – Subnet CIDR reservations.
When using Prefix IP, the addresses in the prefix must be consecutive, i.e. the “10.0.31.162” IP (block 10.0.31.160/28) and “10.0.31.178” (block 10.0.31.176/28) cannot be in the same prefix.
If the subnet is actively used and there is no continuous block of addresses to allocate the entire prefix, you will receive an error:
failed to allocate a private IP/Prefix address: InsufficientCidrBlocks: The specified subnet does not have enough free cidr blocks to satisfy the request
To prevent this, you can use the Subnet Reservation feature in AWS – VPC Subnet CIDR reservations – to create a single block from which blocks will be “sliced” by /28. Such a block will not be used to allocate a Private IP for EC2, instead, VPC CNI will create prefixes from this reservation.
You can create such a reservation even if individual IPs in this block are already in use on EC2 – as soon as such addresses are freed up, they will no longer be allocated to individual EC2 instances, but will be saved to form /28 prefixes.
So, if I have a VPC Subnet with a block of 20, I can split it into two CIDR Reservation blocks of 21 each, and in each 21 block will have:
$ ipcalc 10.0.24.0/21 /28
...
Subnets:   128
Hosts:     1792
128 /28 blocks of 14 IPs each for hosts – a total of 1792 IPs for pods.
Activating VPC CNI Prefix Assignment Mode in AWS EKS
Documentation – Increase the number of available IP addresses for your Amazon EC2 nodes.
All you need to do is to change the value of the ENABLE_PREFIX_DELEGATION variable in the aws-node DaemonSet:
$ kubectl set env daemonset aws-node -n kube-system ENABLE_PREFIX_DELEGATION=true
When using the terraform-aws-modules/eks/aws Terraform module, this can be done through configuration_values for the vpc-cni AddOn:
...
module "eks" {
  ...
  cluster_addons = {
    coredns = {
      most_recent = true
    }
    kube-proxy = {
      most_recent = true
    }
    vpc-cni = {
      most_recent    = true
      before_compute = true
      configuration_values = jsonencode({
        env = {
          ENABLE_PREFIX_DELEGATION = "true"
          WARM_PREFIX_TARGET       = "1"
        }
      })
    }
  }
...
See examples.
Check it:
$ kubectl describe daemonset aws-node -n kube-system
...
    Environment:
      ...
      VPC_ID:                                 vpc-0fbaffe234c0d81ea
      WARM_ENI_TARGET:                        1
      WARM_PREFIX_TARGET:                     1
...
When using AWS Managed NodeGroups, the new limit will be set automatically.
In general, the maximum number of Pods will depend on the type of instance and the number of vCPUs on it – 110 pods for every 10 cores (see Kubernetes scalability thresholds). But there are also limits that are set by AWS itself.
For example, for a t3.nano with 2 vCPUs, this will be 34 Pods – let’s check it with the max-pod-calculator.sh script:
$ ./max-pods-calculator.sh --instance-type t3.nano --cni-version 1.9.0 --cni-prefix-delegation-enabled
34
On a c5.4xlarge with 16 vCPUs, it took 110 Pods:
$ ./max-pods-calculator.sh --instance-type c5.4xlarge --cni-version 1.9.0 --cni-prefix-delegation-enabled
110
And on the c5.24xlarge with 96 cores it will be 250 Pods, because this is already a limit from AWS:
$ ./max-pods-calculator.sh --instance-type c5.24xlarge --cni-version 1.9.0 --cni-prefix-delegation-enabled
250
Karpenter configuration
To set the maximum number of Pods on WorkerNodes created by Karpenter, use the maxPods option for NodePool:
...
        - key: karpenter.sh/capacity-type
          operator: In
          values: ["spot", "on-demand"]
      kubelet:
        maxPods: 110
...
I’m testing that on a test EKS cluster where there is currently only one node for CiritcalAddons, that’s it that regular Pods will not scheduled on it:
$ kk get node
NAME                          STATUS   ROLES    AGE   VERSION
ip-10-0-61-176.ec2.internal   Ready    <none>   2d    v1.28.5-eks-5e0fdde
To check it, let’s create a Deployment with 3 Pods:
apiVersion: apps/v1
kind: Deployment
metadata:
  name: nginx-deployment
  labels:
    app: nginx
spec:
  replicas: 3
  selector:
    matchLabels:
      app: nginx
  template:
    metadata:
      labels:
        app: nginx
    spec:
      containers:
      - name: nginx
        image: nginx:latest
        ports:
        - containerPort: 80
Deploy it, and Karpenter creates a single NodeClaim with a t3.small instance:
$ kk get nodeclaim
NAME            TYPE       ZONE         NODE   READY   AGE
default-w7g9l   t3.small   us-east-1a          False   3s
A couple of minutes, the Pods are up and running:
Now let’s scale Deployment up to 50 Pods:
$ kk scale deployment nginx-deployment --replicas=50
deployment.apps/nginx-deployment scaled
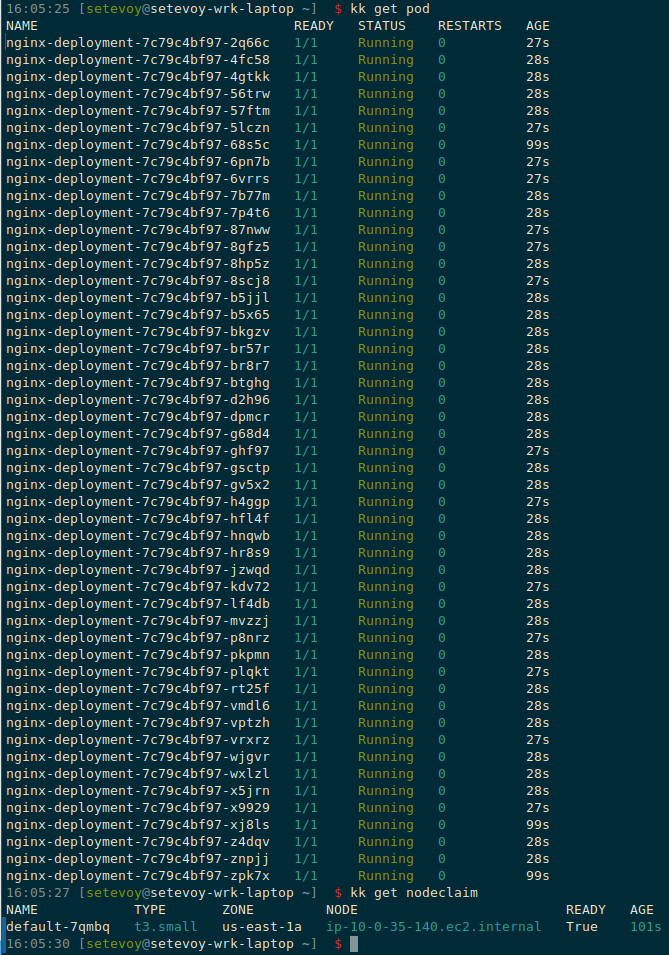
And we still have one NodeClaim with the same t3.small, but now it has 50 Pods running on it:
Of course, with this approach you should always set Pod requests so that each Pod will have enough CPU and Memory – the requests will now be the limits for the number of Pods on Nodes.


