 We have an Ubuntu server running one of our services. The service itself is still at the Proof of Concept stage, so we’re not moving it to Kubernetes yet – but sending traffic in plain text, especially when these are requests to AI Agents with prompts and responses, is not a great idea.
So, the task is to add NGINX as a proxy in front of the services running in Docker and configure TLS/SSL.
We’ll use Let’s Encrypt to get the certificate, and to avoid dealing with renewals every three months, we’ll add update automation through AWS Route 53, because the server lives in AWS and we keep the domain there as well.
The DNS validation scheme with AWS Route 53 is pretty old. I wrote about it before in the post OpenVPN: Let’s Encrypt DNS verification with certbot and AWS Route53, and certificate renewal in OpenVPN Access Server, but that was back in 2019, and there was no NGINX there.
A short note: technically, TLS is the correct term, not SSL – the last SSL version, SSL 3.0, was published back in 1996, while TLS is its modern replacement, with the current version 1.3 published in 2018 – see RFC 8446. But I’m more used to saying “SSL”, so I’ll use either SSL or TLS/SSL.
Contents
Installing NGINX on Ubuntu
So, we have an AWS EC2 instance with Ubuntu 24:
# cat /etc/os-release
PRETTY_NAME="Ubuntu 24.04.4 LTS"
NAME="Ubuntu"
VERSION_ID="24.04"
VERSION="24.04.4 LTS (Noble Numbat)"
Everything is standard here – update the package lists, install NGINX with apt, start the service and enable it on boot:
# apt update
# apt install -y nginx
# systemctl enable --now nginx
Check locally that everything works:
# curl -I http://127.0.0.1
HTTP/1.1 200 OK
Server: nginx/1.24.0 (Ubuntu)
Check and, if needed, open ports 80 and 443 in the AWS Security Group for this EC2 instance:

Now check through the domain and public IP:
# curl -I --connect-timeout 10 http://morpheus-agent.ops.example.co
HTTP/1.1 200 OK
Server: nginx/1.24.0 (Ubuntu)
...
Installing certbot for Let’s Encrypt
certbot is an ACME client (ACME – Automatic Certificate Management Environment) for working with certificates, and among other things it supports the Let’s Encrypt Certificate Authority.
There are many plugins for certbot itself. For AWS Route53 we need python3-certbot-dns-route53, and for NGINX – the standard python3-certbot-nginx.
Install the packages:
# apt install -y certbot python3-certbot-nginx python3-certbot-dns-route53
Check the client itself:
# certbot --version
certbot 2.9.0
And the plugins:
# certbot plugins
Saving debug log to /var/log/letsencrypt/letsencrypt.log

- - - - - - - - - - - - - - - - - - - - - - - - - - - - - - - - - - - - - - - -
* dns-route53
Description: Obtain certificates using a DNS TXT record (if you are using AWS
Route53 for DNS).
...

* nginx
Description: Nginx Web Server plugin
...
Configuring AWS IAM
For our client to be able to add validation records to the AWS Route 53 hosted DNS zone, it obviously needs the required permissions.
Let’s check the current AWS EC2 Instance Profile:
# aws --version
aws-cli/2.35.21 Python/3.14.6 Linux/6.17.0-1013-aws exe/x86_64.ubuntu.24
# aws sts get-caller-identity
{
    "UserId": "ARO***HHT:i-02569635c6284bb35",
    "Account": "492***148",
    "Arn": "arn:aws:sts::492***148:assumed-role/SSMInstanceProfile/i-02569635c6284bb35"
}
SSMInstanceProfile is the default AWS IAM Role for AWS Systems Manager, and, as expected, it doesn’t provide access to AWS Route 53:
# aws route53 list-hosted-zones-by-name \
  --query "HostedZones[?Name=='ops.example.co.' || Name=='example.co.'].[Name,Id]" \
  --output table

aws: [ERROR]: An error occurred (AccessDenied) when calling the ListHostedZonesByName operation: User: arn:aws:sts::492***148:assumed-role/SSMInstanceProfile/i-02569635c6284bb35 is not authorized to perform: route53:ListHostedZonesByName because no identity-based policy allows the route53:ListHostedZonesByName action
So we’ll create our own IAM Role with access to SSM and a specific DNS Zone.
Creating an AWS IAM Role
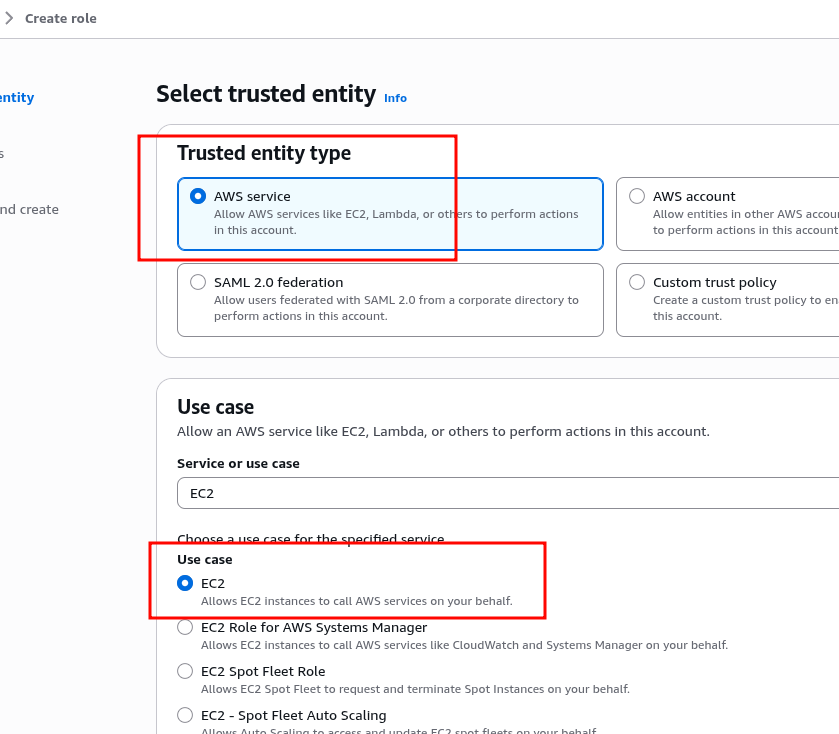
Go to AWS IAM > IAM Roles and add a new role.
For Trusted entity, keep the default AWS service value. In Use case, don’t change anything either and leave EC2 selected:
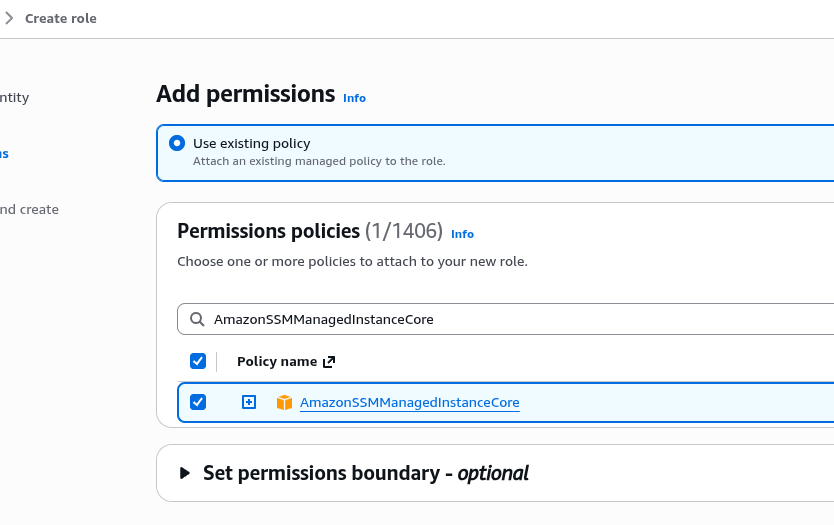
To keep SSM working, immediately add the AWS Managed IAM Policy AmazonSSMManagedInstanceCore – and then we’ll add our own policy for AWS Route 53:
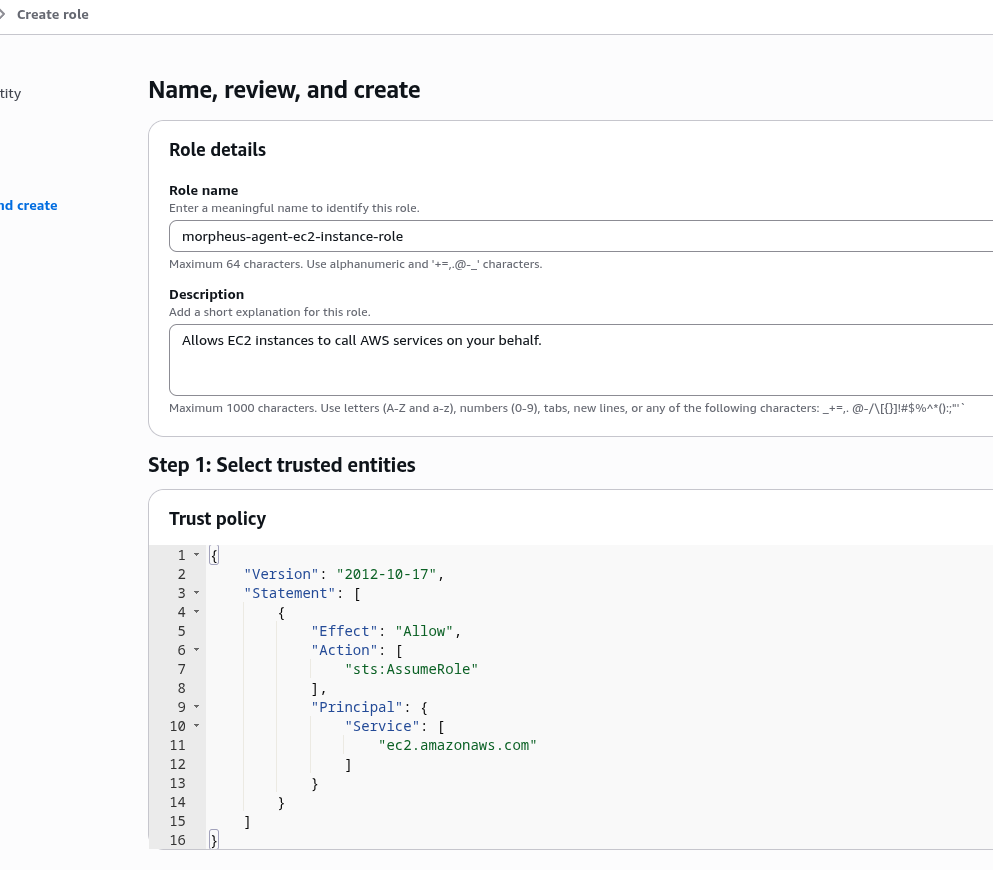
Save it:
Creating an IAM Policy for Route 53
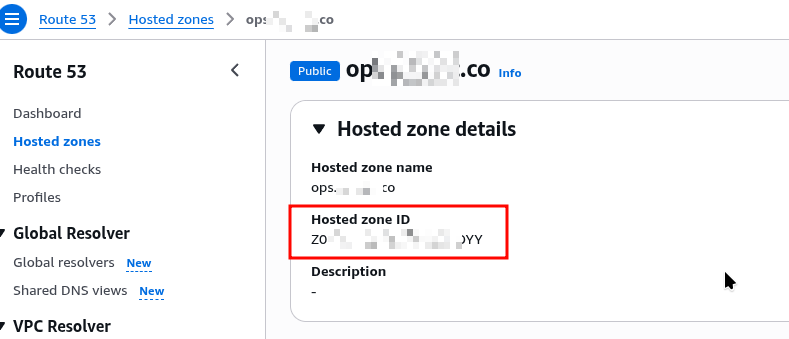
To limit access to a specific DNS zone – because certbot both adds and removes records, and there’s no point giving it access everywhere – find the Hosted Zone ID in Route 53:
Go to IAM > Policies and create a new one.
Replace the default value:
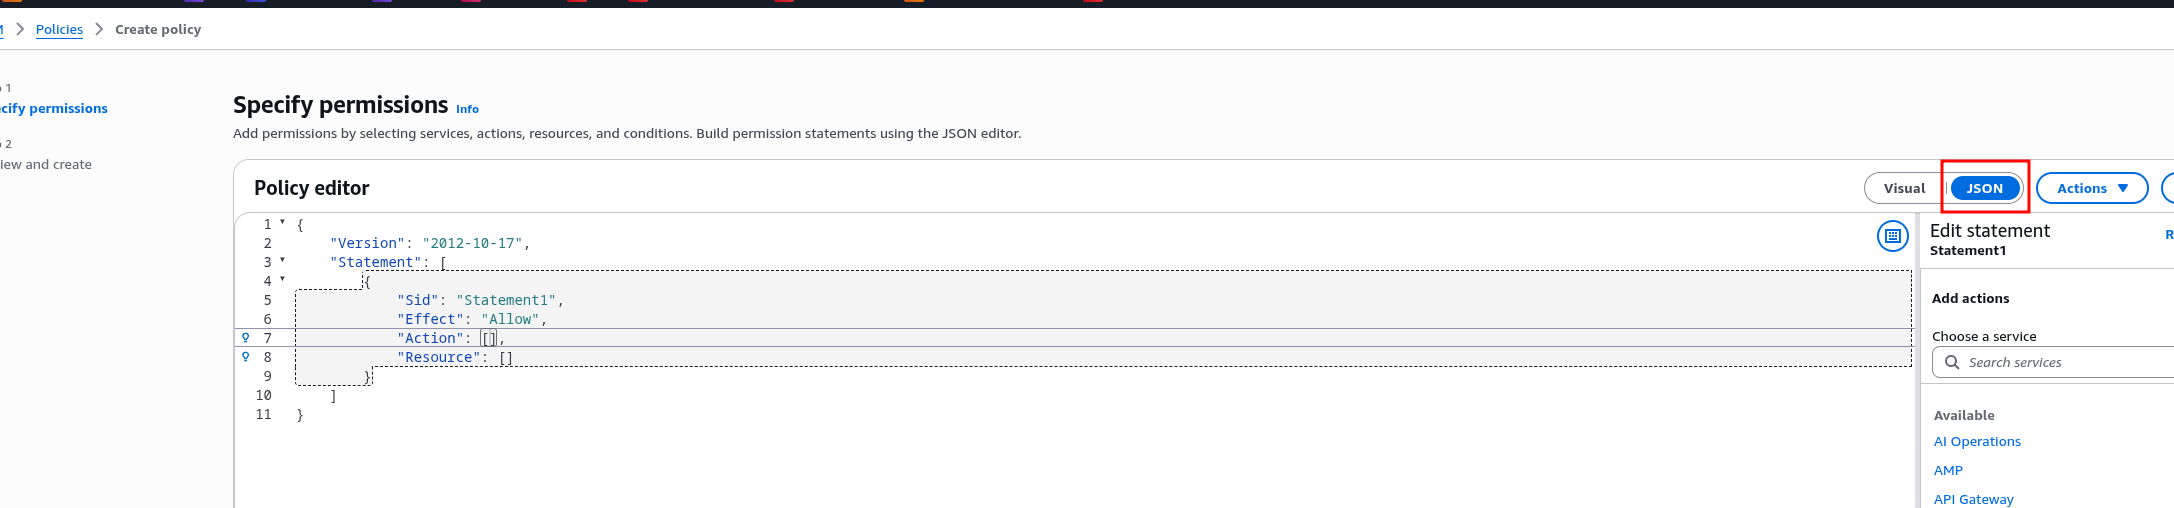
With our own policy, which allows reading all zones in Route 53, but limits edit permissions to a specific <HOSTED_ZONE_ID> only:
{
  "Version": "2012-10-17",
  "Statement": [
    {
      "Sid": "DiscoverHostedZone",
      "Effect": "Allow",
      "Action": [
        "route53:ListHostedZones",
        "route53:ListHostedZonesByName"
      ],
      "Resource": "*"
    },
    {
      "Sid": "ManageAcmeChallenge",
      "Effect": "Allow",
      "Action": "route53:ChangeResourceRecordSets",
      "Resource": "arn:aws:route53:::hostedzone/<HOSTED_ZONE_ID>",
      "Condition": {
        "ForAllValues:StringEquals": {
          "route53:ChangeResourceRecordSetsRecordTypes": [
            "TXT"
          ],
          "route53:ChangeResourceRecordSetsActions": [
            "CREATE",
            "UPSERT",
            "DELETE"
          ]
        }
      }
    },
    {
      "Sid": "CheckDnsChange",
      "Effect": "Allow",
      "Action": "route53:GetChange",
      "Resource": "arn:aws:route53:::change/*"
    }
  ]
}
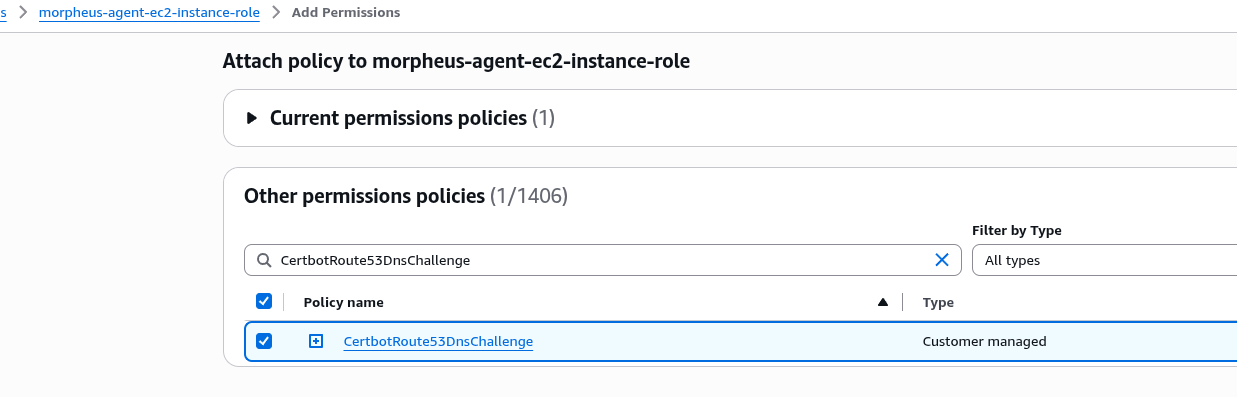
Save the policy as, for example, CertbotRoute53DnsChallenge, go back to the IAM Role we created above, and use Attach Policies to add the IAM Policy:

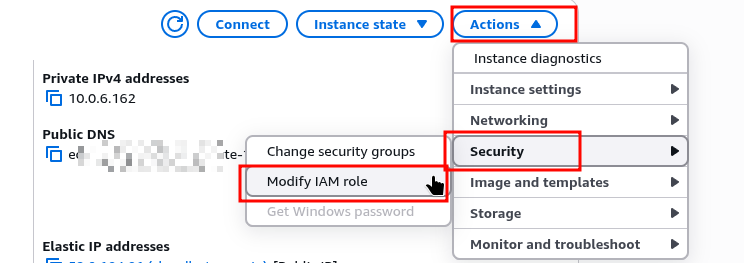
Go to the EC2 instance, then Actions > Security > Modify IAM Role:
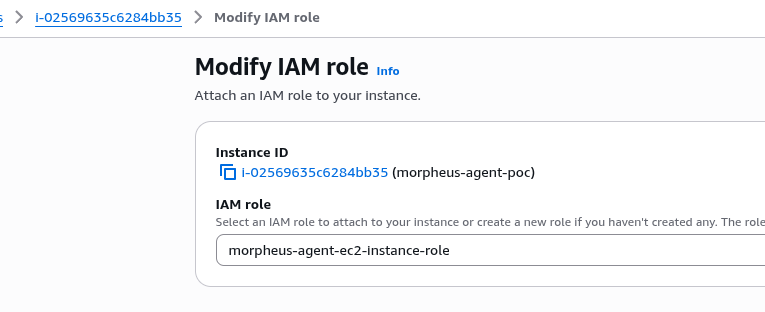
Attach the new role:
Now check access to Route 53:
# aws route53 list-hosted-zones-by-name --query "HostedZones[?Name=='ops.example.co.'].[Name,Id]"
[
    [
        "ops.example.co.",
        "/hostedzone/Z02***OYY"
    ]
]
And now we’re ready to configure NGINX.
Getting a TLS certificate with certbot
Get the certificate and specify the --dns-route53 option – certbot will go to AWS itself and create all the records required for domain validation:
# certbot certonly \
  --dns-route53 \
  --domain morpheus-agent.ops.example.co \
  --email [email protected] \
  --agree-tos \
  --no-eff-email
Saving debug log to /var/log/letsencrypt/letsencrypt.log
Account registered.
Requesting a certificate for morpheus-agent.ops.example.co

Successfully received certificate.
Certificate is saved at: /etc/letsencrypt/live/morpheus-agent.ops.example.co/fullchain.pem
Key is saved at:         /etc/letsencrypt/live/morpheus-agent.ops.example.co/privkey.pem
Check that certbot renew will work:
# certbot renew --dry-run
Saving debug log to /var/log/letsencrypt/letsencrypt.log

- - - - - - - - - - - - - - - - - - - - - - - - - - - - - - - - - - - - - - - -
Processing /etc/letsencrypt/renewal/morpheus-agent.ops.example.co.conf
- - - - - - - - - - - - - - - - - - - - - - - - - - - - - - - - - - - - - - - -
Account registered.
Simulating renewal of an existing certificate for morpheus-agent.ops.example.co

- - - - - - - - - - - - - - - - - - - - - - - - - - - - - - - - - - - - - - - -
Congratulations, all simulated renewals succeeded:
Configuring an NGINX Virtual Host
Our service is running in Docker on port 3001:
# docker ps --format 'table {{.Names}}\t{{.Ports}}'
NAMES                                               PORTS
...
app-hub                                             0.0.0.0:3001->3000/tcp, [::]:3001->3000/tcp
...
Create the /etc/nginx/sites-available/morpheus-agent.ops.example.co file.
As usual – redirect requests to port 80 to 443/SSL, set the certificate paths, and in proxy_pass set port 3001 for our service in Docker:
server {
    listen 80;
    listen [::]:80;

    server_name morpheus-agent.ops.example.co;

    return 301 https://$host$request_uri;
}

server {
    listen 443 ssl;
    listen [::]:443 ssl;

    server_name morpheus-agent.ops.example.co;

    ssl_certificate /etc/letsencrypt/live/morpheus-agent.ops.example.co/fullchain.pem;
    ssl_certificate_key /etc/letsencrypt/live/morpheus-agent.ops.example.co/privkey.pem;

    ssl_protocols TLSv1.2 TLSv1.3;
    ssl_session_cache shared:SSL:10m;
    ssl_session_timeout 1d;

    access_log /var/log/nginx/morpheus-agent.access.log;
    error_log /var/log/nginx/morpheus-agent.error.log;

    location / {
        proxy_pass http://127.0.0.1:3001;
        proxy_http_version 1.1;

        proxy_set_header Host $host;
        proxy_set_header X-Real-IP $remote_addr;
        proxy_set_header X-Forwarded-For $proxy_add_x_forwarded_for;
        proxy_set_header X-Forwarded-Proto $scheme;

        proxy_set_header Upgrade $http_upgrade;
        proxy_set_header Connection "upgrade";

        proxy_read_timeout 300s;
        proxy_send_timeout 300s;
    }
}
I’ve always disliked this Ubuntu setup with manual symlinks, and for myself I usually do it the normal way, simply through configuration files in /etc/nginx/conf.d – but let’s keep the “default” approach here.
Create a symlink from /etc/nginx/sites-available/ to /etc/nginx/sites-enabled/:
# ln -s /etc/nginx/sites-available/morpheus-agent.ops.example.co \
  /etc/nginx/sites-enabled/morpheus-agent.ops.example.co
Check the configuration syntax and reload the configs:
# nginx -t
nginx: the configuration file /etc/nginx/nginx.conf syntax is ok
nginx: configuration file /etc/nginx/nginx.conf test is successful

# systemctl reload nginx
Now check over HTTPS:
# curl -I https://morpheus-agent.ops.example.co
HTTP/1.1 404 Not Found
404 is fine here – the important part is that there are no SSL errors.
We can also check with openssl to see more information about our certificate:
# openssl s_client \
  -connect morpheus-agent.ops.example.co:443 \
  -servername morpheus-agent.ops.example.co \
  </dev/null 2>/dev/null |
openssl x509 -noout \
  -subject \
  -issuer \
  -dates \
  -serial \
  -fingerprint \
  -sha256 \
  -ext subjectAltName
subject=CN = morpheus-agent.ops.example.co
issuer=C = US, O = Let's Encrypt, CN = YE2
notBefore=Aug 11 13:32:07 2026 GMT
notAfter=Nov  9 13:32:06 2026 GMT
serial=06BA69E938D84355CCDF27689AA265DD9926
sha256 Fingerprint=11:E0:E0:D0:F6:A1:15:43:1B:A4:DE:DF:14:7A:23:63:AF:BA:71:1E:7C:CF:42:A1:CC:26:C9:44:BE:8C:F2:17
X509v3 Subject Alternative Name:
    DNS:morpheus-agent.ops.example.co
Everything works, everything is ready.
