 In Kubernetes, we run GitHub Runner for the build and deploy of our Backend API, see GitHub Actions: Running Actions Runner Controller in Kubernetes.
But over time, we noticed that there was too much traffic on the NAT Gateway – see VictoriaLogs: a Grafana dashboard for AWS VPC Flow Logs – migrating from Grafana Loki.
Contents
Problem: traffic to AWS NAT Gateway
When we started checking, we found an interesting detail:
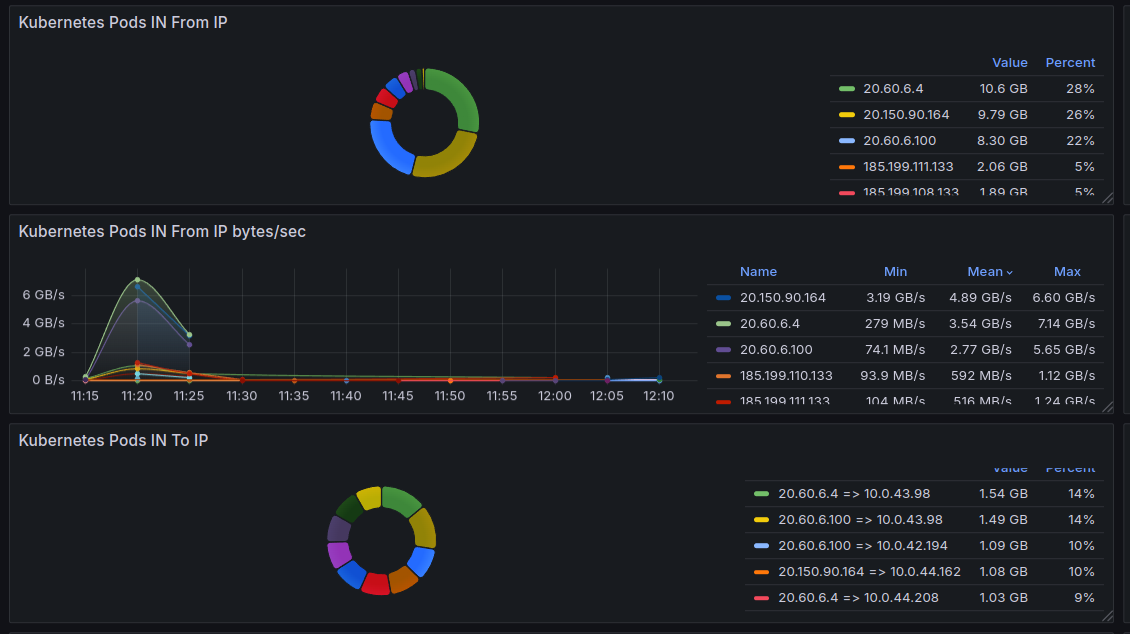
Here, 40.8 gigabytes of data passed through the GW NAT in an hour, 40.7 of which was Ingress.
Out of these 40 GB, there are three Remote IPs at the top, each of which sent us almost 10 GB of traffic (the table on the bottom left of the screenshot above).
The top Remote IPs are ours:
Remote IP       Value     Percent
------------------------------
20.60.6.4       10.6 GB    28%
20.150.90.164   9.79 GB    26%
20.60.6.100     8.30 GB    22%
185.199.111.133 2.06 GB    5%
185.199.108.133 1.89 GB    5%
185.199.110.133 1.78 GB    5%
185.199.109.133 1.40 GB    4%
140.82.114.4    805  MB    2%
146.75.28.223   705  MB    2%
54.84.248.61    267  MB    1%
And in terms of Kubernetes traffic, we have four Kubernetes Pods IPs in the top:
Source IP        Pod IP      Value  Percent
-----------------------------------------------
20.60.6.4     => 10.0.43.98  1.54 GB  14%
20.60.6.100   => 10.0.43.98  1.49 GB  14%
20.60.6.100   => 10.0.42.194 1.09 GB  10%
20.150.90.164 => 10.0.44.162 1.08 GB  10%
20.60.6.4     => 10.0.44.208 1.03 GB  9%
And all of these IPs belong to GitHub Runners, and the “kraken” in the name is exactly the runners for the builds and deploys of our kraken project, the Backend:
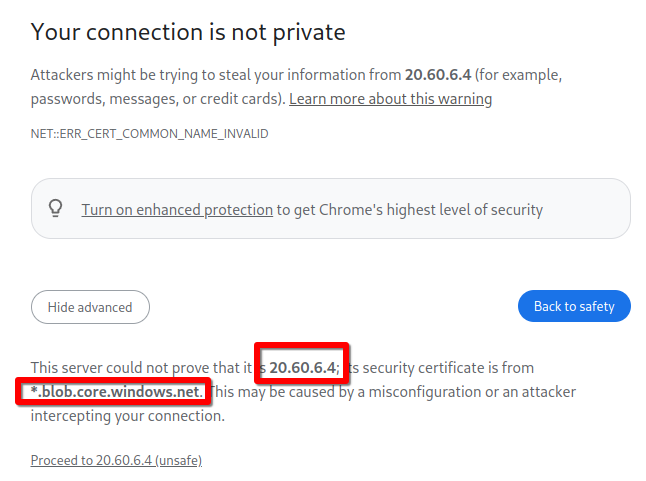
Further – more interesting: if you check the IP https://20.60.6.4 in your browser, you will see an interesting hostname:
*.blob.core.windows.net???
Sta. I was very surprised, because we build in Python, and there are no libraries from Microsoft. But then I had an idea: since we use PiP and Docker caching in GitHub Actions for Backend API builds, it’s most likely GitHub storage, and it’s from there that we pull these caches to Kubernetes.
A similar check of 185.199.111.133 and 140.82.114.4 shows us *.github.io, and 54.84.248.61 is the athena.us-east-1.amazonaws.com.
So, what we decided to do was to run local caching in Kubernetes with Sonatype Nexus, and use it as a proxy for the PyPI.org and for Docker Hub images.
We’ll talk about Docker caching next time, but for now, we will:
- test Nexus locally with Docker on a work machine
- run Nexus in Kubernetes from the Helm-chart
- configure and test the PyPI cache for builds
- and see the results
Nexus: testing locally with Docker
Start the Nexus:
$ docker run -ti --rm --name nexus -p 8081:8081 sonatype/nexus3
Wait a few minutes because Nexus is Java-based, so it takes some time to start.
Get the admin password:
$ docker exec -ti nexus cat /nexus-data/admin.password
6221ad20-0196-4771-b1c7-43df355c2245
In a browser, go to the http://localhost:8081, and log in:
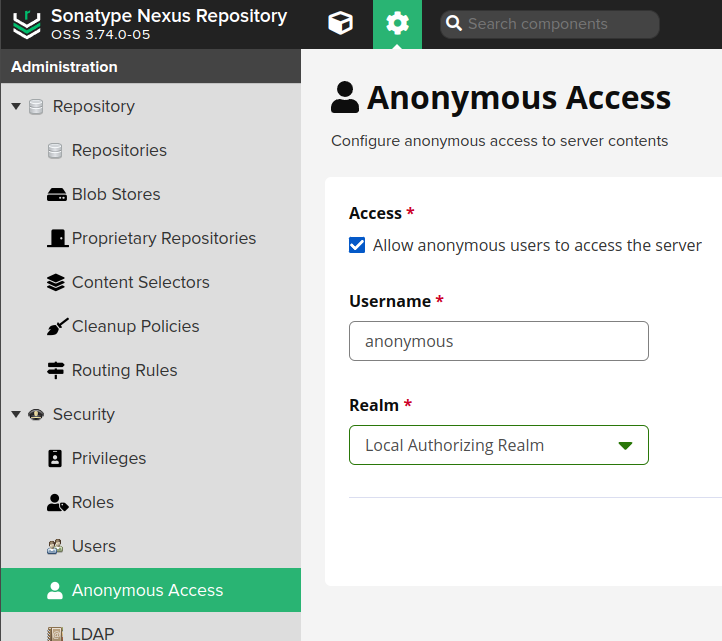
If you haven’t done so in the Setup wizard, then go to the Security > Anonymous access, and allow connection without authentication:
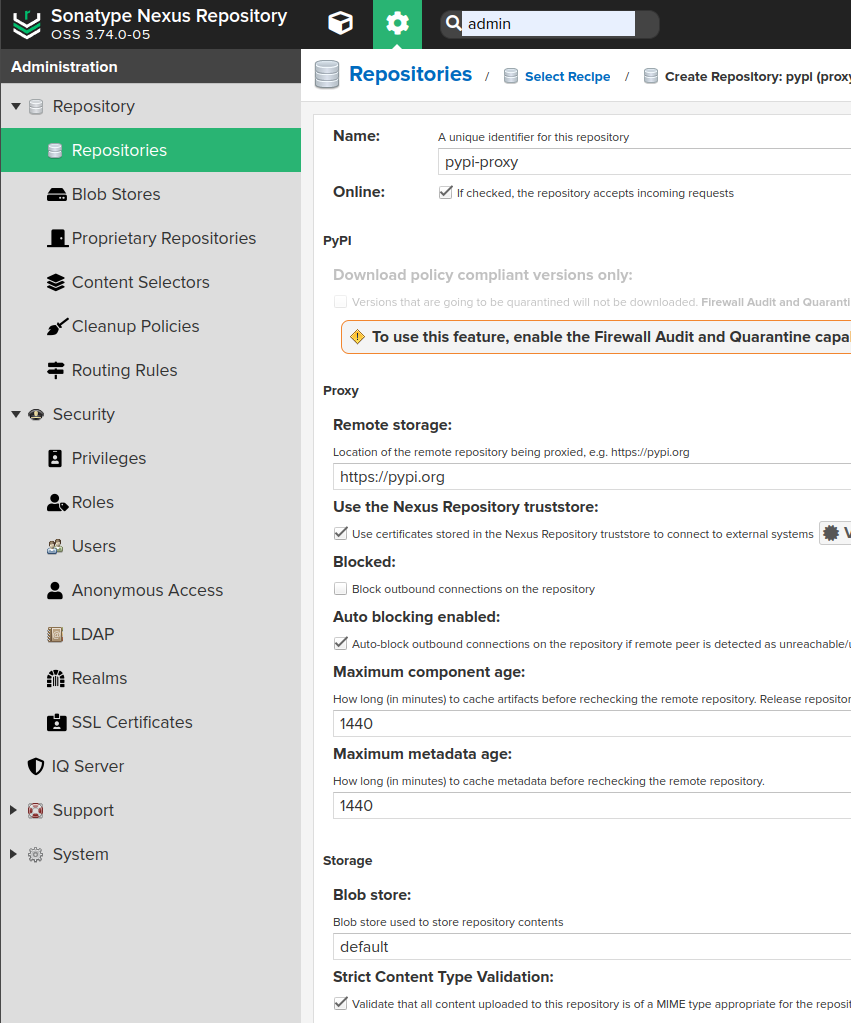
Adding a pypi (proxy) repository
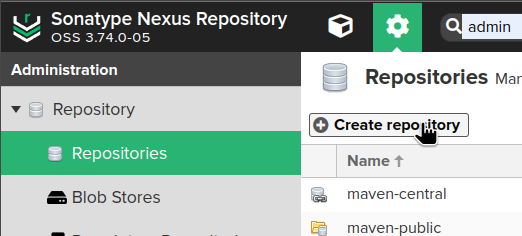
Go to Settings > Repositories, click Create repository:
Choose the pypi (proxy) type:
Create a repository:
- Name:
pypi-proxy - Remote storage:
https://pypi.org - Blob store:
default
At the bottom, click Create repository.
Let’s check what data we have now in the default Blob storage. Go to the Nexus container:
$ docker exec -ti nexus bash
bash-4.4$
And look at the /nexus-data/blobs/default/content/ directory, and it’s empty now, no data stored yet:
bash-4.4$ ls -l /nexus-data/blobs/default/content/
total 8
drwxr-xr-x 3 nexus nexus 4096 Nov 27 11:02 directpath
drwxr-xr-x 2 nexus nexus 4096 Nov 27 11:02 tmp
Checking the Nexus PyPI cache
Now let’s check if our proxy cache is working.
Find the IP of the container from the Nexus:
$ docker inspect nexus | jq '.[].NetworkSettings.IPAddress'
"172.17.0.2"
Run another container with Python:
$ docker run -ti --rm python bash
root@addeba5d307c:/#
And run pip install --index-url http://172.17.0.2:8081/repository/pypi-proxy/simple setuptools --trusted-host 172.17.0.2
root@addeba5d307c:/# time pip install --index-url http://172.17.0.2:8081/repository/pypi-proxy/simple  setuptools  --trusted-host 172.17.0.2
Looking in indexes: http://172.17.0.2:8081/repository/pypi-proxy/simple
Collecting setuptools
  Downloading http://172.17.0.2:8081/repository/pypi-proxy/packages/setuptools/75.6.0/setuptools-75.6.0-py3-none-any.whl (1.2 MB)
     ━━━━━━━━━━━━━━━━━━━━━━━━━━━━━━━━━━━━━━━━ 1.2/1.2 MB 81.7 MB/s eta 0:00:00
Installing collected packages: setuptools
Successfully installed setuptools-75.6.0
...
real    0m2.595s
...
You can see that the Downloading process was completed, and it took 2.59 seconds.
Let’s see what we have now in the default Blob storage in Nexus:
bash-4.4$ ls -l /nexus-data/blobs/default/content/
total 20
drwxr-xr-x 3 nexus nexus 4096 Nov 27 11:02 directpath
drwxr-xr-x 2 nexus nexus 4096 Nov 27 11:21 tmp
drwxr-xr-x 3 nexus nexus 4096 Nov 27 11:21 vol-05
drwxr-xr-x 3 nexus nexus 4096 Nov 27 11:21 vol-19
drwxr-xr-x 3 nexus nexus 4096 Nov 27 11:21 vol-33
Some data has already appeared, okay.
Let’s test with the pip again – first, let’s remove the installed package:
root@addeba5d307c:/# pip uninstall setuptools
And install it again, but this time add the --no-cache-dir argument to avoid using the local cache in the container:
root@5dc925fe254f:/# time pip install --no-cache-dir --index-url http://172.17.0.2:8081/repository/pypi-proxy/simple setuptools --trusted-host 172.17.0.2
Looking in indexes: http://172.17.0.2:8081/repository/pypi-proxy/simple
Collecting setuptools
  Downloading http://172.17.0.2:8081/repository/pypi-proxy/packages/setuptools/75.6.0/setuptools-75.6.0-py3-none-any.whl (1.2 MB)
     ━━━━━━━━━━━━━━━━━━━━━━━━━━━━━━━━━━━━━━━━ 1.2/1.2 MB 942.9 MB/s eta 0:00:00
Installing collected packages: setuptools
Successfully installed setuptools-75.6.0
...
real    0m1.589s
Now it took 1.52 seconds instead of 2.59.
Okay – does everything seem to be working?
Let’s get Nexus up and running on Kubernetes.
Running Nexus on Kubernetes
There’s a chart called stevehipwell/nexus3.
You can write manifests yourself, or you can try this chart.
What we may be interested in from the chart’s values:
config.anonymous.enabled: Nexus will work locally in Kubernetes with access only via a ClusterIP, so while it is in PoC and purely for PiP cache – you can do it without authenticationconfig.blobStores: you can leave it as it is for now, but later you can connect a separate EBS or AWS Elastic File System, see also thepersistence.enabledconfig.job.tolerationsandnodeSelector: to use if you need to run Nexus on a dedicated Node, see Kubernetes: Pods and WorkerNodes – control the placement of the Pods on the Nodesconfig.repos: create repositories directly through valuesingress.enabled: not our case, but it is possiblemetrics.enabled: later you can look at the monitoring
First, let’s set it up with the default parameters, then we’ll add our own values.
Add the repository:
$ helm repo add stevehipwell https://stevehipwell.github.io/helm-charts/
"stevehipwell" has been added to your repositories
Create a separate namespace ops-nexus-ns:
$ kk create ns ops-nexus-ns namespace/ops-nexus-ns created
Install the chart:
$ helm -n ops-nexus-ns upgrade --install nexus3 stevehipwell/nexus3
It took about 5 minutes to start – I was thinking of dropping the chart and writing it myself, but eventually, it started – well, Java.
Let’s check what we have here:
$ kk -n ops-nexus-ns get all
NAME           READY   STATUS    RESTARTS   AGE
pod/nexus3-0   4/4     Running   0          6m5s

NAME                TYPE        CLUSTER-IP       EXTERNAL-IP   PORT(S)    AGE
service/nexus3      ClusterIP   172.20.160.147   <none>        8081/TCP   6m5s
service/nexus3-hl   ClusterIP   None             <none>        8081/TCP   6m5s

NAME                      READY   AGE
statefulset.apps/nexus3   1/1     6m6s
Adding Admin user password
Create a Kubernetes Secret with a password:
$ kk -n ops-nexus-ns create secret generic nexus-root-pass --from-literal=password=p@ssw0rd
secret/nexus-root-pass created
Create a new file nexus-values.yaml, set the name of the Kubernetes Secret and the key with the password, enable Anonymous Access:
rootPassword:
  secret: nexus-root-password
  key: password

  config:
    enabled: true
    anonymous:
      enabled: true
Adding a repository to Nexus using Helm chart values
It took a little bit of “poking and prodding”, but it worked.
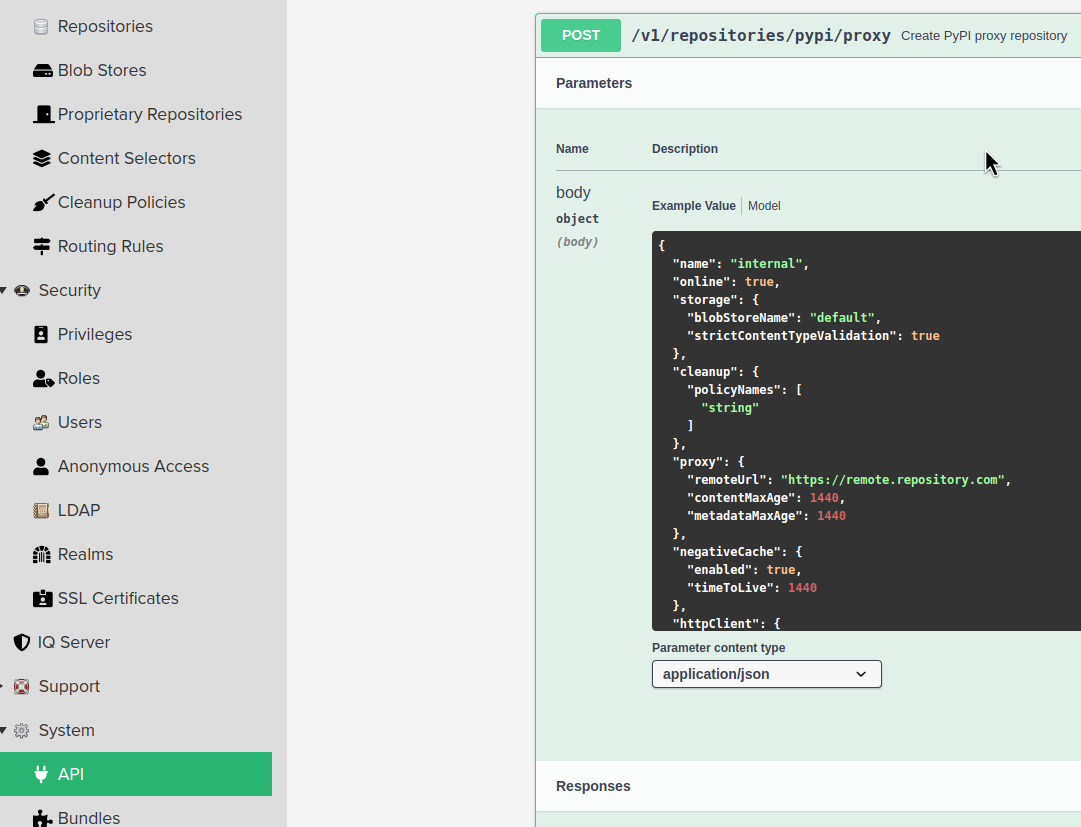
So, the values.yaml of the chart says: “Repository configuration; based on the REST API (API reference docs require an existing Nexus installation and can be found at **Administration** under _System_ → _API_) but with `format` & `type` defined in the object.”
Let’s take a look at the Nexus API specification – which fields are passed with the API request:
The Format and the Type.
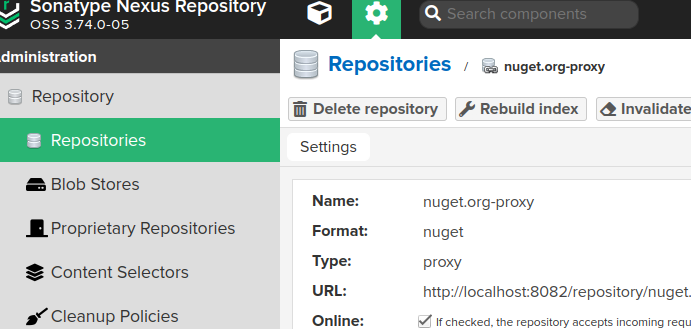
The Format and Type fields can be found in any existing repository:
Describe the repository and other necessary parameters – for me, it looks like this:
rootPassword:
  secret: nexus-root-password
  key: password

persistence:
  enabled: true
  storageClass: gp2-retain

resources:
  requests:
    cpu: 1000m
    memory: 1500Mi

config:
  enabled: true
  anonymous:
    enabled: true
  repos:
    - name: pip-cache
      format: pypi
      type: proxy
      online: true
      negativeCache:
        enabled: true
        timeToLive: 1440
      proxy:
        remoteUrl: https://pypi.org
        metadataMaxAge: 1440
        contentMaxAge: 1440
      httpClient:
        blocked: false
        autoBlock: true
        connection:
        retries: 0
        useTrustStore: false
      storage:
        blobStoreName: default
        strictContentTypeValidation: false
This is a fairly simple setup, and I’ll do some tuning later if necessary. But it’s already works.
Let’s deploy it:
$ helm -n ops-nexus-ns upgrade --install nexus3 stevehipwell/nexus3 -f nexus-values.yml
In case of errors like “Could not create repository“:
$ kk -n ops-nexus-ns logs -f nexus3-config-9-2cssf
Configuring Nexus3...
Configuring anonymous access...
Anonymous access configured.
Configuring blob stores...
Configuring scripts...
Script 'cleanup' updated.
Script 'task' updated.
Configuring cleanup policies...
Configuring repositories...
ERROR: Could not create repository 'pip-cache'.
Check the logs – Nexus wants to have set almost all fields in the values, in this case config.repos.httpClient.contentMaxAge was missing:
nexus3-0:nexus3 2024-11-27 12:34:16,818+0000 WARN [qtp554755438-84] admin org.sonatype.nexus.siesta.internal.resteasy.ResteasyViolationExceptionMapper - (ID af473d22-3eca-49ea-adb9-c7985add27e7) Response: [400] '[ValidationErrorXO{id='PARAMETER strictContentTypeValidation', message='must not be null'}, ValidationErrorXO{id='PARAMETER negativeCache', message='must not be null'}, ValidationErrorXO{id='PARAMETER metadataMaxAge', message='must not be null'}, ValidationErrorXO{id='PARAMETER contentMaxAge'[]ust not be null]arg0.httpClient]ntMaxAge]]TypeValidation]TER httpClient', message='must not be null'}]'; mapped from: [PARAMETER]
During deploy, when we set the config.enabled=true parameter, the chart launches another Kubernetes Pod that actually performs the Nexus configuration.
Let’s check the access and the repository – open a local port:
$ kk -n ops-nexus-ns port-forward pod/nexus3-0 8082:8081
Forwarding from 127.0.0.1:8082 -> 8081
Forwarding from [::1]:8082 -> 8081
Go to the http://localhost:8082/#admin/repository/repositories URL:
Nexus wants many resources, especially Memory, because again, it’s Java:
Therefore, it makes sense to set the requests to the values.
Checking Nexus in Kubernetes
Run a Pod with Python:
$ kk run pod --rm -i --tty --image python bash
If you don't see a command prompt, try pressing enter.
root@pod:/#
Find a Kubernetes Service for the Nexus:
$ kk -n ops-nexus-ns get svc
NAME        TYPE        CLUSTER-IP       EXTERNAL-IP   PORT(S)    AGE
nexus3      ClusterIP   172.20.160.147   <none>        8081/TCP   78m
nexus3-hl   ClusterIP   None             <none>        8081/TCP   78m
Run pip install again :
root@pod:/# time pip install --index-url http://nexus3.ops-nexus-ns.svc:8081/repository/pip-cache/simple setuptools --trusted-host nexus3.ops-nexus-ns.svc
Looking in indexes: http://nexus3.ops-nexus-ns.svc:8081/repository/pip-cache/simple
Collecting setuptools
  Downloading http://nexus3.ops-nexus-ns.svc:8081/repository/pip-cache/packages/setuptools/75.6.0/setuptools-75.6.0-py3-none-any.whl (1.2 MB)
     ━━━━━━━━━━━━━━━━━━━━━━━━━━━━━━━━━━━━━━━━ 1.2/1.2 MB 86.3 MB/s eta 0:00:00
Installing collected packages: setuptools
Successfully installed setuptools-75.6.0
...

real    0m3.958s
Installed setuptools-75.6.0 in 3.95 seconds.
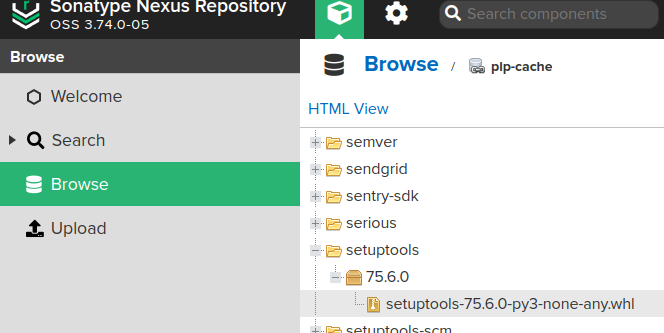
Let’s check at http://localhost:8082/#browse/browse:pip-cache:
Remove the setuptools from our Pod:
root@pod:/# pip uninstall setuptools
And install again, again with the --no-cache-dir:
root@pod:/# time pip install --no-cache-dir --index-url http://nexus3.ops-nexus-ns.svc:8081/repository/pip-cache/simple setuptools --trusted-host nexus3.ops-nexus-ns.svc
Looking in indexes: http://nexus3.ops-nexus-ns.svc:8081/repository/pip-cache/simple
Collecting setuptools
  Downloading http://nexus3.ops-nexus-ns.svc:8081/repository/pip-cache/packages/setuptools/75.6.0/setuptools-75.6.0-py3-none-any.whl (1.2 MB)
     ━━━━━━━━━━━━━━━━━━━━━━━━━━━━━━━━━━━━━━━━ 1.2/1.2 MB 875.9 MB/s eta 0:00:00
Installing collected packages: setuptools
Successfully installed setuptools-75.6.0
..

real    0m2.364s
Now it took 2.364s.
The only thing left to do is to update GitHub Workflows to disable any caches there, and add the use of Nexus.
GitHub and results for AWS NAT Gateway traffic
I won’t dwell on Workflow in details because it’s different for everyone, but in short, we disabled PiP caching:
...
    - name: "Setup: Python 3.10"
      uses: actions/setup-python@v5
      with:
        python-version: "3.10"
        # cache: 'pip'
        check-latest: "false"
        # cache-dependency-path: "**/*requirements.txt"
...
This will save about 540 megabytes on downloading the archive with the cache.
Next, we have a step that performs the pip install by calling make:
...
    - name: "Setup: Dev Dependencies"
      id: setup_dev_dependencies
      #run: make dev-python-requirements
      run: make dev-python-requirements-nexus
      shell: bash
...
And in the Makefile, I made a new task so that I could quickly return to the old configuration:
...
dev-python-requirements:
  python3 -m pip install --no-compile -r dev-requirements.txt

dev-python-requirements-nexus:
  python3 -m pip install --index-url http://nexus3.ops-nexus-ns.svc:8081/repository/pip-cache/simple --no-compile -r dev-requirements.txt --trusted-host nexus3.ops-nexus-ns.svc
...
In Workflow, disable any caches like actions/cache:
..
    # - name: "Setup: Get cached api-generator images"
    #   id: api-generator-cache
    #   uses: actions/cache@v4
    #   with:
    #     path: ~/_work/api-generator-cache
    #     key: api-generator-cache
...
Let’s compare the results.
The build with the old configuration, without Nexus and with GitHub caches – the traffic of the Kubernetes Pod runner that this build ran:
3.55 gigabytes of traffic, the build and deployment took 4 minutes and 11 seconds.
And the same GitHub Actions job, but with the changes merged and using Nexus and without GitHub caching.
In the logs, we can see that the packages are indeed taken from Nexus:
Traffic:
329 megabytes, the build deployment took 4 minutes and 20 seconds.
And that’s it for now.
What we will do next is to see how Nexus can be monitored, what metrics it has, and which ones can be used to make alerts, and then add more Docker cache, because we often encounter Docker Hub limits –“429 Too Many Requests – Server message: toomanyrequests: You have reached your pull rate limit. You can increase the limit by authenticating and upgrading.”
![]()


