![]() Actually, almost everything regarding my home NAS setup has been done – there is VPN access from various networks, different shares are available, and the security has been slightly tuned.
Actually, almost everything regarding my home NAS setup has been done – there is VPN access from various networks, different shares are available, and the security has been slightly tuned.
Two main things remain: monitoring and backups. Having a ZFS mirror on two disks with regular ZFS snapshots is, of course, great, but it is still not enough, so I want to additionally back up data somewhere to the cloud.
I especially felt the need to have access to cloud backups at the beginning of the war, when it was unclear where I would end up in an hour and whether I would be able to take at least some hardware with me.
Today we will think and plan how to make backups from Linux hosts to an NFS share and how to back up NFS and Samba data on FreeBSD. Moreover, I want to make backups to two independent storages – AWS S3 and Google Drive: S3 will be the primary one, and Google will be a backup copy (of the backup copy).
All posts in this series:
- FreeBSD: Home NAS, part 1 – configuring ZFS mirror (RAID1)
- FreeBSD: Home NAS, part 2 – introduction to Packet Filter (PF) firewall
- FreeBSD: Home NAS, part 3 – WireGuard VPN, Linux peer, and routing
- FreeBSD: Home NAS, part 4 – Local DNS with Unbound
- FreeBSD: Home NAS, part 5 – ZFS pool, datasets, snapshots, and ZFS monitoring
- FreeBSD: Home NAS, part 6 – Samba server and client connections
- FreeBSD: Home NAS, part 7 – NFSv4 and use with Linux clients
- (current) FreeBSD: Home NAS, part 8 – NFS and Samba data backup with restic
- FreeBSD: Home NAS, part 9 – data backup to AWS S3 and Google Drive with rclone
- FreeBSD: Home NAS, part 10 – monitoring with VictoriaMetrics and Grafana
- FreeBSD: Home NAS, part 11 – extended monitoring with additional exporters
- FreeBSD: Home NAS, part 12: synchronizing data with Syncthing
- FreeBSD: Home NAS, Part 13: Planning Data Storage and Backups
- FreeBSD: Home NAS, part 14 – logs with VictoriaLogs and alerts with VMAlert
- FreeBSD: Home NAS, Part 15: Automating Backups – scripts, rsync, rclone
- (to be continued)
Contents
Backup Planning
So, what I have:
- Linux hosts: home and work laptops – various photos, videos, music, work data, documents, SSH/GPG/etc keys, and system configs
- FreeBSD host: this is where Samba and NFS shares live, along with system data that needs to be preserved
NFS shares are connected to Linux hosts, which will perform backups here, and then these backups will be copied from FreeBSD to AWS S3 and Google Drive.
If represent this schematically, it may be like this:
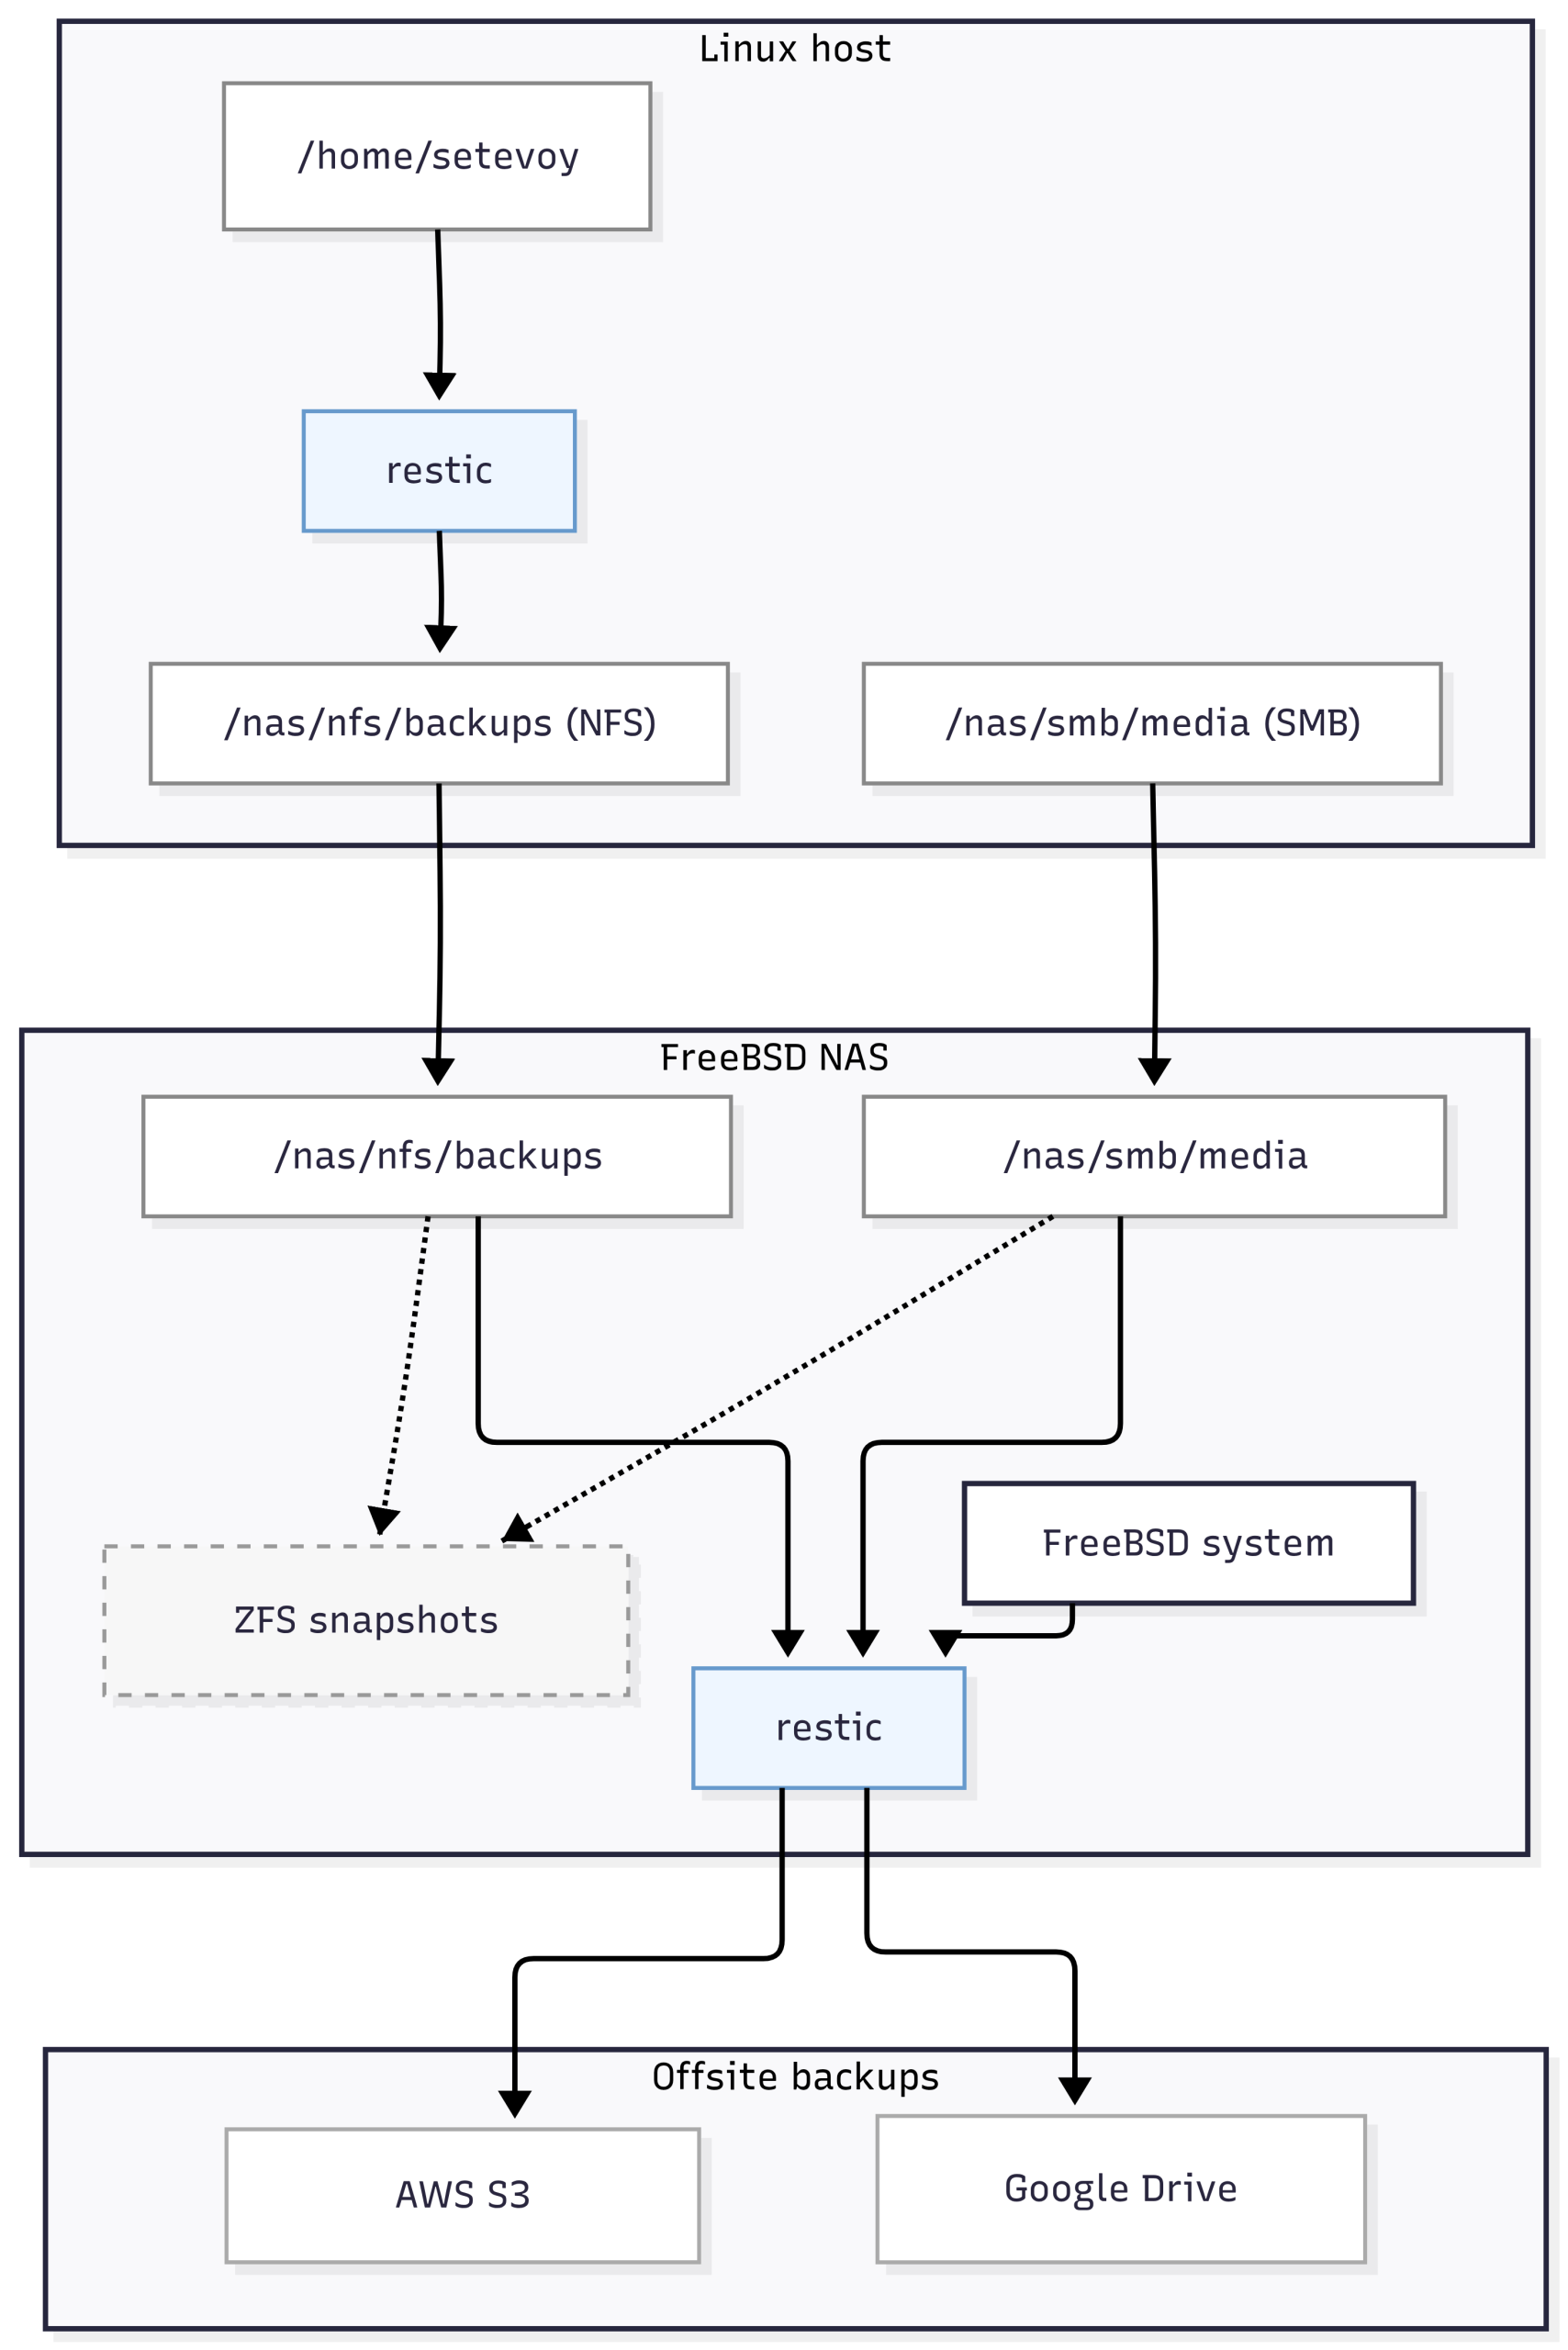
FreeBSD backup plan
While everything is more or less simple with laptops and Linux – we back up important data from /home/setevoy – the FreeBSD part should be planned separately, as there is more data here:
/nas/nfs/backups: backups of Linux hosts – copies must be stored in the cloud/nas/smb: there are two datasets here –/nas/smb/mediawith music/movies, and/nas/smb/privatewith private data; both should also be stored in the cloud- plus system backups of FreeBSD itself
A FreeBSD system backup can include:
/etcand/usr/local/etc: always having a copy of all configuration files/root: if there are files likenas-private-pass.key, which I use to encrypt and mount one of the datasets/var/db:pkgandjailsmetadata, sqlite/db files of certain services
Selecting Backup Utilities
At first, I thought about using Timeshift, but as it turned out, it doesn’t support remote storage and cannot save to NFS.
Therefore, I need to choose something that fits my needs:
- Multi-platform – FreeBSD, Linux, Windows
- Ability to perform full and incremental copying
- Ability to specify a list of directories and files to back up or skip via a config file
- Must have – CLI
- Optional – have a Web or standard GUI
- Ability to work with local file systems, NFS, or Samba, and additionally – ability to work with clouds
- Correct handling of permissions and file system ACLs, as file systems vary
- Optional – ability to encrypt backups
Of the options I reviewed, I liked restic the most, so I decided to try it.
Restic Overview
All its documentation is available at Restic Documentation and the Manual.
Main benefits of restic:
- Written in Golang, see GitHub restic
- Fairly simple command syntax for CLI
- Encryption and data compression out of the box
- Incremental backups via proprietary snapshots
- Works out of the box with NFS and AWS S3, see Storage Backends
- Can work with other backends via
rclone, andrclonesupports a vast number of backend options (see Supported providers) - Third-party Web UI available – Backrest
- Clients available for all systems – Linux, FreeBSD, macOS, Windows (see Installation)
Install on Arch Linux:
$ sudo pacman -S restic
And on FreeBSD:
# pkg install restic
The examples in this post will be from Linux, but there is no fundamental difference – the client works identically on all platforms.
Restic Repositories and Snapshots
Documentation – Preparing a new repository and Repository Format.
Data in restic is organized into repositories: each repository is a separate directory containing the repository configuration, indexes, and encrypted data.
When creating a backup, restic forms its own logical snapshots. Data is broken down into independent blocks (blobs), which are the basic units of storage in the repository.
During subsequent backups, restic checks which specific blocks have been changed and copies only those. For blocks of data that have not changed, it creates links from the new snapshot, thus optimizing occupied disk space.
So the process here is similar to ZFS snapshots – except that in ZFS, links are created to blocks of the file system itself and original data, while in restic, they are created to its own data blocks in the repository directory.
Moreover, restic stores data in its own format, so we are not dependent on the file system – we create a backup from ext4, copy it to ZFS, store it in S3, and restore it on, God forbid, Windows with NTFS. The only thing we will need is the restic client.
Create a test repository:
$ restic init --repo test-repo
enter password for new repository:
enter password again:
created restic repository 50ef450308 at test-repo
Check the contents:
$ ll test-repo/
total 24
-r--------   1 setevoy setevoy  155 Jan  1 16:47 config
drwx------ 258 setevoy setevoy 4096 Jan  1 16:47 data
drwx------   2 setevoy setevoy 4096 Jan  1 16:47 index
drwx------   2 setevoy setevoy 4096 Jan  1 16:47 keys
drwx------   2 setevoy setevoy 4096 Jan  1 16:47 locks
drwx------   2 setevoy setevoy 4096 Jan  1 16:47 snapshots
Restic and Data Encryption
Documentation – Keys, Encryption and MAC.
Each repository has a key used to access encrypted data:
$ restic key list --repo test-repo
enter password for repository:
repository 50ef4503 opened (version 2, compression level auto)
 ID        User     Host          Created
-----------------------------------------------------
*0ca1c659  setevoy  setevoy-work  2026-01-01 16:49:49
-----------------------------------------------------
Data encryption is performed with a master key stored in the repository:
$ restic -r test-repo cat masterkey
enter password for repository:
repository 50ef4503 opened (version 2, compression level auto)
{
  "mac": {
    "k": "v1PIB3bB1VW46oWWBtKQYA==",
    "r": "Tia4a7HGs7PmN1EzWoWh4g=="
  },
  "encrypt": "0c3l/00P3dTgdbAqPZApAYn7E/MiloqOXyQsYr6AGOA="
}
User keys data are used to gain access to it:
$ cat test-repo/keys/0ca***f3a | jq
{
  "created": "2026-01-01T16:49:49.010471345+02:00",
  "username": "setevoy",
  "hostname": "setevoy-work",
  "kdf": "scrypt",
  "N": 32768,
  "r": 8,
  "p": 9,
  "salt": "F3G***50Q==",
  "data": "rjw***FLQ=="
}
Here:
scrypt: KDF (Key Derivation Function) used to derive a cryptographic key from a password (see Scrypt Key Derivation Function)salt: salt with a random valuedata: encrypted master key – this is what is used to encrypt the data
When restic needs access to data in a repository – it takes the entered password and salt, passes them to the KDF, and forms a key used to decrypt the repository’s master key.
The master key, in turn, is applied to encrypt and decrypt keys that directly encrypt data and metadata in the repository.
You can have several different user keys (or access keys) used to obtain the master key.
If necessary, the password can be changed:
$ restic key passwd --repo test-repo/
enter password for repository:
repository 50ef4503 opened (version 2, compression level auto)
created new cache in /home/setevoy/.cache/restic
enter new password:
enter password again:
saved new key as <Key of setevoy@setevoy-work, created on 2026-01-01 16:49:49.010471345 +0200 EET m=+13.105722833>
When setting up backup automation – the password can be passed from the RESTIC_PASSWORD environment variable (see Environment Variables) or from a file via --password-file.
For example, to use a password from a file – let’s create a directory:
$ mkdir -p ~/.config/restic-test
$ chmod 700 ~/.config/restic-test/
Generate a password:
$ pwgen 32 1
xoo8eibia2ohch7Oat7zeeshahn0keic
And save it to the file ~/.config/restic-test/test-repo-password.
Set read access for the owner only:
$ chmod 600 ~/.config/restic-test/test-repo-password
Add a new key for the repository:
$ restic key add --repo test-repo
enter password for repository:
repository 50ef4503 opened (version 2, compression level auto)
enter new password:
enter password again:
saved new key with ID c08c993b87363c17526e98fd46aeaf14767fa051e3b0d87a32c0cecc50e361d4
Check the keys now:
[setevoy@setevoy-work ~/Projects/Restic]  $ restic key list --repo test-repo
enter password for repository:
repository 50ef4503 opened (version 2, compression level auto)
 ID        User     Host          Created
-----------------------------------------------------
*0ca1c659  setevoy  setevoy-work  2026-01-01 16:49:49
 c08c993b  setevoy  setevoy-work  2026-01-01 17:02:10
-----------------------------------------------------
In *0ca1c659, the asterisk indicates that the repository is currently opened with this key.
Try to open with the new key – the password from the file:
$ restic stats --repo test-repo --password-file ~/.config/restic-test/test-repo-password
repository 50ef4503 opened (version 2, compression level auto)
[0:00]          0 index files loaded
scanning...
Stats in restore-size mode:
     Snapshots processed:  0
              Total Size:  0 B
Restic Backup and Restore
Documentation – Backing up.
To create backups, we use the restic backup command, and for restoration, restic restore.
Back up the file /tmp/restic-test.txt to our repository:
$ restic backup /tmp/restic-test.txt --repo test-repo
repository 50ef4503 opened (version 2, compression level auto)
no parent snapshot found, will read all files
[0:00]          0 index files loaded

Files:           1 new,     0 changed,     0 unmodified
Dirs:            1 new,     0 changed,     0 unmodified
Added to the repository: 755 B (687 B stored)

processed 1 files, 13 B in 0:01
snapshot bf8def5f saved
Each time restic backup is called, a new snapshot is created in the repository, even if the source data hasn’t changed.
But, as mentioned earlier – if the data doesn’t change, the repository size doesn’t grow either, as restic will simply create a link from the new snapshot to the old data blocks.
When a part of the data changes – new blocks will be created only for the new data that this snapshot will be mapped to, while old links will remain for unchanged data in the new snapshot.
Check available snapshots:
$ restic snapshots --repo test-repo
repository 50ef4503 opened (version 2, compression level auto)
ID        Time                 Host          Tags        Paths                 Size
-----------------------------------------------------------------------------------
bf8def5f  2026-01-01 17:07:53  setevoy-work              /tmp/restic-test.txt  13 B
-----------------------------------------------------------------------------------
1 snapshots
Basic useful commands when working with repositories and snapshots:
restic stats: statistics for the repository or snapshotrestic check: check repository integrityrestic ls: view snapshot contentsrestic diff: compare data in two snapshotsrestic copy: copy contents of one repository to another
Special mention goes to --dry-run – to check what exactly will be performed and what data the operation will affect.
To restore data from a backup, we use restic restore and specify the snapshot ID and where to restore it.
If the destination directory doesn’t exist – restic will create it and restore the hierarchy of directories and files from the snapshot within it:
$ restic restore --repo test-repo bf8def5f --target /tmp/test-restic-restore
...
restoring snapshot bf8def5f of [/tmp/restic-test.txt] at 2026-01-01 17:07:53.016664301 +0200 EET by setevoy@setevoy-work to /tmp/test-restic-restore
Summary: Restored 2 files/dirs (13 B) in 0:00
Checking:
$ tree /tmp/test-restic-restore
/tmp/test-restic-restore
└── tmp
    └── restic-test.txt
Include and Exclude for Backup and Restore
When creating a backup with restic backup, we specify the path to be backed up, so there is no separate --include option.
However, there is --exclude, which can be used to specify which data not to include in the snapshot.
For example, we have a directory:
$ tree /tmp/restic-dir-test
/tmp/restic-dir-test
├── a.txt
└── sub
    └── b.txt
Back up this entire directory but skipping the file a.txt:
$ restic backup /tmp/restic-dir-test --exclude /tmp/restic-dir-test/a.txt --repo test-repo
Look into the snapshot – a.txt is not there:
$ restic ls dfd8271d --repo test-repo
...
/tmp
/tmp/restic-dir-test
/tmp/restic-dir-test/sub
/tmp/restic-dir-test/sub/b.txt
For restic restore, we can specify --include – what exactly to restore, as well as --exclude – which data to skip from the snapshot.
Instead of passing include/exclude via the CLI, you can describe all paths in files, one per line; see Including Files and Excluding Files.
Files can use comments and empty lines, for example, the file backup-nfs.list:
# MAIN
/home/setevoy/Photos
...

# dotdirs
/home/setevoy/.aws
...
Then call it as:
restic backup --files-from backup-nfs.list -r <REPO_NAME>restic backup --files-from backup-nfs.list --exclude-file exclude-nfs.list -r <REPO_NAME>
And similarly with restic restore and --include-file and --exclude-file.
Additionally, globbing (not regex) can be used in include and exclude:
*:– any sequence of characters within one directory level- example:
*.log,cache/*
- example:
**: any number of directories recursively- example:
**/data,/home/**/cache
- example:
?:one single character- example:
file?.txt
- example:
[abc]: one character from the set- example:
file[12].txt
- example:
[a-z]: range of characters- example:
img[0-9].jpg
- example:
!pattern: rule inversion (only in include/exclude files)
Snapshot Tags
When creating snapshots in ZFS, we can specify its name via @.
In restic, snapshots are saved only with an ID – but tags can be added to them:
$ restic backup /tmp/restic-dir-test --repo test-repo --tag "daily" --tag "$(date +"%Y-%m-%d-%H-%M")"
Search, copy, restore, and forget (more on forget later) can then be performed by these tags.
For example, to list only snapshots with the daily tag:
$ restic snapshots --tag daily -r test-repo
repository 50ef4503 opened (version 2, compression level auto)
ID        Time                 Host          Tags                    Paths                 Size
-----------------------------------------------------------------------------------------------
d14ecde9  2026-01-04 15:08:41  setevoy-work  daily,2026-01-04-15-08  /tmp/restic-dir-test  18 B
-----------------------------------------------------------------------------------------------
Removing Snapshots with forget and prune
Documentation – Removing backup snapshots.
To clean up restic data, we use the forget and prune commands:
restic forget: removes the snapshot’s link to data blocks but does not delete themrestic prune: deletes the actual data – blocks that have no links from any snapshots
For example:
$ restic forget f3ce1ac3 -r test-repo
repository 50ef4503 opened (version 2, compression level auto)
[0:00] 100.00%  1 / 1 files deleted
Alternatively, you can execute prune immediately via restic forget --prune:
$ restic forget 45e6f909 -r test-repo --prune
repository 50ef4503 opened (version 2, compression level auto)
[0:00] 100.00%  1 / 1 files deleted
1 snapshots have been removed, running prune
loading indexes...
[0:00] 100.00%  7 / 7 index files loaded
loading all snapshots...
finding data that is still in use for 5 snapshots
[0:00] 100.00%  5 / 5 snapshots
...
repacking packs
[0:00] 100.00%  1 / 1 packs repacked
rebuilding index
[0:00] 100.00%  8 / 8 indexes processed
[0:00] 100.00%  8 / 8 old indexes deleted
removing 2 old packs
[0:00] 100.00%  2 / 2 files deleted
done
A policy can be specified instead of a snapshot ID; see Removing snapshots according to a policy.
For example:
$ restic forget --keep-daily 7 --keep-weekly 4 --keep-monthly 6 --tag daily --prune -r test-repo
repository 50ef4503 opened (version 2, compression level auto)
Applying Policy: keep 7 daily, 4 weekly, 6 monthly snapshots
keep 1 snapshots:
ID        Time                 Host          Tags                    Reasons           Paths                 Size
-----------------------------------------------------------------------------------------------------------------
d14ecde9  2026-01-04 15:08:41  setevoy-work  daily,2026-01-04-15-08  daily snapshot    /tmp/restic-dir-test  18 B
                                                                     weekly snapshot
                                                                     monthly snapshot
-----------------------------------------------------------------------------------------------------------------
Here:
--keep-daily 7: keep snapshots for the last 7 days--keep-weekly 4: keep snapshots for the last 4 weeks (one snapshot per week)--keep-monthly 6: keep snapshots for the last 6 months (one snapshot per month)- applied only to snapshots with the
dailytag, and data is removed from the disk immediately
Restic Mount – Repository as a Directory
The repository can be mounted as a regular folder, but only in read-only mode:
$ mkdir /tmp/restic-mounted-test-repo

$ restic mount -r test-repo /tmp/restic-mounted-test-repo
...
Now serving the repository at /tmp/restic-mounted-test-repo
...
And we gain access to the data in all snapshots:
$ tree /tmp/restic-mounted-test-repo
/tmp/restic-mounted-test-repo
├── hosts
│   └── setevoy-work
│       ├── 2026-01-01T17:07:53+02:00
│       │   └── tmp
│       │       └── restic-test.txt
...
├── ids
│   ├── 0f477146
│   │   └── tmp
│   │       └── restic-dir-test
│   │           └── sub
│   │               └── b.txt
...
├── snapshots
│   ├── 2026-01-01T17:07:53+02:00
│   │   └── tmp
│   │       └── restic-test.txt
...
However, this is more for manual debugging/fixing rather than automation.
Restic Copy – Copying Data Between Repositories
To copy one repository to another, we use restic copy; see Copying snapshots between repositories.
For example, this is how backups from repositories in NFS on FreeBSD can be copied to repositories in AWS S3 and Google Drive.
By default, restic copy copies all snapshots from the source repo, but specific snapshots can be specified for copying.
Create a new empty repository:
$ restic init -r new-test-repo
Copy one snapshot from the old repository:
$ restic copy --from-repo test-repo --repo new-test-repo d14ecde9
Or all snapshots with the daily tag:
$ restic copy --from-repo test-repo --repo new-test-repo --tag daily
Now the new repository contains the same data:
 $ restic snapshots -r new-test-repo
repository fc8a407c opened (version 2, compression level auto)
ID        Time                 Host          Tags                    Paths                 Size
-----------------------------------------------------------------------------------------------
7335e7bf  2026-01-04 15:08:41  setevoy-work  daily,2026-01-04-15-08  /tmp/restic-dir-test  18 B
-----------------------------------------------------------------------------------------------
Restic and the AWS S3 Repository
Everything with S3 is more or less identical to working with local repositories, but there are some nuances.
For authentication, restic uses the standard mechanism – searching for AWS_ACCESS_KEY_ID and AWS_SECRET_ACCESS_KEY environment variables, or searching in the ~/.aws/config and ~/.aws/credentials files.
Set the variables:
$ export AWS_PROFILE=setevoy
$ export AWS_DEFAULT_REGION=eu-west-1
Create a bucket in AWS, then initialize a repository in it, using the format s3:s3.amazonaws.com/<BUCKET_NAME>/<REPO_NAME>:
$ restic init --repo s3:s3.amazonaws.com/test-restic-repo-bucket/test-restic-repository
created restic repository 58303a9c88 at s3:s3.amazonaws.com/test-restic-repo-bucket/test-restic-repository
Check the bucket:
$ aws s3 ls s3://test-restic-repo-bucket --recursive
2026-01-04 16:11:28        155 test-restic-repository/config
2026-01-04 16:11:28        457 test-restic-repository/keys/e53...22f
Important nuances to keep in mind when working with S3:
- deleting data from a
resticrepository in AWS S3 is only possible viarestic forgetandrestic prune - using S3 Lifecycle rules for
resticis not recommended – even for changing storage class
Directories (index/, snapshots/, keys/) are actively used by restic; if, for example, keys/ are moved to Glacier or Deep Archive – restic might hang or crash on a timeout, waiting for access to keys.
Theoretically, lifecycle transitions can only be applied to the data/ directory, where data pack-files are stored, but if restic prune is run later – restic will need access to old pack-files in data/, and if they are in Glacier or Deep Archive, the operation will become either very slow or completely impossible.
Therefore, it’s better to simply run periodic restic forget and restic prune, and keep S3 Standard class for data in the bucket.
Restic and Google Drive via rclone
I already have rclone configured for Google Drive; I’ll write about it separately, as it’s also a very interesting system and is already in my drafts.
What we can do is use rclone as a storage backend to work with storage types that are not available in restic itself.
However, this scheme works very slowly (at least with Google Drive) – so it’s better used for one-time copies rather than regular backups.
Documentation – rclone serve restic.
For example, I have an rclone profile:
$ rclone config show
[setevoy-google-drive]
type = drive
...
Through which I can connect to Google Drive:
$ rclone lsd setevoy-google-drive:
           0 2025-04-16 16:32:56        -1 Arch_Old_Music
           0 2025-04-16 16:50:53        -1 Arch_Work_Photos
           0 2020-06-19 22:13:53        -1 BackendParty-2020-06
...
Create a new directory restic-rclone-gdrive-repo there:
$ rclone mkdir setevoy-google-drive:restic-rclone-gdrive-repo
With rclone serve restic, launch a local HTTP endpoint for the new restic backend, specifying the directory created above – this will be the repository root:
$ rclone serve restic setevoy-google-drive:restic-rclone-gdrive-repo
2026/01/04 16:39:34 NOTICE: Google drive root 'restic-rclone-gdrive-repo': Serving restic REST API on [http://127.0.0.1:8080/]
In another window, set the new endpoint variable for restic:
$ export RESTIC_REPOSITORY=rest:http://127.0.0.1:8080/
Initialize this repository:
$ restic init
enter password for new repository:
enter password again:
created restic repository e1a8edaebd at rest:http://127.0.0.1:8080/
Check the data on Google Drive:
$ rclone lsd setevoy-google-drive:restic-rclone-gdrive-repo
           0 2026-01-04 16:42:08        -1 data
           0 2026-01-04 16:42:09        -1 index
           0 2026-01-04 16:42:10        -1 keys
           0 2026-01-04 16:42:11        -1 locks
           0 2026-01-04 16:42:12        -1 snapshots
And let’s copy data from AWS S3 to the repository in Google Drive.
Set the variables:
$ export AWS_PROFILE=setevoy
$ export AWS_DEFAULT_REGION=eu-west-1
$ export RESTIC_REPOSITORY=rest:http://127.0.0.1:8080/
Run restic copy, but this time for copy specify only --from-repo – since the destination is already set via $RESTIC_REPOSITORY:
$ restic copy --from-repo s3:s3.amazonaws.com/test-restic-repo-bucket/test-restic-repository
enter password for source repository:
repository 58303a9c opened (version 2, compression level auto)
created new cache in /home/setevoy/.cache/restic
enter password for repository:
repository e1a8edae opened (version 2, compression level auto)
created new cache in /home/setevoy/.cache/restic
[0:00]          0 index files loaded
[0:00]          0 index files loaded
Check on Google Drive:
$ restic snapshots
enter password for repository:
repository e1a8edae opened (version 2, compression level auto)
ID        Time                 Host          Tags                    Paths                 Size
-----------------------------------------------------------------------------------------------
...
bb02e44b  2026-01-04 15:08:41  setevoy-work  daily,2026-01-04-15-08  /tmp/restic-dir-test  18 B
-----------------------------------------------------------------------------------------------
Things to keep in mind when working with restic via rclone:
- do not use
rclone mount - do not execute writes simultaneously from two
resticclients - do not use two
rclone serve resticinstances for one repository simultaneously
That’s all, actually.
What’s left is to add automation for launching backups on Linux and FreeBSD, but I’ll describe that in a separate post.
In addition – documentation on tuning restic: Tuning Backup Parameters.
![]()