![]() I looked at the costs for the infrastructure described in the previous post AWS: basic infrastructure setup for WordPress, and let out a heavy sigh:
I looked at the costs for the infrastructure described in the previous post AWS: basic infrastructure setup for WordPress, and let out a heavy sigh:

One NAT Gateway is a quarter of my AWS spend, and even with AWS Credits I can’t help feeling a bit stingy about it.
There’s an option to remove the NAT Gateway from the setup entirely, of course:
- you can simply move EC2 to a Public Subnet: honestly, the setup with AWS Load Balancer is genuinely a bit overkill for a project like a small blog – but I still want to have “pretty” infrastructure built “by the book” and closer to the AWS Well-Architected Framework (deliberately without Reliability – only one Availability Zone, and without infrastructure as code – see AWS Well-Architected Framework Design Principles)
- you can remove the NAT Gateway entirely – but keep EC2 in a Private Subnet:
- in practice, in the setup described the NAT GW is only used at the very beginning, when installing
nginx,php, and downloading the WordPress archive - but afterwards, first – you need to install upgrades from external repositories, and second – WordPress itself may reach the internet when running its cron jobs or making calls from plugins (there’s an interesting example in the post TCP/IP: SYN flood attack on the RTFM server and Hacker News hug of death, where the Page View Count plugin was constantly making requests from the RTFM server to Cloudflare)
- in practice, in the setup described the NAT GW is only used at the very beginning, when installing
But there’s also a third option – spin up your own “poor man’s NAT gateway“: just launch a separate minimal t3.nano EC2, run Linux or FreeBSD on it, and configure a regular NAT there.
Because in essence, AWS VPC can be thought of by analogy with a home network, where the role of the NAT Gateway is played by a router – TP-Link, MikroTik, etc. – and that router can be replaced by any laptop or PC running Linux/FreeBSD with NAT configured.
A commenter on this post pointed out the fck-nat project – a ready-to-use AWS AMI, and there’s even a Terraform module for it: terraform-aws-fck-nat.
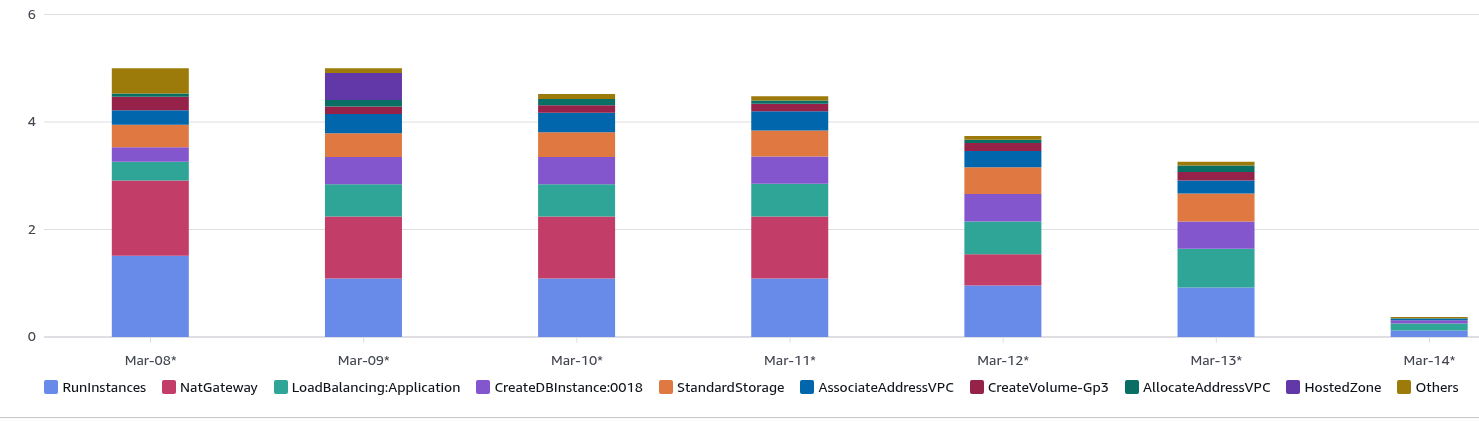
UPD: The Cost Explorer picture a few days later:
- AWS Managed NAT Gateway removed entirely
- added a
t2.nanoas a self-managed EC2 NAT Gateway - blog EC2 switched from
t3.mediumtot3.small
Result: on March 8-9 the total cost was exactly $5.00, by the 13th it dropped to $3.26.
See also related posts:
- AWS: Basic Infrastructure Setup for WordPress
- AWS: ALB and Cloudflare – Configuring mTLS and AWS Security Rules
- AWS: Amazon Linux – Sending Email with Postfix via Gmail
- VictoriaMetrics: Basic Monitoring for AWS, Linux, NGINX, and PHP
Contents
Pros and cons
Of course, for any production setup of a real project it’s simpler and – more importantly – more reliable to use the standard AWS Managed NAT Gateway: zero hassle with upgrades, zero availability concerns – AWS handles everything.
If you run your own NAT Gateway – that means additional time for installing upgrades, monitoring, and if such an instance goes down – the instances in the private subnets will lose internet access.
And if you’re doing automation – describing one or more NAT Gateways with Terraform is much simpler than describing the configuration of a separate EC2 – basically, it’s enough to just specify one parameter in the VPC module resource.
But if you look at the cost…
What about the money?
Let’s compare the cost of AWS Managed NAT Gateway versus a self-managed NAT on a t3.nano.
We’ll compare both the instance cost itself and the traffic cost, since everything is billed separately.
NAT Gateway vs t3.nano: per-hour pricing
First, and most noticeable – the hourly rate:
- AWS Managed NAT Gateway: $0.048/hour – that’s ~$32 per month
- AWS EC2
t3.nano: $0.0059/hour – that’s ~$4.3 per month
A t3.nano as a NAT Gateway for a small project is more than adequate: all operations run in the kernel, CPU/RAM load is minimal. The only thing worth watching is network bandwidth – but for t3.nano we get up to 5 Gbps burst – with plenty of headroom, see Amazon EC2 instance network bandwidth.
NAT Gateway vs t3.nano: per-gigabyte pricing
There’s a nuance here in what exactly we pay for when using AWS Managed NAT Gateway, see Amazon VPC pricing:
- NAT Gateway Data Processing Charge: 1 GB data went through the NAT gateway. The Data Processing charge will result in a charge of $0.045.
- meaning for every gigabyte transferred, regardless of direction, we pay $0.045
- Data Transfer Charge: This is the standard EC2 Data Transfer charge for internet traffic […] With the Data Transfer Out to Internet rate set at $0.09 per GB […]
- and on top of the NAT Gateway Data Processing fee – we also pay $0.09 for each gigabyte sent to the internet
So every gigabyte transferred from the VPC to the internet through the AWS Managed NAT Gateway costs us $0.135.
Whereas when using an AWS EC2 instance as a NAT Gateway we only pay the Data Transfer Charge of $0.09 per GB.
Action plan
So, here’s what we’ll do:
- launch an EC2 in the public network
- Security Group:
- allow only outbound traffic – nothing should be coming in from the internet
- allow all ingress from Private Subnets – our EC2 will be forwarding data outbound
- allow SSH from within the VPC or use EC2 Instance Connect
- the EC2 runs some Linux, where we configure NAT with
iptables - in the VPC and Private Subnet Route Tables, configure the default route – 0.0.0.0/0 via the Private IP of this EC2
For the OS – in principle, any Linux works, here we’ll use Amazon Linux, since it genuinely involves less hassle than Debian.
Though initially I was even thinking about FreeBSD – since FreeBSD is traditionally strong in networking, but since the main server for the blog itself is already on Amazon Linux, I don’t want to create a zoo.
Amazon Linux 2023 has nftables installed by default – but iptables is also available as a wrapper and can be installed as a separate package from the repository.
Creating the NAT Gateway Security Group
Go to VPC, add a new group:

Creating the EC2
Set the name, choose the OS – here it will be Amazon Linux:

Select the instance type, select or create an SSH key:

In Network settings select the VPC, in Subnet specify the one where the “main EC2” with the blog lives – to avoid cross Availability Zone traffic (see Overview of Data Transfer Costs for Common Architectures), and enable Auto-assign public IP – because the NAT Gateway needs a Public IP on which it receives packets from internet clients:

That’s all – launch the instance creation.
After it starts, make an important change in its settings – you need to disable the Source/Destination check: this tells EC2 to only accept and send traffic where the source or destination matches its own IP.
For NAT this needs to be disabled, because a NAT instance by definition forwards other people’s traffic, where neither the source nor destination is its own IP:

Set to Stop:

Configuring Linux as a NAT Gateway
Connect to the EC2 (EC2 Instance Connect was set up in the previous post):
[setevoy@setevoy-work ~]  $ aws --region eu-west-1 --profile setevoy ec2-instance-connect ssh --instance-id i-0e54f36ce6bb90da4 --connection-type eice
...
[ec2-user@ip-10-0-1-79 ~]$
Check the net.ipv4.ip_forward parameter, which tells the kernel to allow forwarding packets between network interfaces – this is the foundation of any NAT and routing:
[ec2-user@ip-10-0-1-79 ~]$ sysctl net.ipv4.ip_forward
net.ipv4.ip_forward = 0
0 – disabled, let’s enable it:
[ec2-user@ip-10-0-1-79 ~]$ sudo sysctl -w net.ipv4.ip_forward=1
net.ipv4.ip_forward = 1
Changes made with sysctl -w are applied immediately but will be lost after a system reboot, so add it to /etc/sysctl.conf:
[ec2-user@ip-10-0-1-79 ~]$ echo "net.ipv4.ip_forward = 1" | sudo tee -a /etc/sysctl.conf
net.ipv4.ip_forward = 1
Reload the config and apply the changes:
[ec2-user@ip-10-0-1-79 ~]$ sudo sysctl -p
net.ipv4.ip_forward = 1
Verify once more:
[ec2-user@ip-10-0-1-79 ~]$ sysctl net.ipv4.ip_forward
net.ipv4.ip_forward = 1
Configuring iptables and MASQUERADE
You could do this with nftables, but iptables is more commonly seen and more familiar.
I wrote about iptables in more detail back in 2014 (OMG!), see Linux: IPTABLES – guide: part 1 – iptables basics (in rus) – the fundamentals haven’t changed dramatically, though iptables itself is gradually being replaced by nftables.
Check the interface names:
[ec2-user@ip-10-0-1-79 ~]$ ip a s
1: lo: <LOOPBACK,UP,LOWER_UP> mtu 65536 qdisc noqueue state UNKNOWN group default qlen 1000
...
2: enX0: <BROADCAST,MULTICAST,UP,LOWER_UP> mtu 9001 qdisc fq_codel state UP group default qlen 1000
...
Install the iptables package:
[ec2-user@ip-10-0-1-79 ~]$ sudo dnf install -y iptables
Add the rule:
[ec2-user@ip-10-0-1-79 ~]$ sudo iptables -t nat -A POSTROUTING -o enX0 -j MASQUERADE
Here:
-t nat: make changes to thenattable-A POSTROUTING: add a rule to thePOSTROUTINGchain – meaning the rule fires after the kernel has already decided where to send the packet, but before it’s actually sent to the recipient-o enX0: rule only applies to packets going out through theenX0interface (our public interface)-j MASQUERADE: replace the source IP of the packet (the Private IP of the blog’s EC2 instance) with the IP of theenX0interface – the public IP of our NAT Gateway EC2 instance
Check the rules:
[ec2-user@ip-10-0-1-79 ~]$ sudo iptables -t nat -L POSTROUTING -n -v
Chain POSTROUTING (policy ACCEPT 0 packets, 0 bytes)
 pkts bytes target     prot opt in     out     source               destination
    0     0 MASQUERADE  all  --  *      enX0    0.0.0.0/0            0.0.0.0/0
To persist the rule across instance reboots – install (should already be there) the iptables-services package, save the rules to /etc/sysconfig/iptables:
[ec2-user@ip-10-0-1-79 ~]$ sudo dnf install -y iptables-services

[ec2-user@ip-10-0-1-79 ~]$ sudo service iptables save

[ec2-user@ip-10-0-1-79 ~]$ sudo systemctl enable iptables
Changes to AWS VPC Route Tables
We have separate routing tables for each Private Subnet:

Where the route to the internet, i.e. 0.0.0.0/0, is currently via the AWS Managed NAT Gateway:

Add a new rule, specify the new EC2 instance:

Delete the route through the NAT gateway – there may be a brief downtime here, since active connections from the VPC to the internet will be interrupted:

Repeat the changes for both Route Tables, then verify.
SSH into the EC2, check the result from ifconfig.me – and we get the Public IP of our new self-managed NAT Gateway:
[ec2-user@ip-10-0-3-146 ~]$ curl -s ifconfig.me
108.130.182.54
And that’s basically it.
You can now delete the AWS Managed NAT Gateway:

Bonus: Amazon Linux auto-upgrades
And to avoid having to SSH in for manual upgrades, let’s configure the equivalent of Debian’s unattended-upgrades.
In RHEL/CentOS/Fedora/Amazon Linux this is the dnf-automatic package:
[ec2-user@ip-10-0-1-79 ~]$ sudo dnf install -y dnf-automatic
Edit the config /etc/dnf/automatic.conf, at minimum – set apply_updates = yes.
In upgrade_type you can set security rather than installing all updates – since this is a gateway after all:
...
# default                            = all available upgrades
# security                           = only the security upgrades
upgrade_type = security

...

apply_updates = yes
...

[email]
# TODO in the following rtfm.co.ua posts about setting up AWS
I may write separately about sending emails from AWS EC2 instances in the part about setting up AWS Simple Email Service.
Enable the cron scheduled run:
[ec2-user@ip-10-0-1-79 ~]$ sudo systemctl enable --now dnf-automatic.timer
Created symlink /etc/systemd/system/timers.target.wants/dnf-automatic.timer → /usr/lib/systemd/system/dnf-automatic.timer.
Done.
![]()