![]() Continuing the “for fun and profit” journey of setting up my home server with FreeBSD on a Lenovo ThinkCentre M720s SFF.
Continuing the “for fun and profit” journey of setting up my home server with FreeBSD on a Lenovo ThinkCentre M720s SFF.
And today, finally, we will do the main part – set up a ZFS pool on real disks, look at working with datasets, encryption, snapshots, and monitoring.
All posts in this blog series:
- FreeBSD: Home NAS, part 1 – configuring ZFS mirror (RAID1)
- FreeBSD: Home NAS, part 2 – introduction to Packet Filter (PF) firewall
- FreeBSD: Home NAS, part 3 – WireGuard VPN, Linux peer, and routing
- FreeBSD: Home NAS, part 4 – Local DNS with Unbound
- (current) FreeBSD: Home NAS, part 5 – ZFS pool, datasets, snapshots, and ZFS monitoring
- FreeBSD: Home NAS, part 6 – Samba server and client connections
- FreeBSD: Home NAS, part 7 – NFSv4 and use with Linux clients
- FreeBSD: Home NAS, part 8 – NFS and Samba data backup with restic
- FreeBSD: Home NAS, part 9 – data backup to AWS S3 and Google Drive with rclone
- FreeBSD: Home NAS, part 10 – monitoring with VictoriaMetrics and Grafana
- FreeBSD: Home NAS, part 11 – extended monitoring with additional exporters
- FreeBSD: Home NAS, part 12: synchronizing data with Syncthing
- FreeBSD: Home NAS, Part 13: Planning Data Storage and Backups
- FreeBSD: Home NAS, part 14 – logs with VictoriaLogs and alerts with VMAlert
- FreeBSD: Home NAS, Part 15: Automating Backups – scripts, rsync, rclone
- … to be continued
Contents
Disk Preparation
Check which disks are physically present in the system:
root@setevoy-nas:~ # geom disk list
Geom name: nda0
Providers:
1. Name: nda0
   Mediasize: 500107862016 (466G)
   ...

Geom name: ada0
Providers:
1. Name: ada0
   Mediasize: 4000787030016 (3.6T)
   ...

Geom name: ada1
Providers:
1. Name: ada1
   Mediasize: 4000787030016 (3.6T)
   ...
Or using camcontrol:
root@setevoy-nas:~ # camcontrol devlist
<Samsung SSD 870 EVO 4TB SVT03B6Q>  at scbus0 target 0 lun 0 (pass0,ada0)
<Samsung SSD 870 EVO 4TB SVT03B6Q>  at scbus1 target 0 lun 0 (pass1,ada1)
<CT500P310SSD8 VACR001>            at scbus7 target 0 lun 1 (pass3,nda0)
Here I have ada0 and ada1 – these are SATA disks for the NAS storage itself, and nda0 is an NVMe where the system is installed (it’s currently on UFS, but later I will likely reinstall it with ZFS as well).
Device names like /dev/ada0, /dev/ada1, or /dev/nda0 can change depending on the disk attaching order, so using them directly in ZFS is not recommended. Next, we will create our own GPT labels.
Creating GPT tables
Just in case – let’s delete existing partition tables.
IMPORTANT: the partition table will be destroyed. Data remains on the media but will become inaccessible.
In my case – the disks are new, so we see an “Invalid argument” error:
root@setevoy-nas:~ # gpart destroy -F ada0
gpart: arg0 'ada0': Invalid argument
root@setevoy-nas:~ # gpart destroy -F ada1
gpart: arg0 'ada1': Invalid argument
Create GPT (GUID Partition Table) tables:
root@setevoy-nas:~ # gpart create -s gpt ada0
ada0 created
root@setevoy-nas:~ # gpart create -s gpt ada1
ada1 created
Check with gpart:
root@setevoy-nas:~ # gpart show ada0
=>        40  7814037088  ada0  GPT  (3.6T)
          40  7814037088        - free -  (3.6T)

root@setevoy-nas:~ # gpart show ada1
=>        40  7814037088  ada1  GPT  (3.6T)
          40  7814037088        - free -  (3.6T)
Creating GPT labels
For further work with the disks, we will create persistent GPT labels – named partition identifiers that are stored in the GPT partition table and read at system startup.
They do not change after a reboot, do not depend on the SATA port order, and do not depend on how the kernel detected the disk.
Add them for both disks:
root@setevoy-nas:~ # gpart add -t freebsd-zfs -l zfs_disk1 ada0
ada0p1 added
root@setevoy-nas:~ # gpart add -t freebsd-zfs -l zfs_disk2 ada1
ada1p1 added
Check in the /dev/gpt/:
root@setevoy-nas:~ # ls -l /dev/gpt/
total 0
crw-r-----  1 root operator 0x9b Dec 19 13:32 zfs_disk1
crw-r-----  1 root operator 0xa9 Dec 19 13:32 zfs_disk2
Or with gpart:
root@setevoy-nas:/home/setevoy # gpart show -l ada0
=>        40  7814037088  ada0  GPT  (3.6T)
          40  7814037088     1  zfs_disk1  (3.6T)

root@setevoy-nas:/home/setevoy # gpart show -l ada1
=>        40  7814037088  ada1  GPT  (3.6T)
          40  7814037088     1  zfs_disk2  (3.6T)
Or with glabel:
root@setevoy-nas:~ # glabel status
                                      Name  Status  Components
                             gpt/zfs_disk1     N/A  ada0p1
gptid/67ebfac9-dcce-11f0-98bf-00d861f3bff0     N/A  ada0p1
               diskid/DISK-S758NX0Y701757D     N/A  ada0
                             gpt/zfs_disk2     N/A  ada1p1
gptid/6a9c3ee5-dcce-11f0-98bf-00d861f3bff0     N/A  ada1p1
               diskid/DISK-S758NX0Y701756A     N/A  ada1
Disks are ready – moving on to ZFS, we need to:
- configure a ZFS pool with a mirror
- create datasets
- look at data encryption
- check how to work with snapshots
And at the end, we will separately discuss disk and ZFS pool monitoring.
Creating a ZFS mirror pool
We use the following parameters:
ashift=12: physical sector size that ZFS uses for I/O- the sector size is defined as 2^ashift bytes, i.e.,
2¹²= 4096 bytes - it is not possible to change the
ashiftvalue after the Pool is created
- the sector size is defined as 2^ashift bytes, i.e.,
atime=off: disable updating file access times, reducing unnecessary disk writescompression=lz4: fast data compression on disk with minimal CPU overheadxattr: file attribute storage settings:xattr=on: the old and default option, extended attributes are stored as separate hidden filesxattr=sa:xattrare stored directly in the file’sdnode(analogue ofinodein UFS/ext4), without creating separate hidden files – fewer disk accesses and better performance
mirror: use ZFS mirror (analogue of RAID1) – data is synchronously written to both disks (see alsovdev)
See ZFS Tuning Recommendations.
Create a pool from disks /dev/gpt/zfs_disk1 and /dev/gpt/zfs_disk2:
root@setevoy-nas:~ # zpool create -o ashift=12 -O atime=off -O compression=lz4 -O xattr=sa nas mirror /dev/gpt/zfs_disk1 /dev/gpt/zfs_disk2
Check:
root@setevoy-nas:~ # zpool status
  pool: nas
 state: ONLINE
config:

        NAME               STATE     READ WRITE CKSUM
        nas                ONLINE       0     0     0
          mirror-0         ONLINE       0     0     0
            gpt/zfs_disk1  ONLINE       0     0     0
            gpt/zfs_disk2  ONLINE       0     0     0

errors: No known data errors
Adding pool init during reboots:
root@setevoy-nas:/home/setevoy # sysrc zfs_enable=YES
zfs_enable: NO -> YES
Creating ZFS datasets
A ZFS dataset is a separate file system within a ZFS pool, which has its own properties (compression, quota, mountpoint, etc.) and is managed independently of other datasets.
Currently, we have one root dataset:
root@setevoy-nas:~ # zfs list
NAME   USED  AVAIL  REFER  MOUNTPOINT
nas    420K  3.51T    96K  /nas
The pool root is a technical root, not a place for data, so we will create several separate ones.
I’m not sure if these datasets will stay like this in the future, but here’s just an idea of how the disk space can be divided:
nas/data: main dataset for storing various data like music and moviesnas/backups: here you can copy periodic backups from your work and home laptopsnas/private: an encrypted partition for private data and/or databases like KeePass or 1Password backupsnas/shared: a public dataset for access from phones and laptops via Samba share (I’ll write about Samba configuration in a separate post, it’s already in the drafts)
Create a new dataset named nas/data:
root@setevoy-nas:~ # zfs create nas/data
Check the list again:
root@setevoy-nas:~ # zfs list
NAME       USED  AVAIL  REFER  MOUNTPOINT
nas        540K  3.51T    96K  /nas
nas/data    96K  3.51T    96K  /nas/data
And the directory of this dataset:
root@setevoy-nas:~ # ls -la /nas/data/
total 1
drwxr-xr-x  2 root wheel 2 Dec 19 13:41 .
drwxr-xr-x  3 root wheel 3 Dec 19 13:41 ..
It also has its own mountpoint:
root@setevoy-nas:/home/setevoy # mount | grep data
nas/data on /nas/data (zfs, local, noatime, nfsv4acls)
Which is defined in the dataset properties:
root@setevoy-nas:/home/setevoy # zfs get mountpoint nas/data
NAME      PROPERTY    VALUE       SOURCE
nas/data  mountpoint  /nas/data   default
Add another one dataset:
root@setevoy-nas:~ # zfs create nas/backups
List once more:
root@setevoy-nas:~ # zfs list
NAME          USED  AVAIL  REFER  MOUNTPOINT
nas           696K  3.51T    96K  /nas
nas/backups    96K  3.51T    96K  /nas/backups
nas/data       96K  3.51T    96K  /nas/data
Dataset Encryption
I want to have a separate dataset for sensitive data, so let’s see how it’s done in ZFS.
Documentation – Encrypting ZFS File Systems.
Important:
- encryption can only be enabled during dataset creation – but it can be disabled later
- if the parent dataset is not encrypted – the child can still be encrypted
- if the parent is encrypted – children inherit its encryption
Create a new dataset, specifying that it is encrypted with a password:
root@setevoy-nas:~ # zfs create -o encryption=on -o keyformat=passphrase -o keylocation=prompt nas/private
Enter new passphrase:
Re-enter new passphrase:
Check this dataset:
root@setevoy-nas:~ # zfs get encryption,keyformat,keylocation nas/private
NAME         PROPERTY     VALUE        SOURCE
nas/private  encryption   aes-256-gcm  -
nas/private  keyformat    passphrase   -
nas/private  keylocation  prompt       local
How this will look after a reboot:
- pool
nasis imported nas/privatewill be locked, and the mountpoint will not appear until you manually enter the password and unlock it
To unlock later, use:
root@setevoy-nas:~ # zfs load-key nas/private
root@setevoy-nas:~ # zfs mount nas/private
Unlike, for example, partition encryption with LUKS – ZFS allows changing the password for an encrypted dataset without re-encrypting the data. In fact, only the key that protects the main encryption key is changed.
If you want to change the password – execute zfs change-key:
root@setevoy-nas:~ # zfs change-key nas/private
Enter new passphrase for 'nas/private':
Instead of using a password, we can create a key file to be used at reboots to unlock and mount the dataset.
Generate the key:
root@setevoy-nas:/home/setevoy # dd if=/dev/random of=/root/nas-private-pass.key bs=32 count=1
Replace the password which was set during dataset creation with a key file:
root@setevoy-nas:/home/setevoy # zfs change-key -o keyformat=raw -o keylocation=file:///root/nas-private-pass.key nas/private
Check the attributes:
root@setevoy-nas:/home/setevoy # zfs get encryption,keyformat,keylocation nas/private
NAME         PROPERTY     VALUE                              SOURCE
nas/private  encryption   aes-256-gcm                        -
nas/private  keyformat    raw                                -
nas/private  keylocation  file:///root/nas-private-pass.key  local
Reboot the machine:
root@setevoy-nas:/home/setevoy # shutdown -r now
Shutdown NOW!
shutdown: [pid 13519]
And then check the partitions:
root@setevoy-nas:/home/setevoy # mount | grep nas
nas on /nas (zfs, local, noatime, nfsv4acls)
nas/backups on /nas/backups (zfs, local, noatime, nfsv4acls)
nas/data on /nas/data (zfs, local, noatime, nfsv4acls)
And with zfs list:
root@setevoy-nas:/home/setevoy # zfs list
NAME                        USED  AVAIL  REFER  MOUNTPOINT
nas                         200G  3.32T   112K  /nas
nas/backups                 200K   500G   104K  /nas/backups
nas/data                     96K  3.51T    96K  /nas/data
nas/private                 200K  3.32T   200K  /nas/private
Setting dataset quotas
ZFS datasets support setting quotas on dataset size – i.e., the maximum size it can occupy.
Documentation – Setting Quotas on ZFS File Systems.
This is convenient, for example, to prevent backups/ from accidentally filling up the entire disk.
There is also dataset reservation, but more on that later.
Set a 500 gigabyte limit on nas/backups:
root@setevoy-nas:~ # zfs set quota=500G nas/backups
Check:
root@setevoy-nas:~ # zfs get quota,used,available nas/backups
NAME         PROPERTY   VALUE  SOURCE
nas/backups  quota      500G   local
nas/backups  used       96K    -
nas/backups  available  500G   -
Setting dataset reservation
ZFS allows you to reserve space for a dataset, guaranteeing available space regardless of pool fullness.
Documentation – Setting Reservations on ZFS File Systems.
It is important that ZFS Reservation reserves space regardless of whether it is used or not.
Set the minimum available size for the main dataset nas/data:
root@setevoy-nas:~ # zfs set reservation=200G nas/data
Check:
root@setevoy-nas:~ # zfs get reservation,used,available nas/data
NAME      PROPERTY     VALUE   SOURCE
nas/data  reservation  200G    local
nas/data  used         96K     -
nas/data  available    3.51T   -
To change or delete a reservation – just execute zfs set once with the new value:
root@setevoy-nas:~ # zfs set reservation=100G nas/data
root@setevoy-nas:~ # zfs set reservation=none nas/data
Using ZFS snapshots
ZFS Snapshots are instantaneous read-only state shots of a dataset, allowing for a quick rollback to a previous state.
Documentation – Overview of ZFS Snapshots.
How it works, in short:
- ZFS operates on the COW (Copy On Write) principle, i.e., when data blocks change – changes are made in a new block, and the old blocks are not overwritten as long as there are active links to them
- during snapshot creation, ZFS does not copy data but creates such a link to this block
- later, when we make changes to dataset data for which there is a snapshot – changes on the disk are made in new data blocks, and access to old ones is maintained through the snapshot
Creating snapshots
Let’s check with an example.
Create a test file in /nas/data/:
root@setevoy-nas:/home/setevoy # echo test-snap >> /nas/data/test-snap.txt
Create a snapshot:
root@setevoy-nas:/home/setevoy # zfs snapshot nas/data@test-snap
Check it:
root@setevoy-nas:/home/setevoy # zfs list -t snapshot nas/data@test-snap
NAME                 USED  AVAIL  REFER  MOUNTPOINT
nas/data@test-snap     0B      -   104K  -
Its attributes:
root@setevoy-nas:/home/setevoy # zfs get creation,used,referenced nas/data@test-snap
NAME                PROPERTY    VALUE                  SOURCE
nas/data@test-snap  creation    Sat Dec 20 15:46 2025  -
nas/data@test-snap  used        0B                     -
nas/data@test-snap  referenced  104K                   -
Restoring from snapshot
Snapshots are stored in the dataset’s .zfs directory – /nas/data/.zfs/snapshot/:
root@setevoy-nas:/home/setevoy # ll /nas/data/.zfs/snapshot/test-snap/
total 1
-rw-r--r--  1 root wheel 10 Dec 20 15:45 test-snap.txt
And from here, we can also access our test file:
root@setevoy-nas:/home/setevoy # cat /nas/data/.zfs/snapshot/test-snap/test-snap.txt
test-snap
Now delete the original file from the dataset:
root@setevoy-nas:/home/setevoy # rm /nas/data/test-snap.txt
root@setevoy-nas:/home/setevoy # file /nas/data/test-snap.txt
/nas/data/test-snap.txt: cannot open `/nas/data/test-snap.txt' (No such file or directory)
But it’s available in the snapshot:
root@setevoy-nas:/home/setevoy # cat /nas/data/.zfs/snapshot/test-snap/test-snap.txt
test-snap
To restore from a snapshot – you can either just copy from the /nas/data/.zfs/snapshot/test-snap/ directory with cp, or, if you need to rollback the entire dataset, then use zfs rollback – but in that case, all changes made after the snapshot was created will be lost:
root@setevoy-nas:/home/setevoy # zfs rollback nas/data@test-snap
And now the test file is back in place:
root@setevoy-nas:/home/setevoy # file /nas/data/test-snap.txt
/nas/data/test-snap.txt: ASCII text
root@setevoy-nas:/home/setevoy # cat /nas/data/test-snap.txt
test-snap
Also ZFS Boot Environments work through the same snapshots – while executing freebsd-update install, a data copy is automatically created, to which you can rollback in case of issues.
In general, ZFS Boot Environments are a very interesting thing, maybe I’ll write about them separately.
Instead of a full rollback – to avoid overwriting data on the current dataset – you can clone a snapshot into a new dataset:
root@setevoy-nas:~ # zfs clone nas/data@test-snap nas/data-restored
Check:
root@setevoy-nas:/home/setevoy # zfs list
NAME                        USED  AVAIL  REFER  MOUNTPOINT
nas                         200G  3.32T   120K  /nas
...
nas/data                    168K  3.51T   104K  /nas/data
nas/data-restored             0B  3.32T   104K  /nas/data-restored
...
And now the file is available here:
root@setevoy-nas:/home/setevoy # cat /nas/data-restored/test-snap.txt
test-snap
Deleting snapshot
To delete, we use zfs destroy:
root@setevoy-nas:/home/setevoy # zfs destroy nas/data@test-snap
Datasets are deleted in a similar way:
root@setevoy-nas:/home/setevoy # zfs destroy nas/data-restore
Copying snapshot
Snapshots can be transferred between hosts and a new snapshot can be created with zfs receive, or you can just create a tar.gz archive.
Documentation and many examples – Sending and Receiving ZFS Data.
For transfer, we use zfs send, and then through a pipe – the receiver, e.g. – zfs receive:
root@setevoy-nas:/home/setevoy # zfs send nas/data@test-snap | zfs receive nas/backups/data-$(date +%Y%m%d)
Now in the nas/backups dataset, we have a new dataset nas/backups/data-20251221:
root@setevoy-nas:/home/setevoy # zfs list | grep data
nas/backups/data-20251221   104K   500G   104K  /nas/backups/data-20251221
nas/data                    104K  3.51T   104K  /nas/data
Which contains a snapshot copy:
root@setevoy-nas:/home/setevoy # ll /nas/backups/data-20251221/.zfs/snapshot/
total 1
drwxr-xr-x  2 root wheel 4 Dec 20 15:45 test-snap
You can also create incremental snapshot copies with -i and copy encrypted snapshots.
If there is confidential information in the snapshot, then for zfs send we set the -w key (raw send) – in this case, data is transmitted in encrypted form.
FreeBSD Periodic and automation of snapshot creation
There are several utilities that help automate snapshot creation, the main ones being zfsnap, zfs-periodic (see more on ZFS Orchestration Tools – Part 1: Snapshots).
Let’s try with zfsnap – install it:
root@setevoy-nas:~ # pkg install zfsnap
An important nuance – the file itself is called zfSnap not zfsnap:
root@setevoy-nas:~ # pkg info -l zfsnap
zfsnap-1.11.1_1:
...
        /usr/local/sbin/zfSnap
...
Along with zfsnap, a set of Periodic files is added:
root@setevoy-nas:/home/setevoy # ll /usr/local/etc/periodic/daily/ | grep Snap
-r-xr-xr-x  1 root wheel 1512 Nov 30 01:57 402.zfSnap
-r-xr-xr-x  1 root wheel 1073 Nov 30 01:57 403.zfSnap_delete
Which essentially are just shell scripts:
root@setevoy-nas:/home/setevoy # cat /usr/local/etc/periodic/daily//402.zfSnap
#!/bin/sh

# If there is a global system configuration file, suck it in.
#
if [ -r /etc/defaults/periodic.conf ]; then
        . /etc/defaults/periodic.conf
        source_periodic_confs
fi
...
You can enable running the scripts in the /etc/periodic.conf file (or, better, /etc/periodic.conf.local):
daily_zfsnap_enable="YES"
daily_zfsnap_recursive_fs="nas/data"
daily_zfsnap_delete_enable="YES"
Run all daily tasks for which “YES” is set in /etc/defaults/periodic.conf with the periodic command:
root@setevoy-nas:/home/setevoy # periodic daily
And now we have a new snapshot:
root@setevoy-nas:/home/setevoy # zfs list -t snapshot
NAME                                     USED  AVAIL  REFER  MOUNTPOINT
...
nas/data@daily-2025-12-21_16.41.03--1w     0B      -   104K  -
ZFS Monitoring
For monitoring, we have a whole set of utilities – both default from the file system itself and additional ones that can be installed separately.
There is a great document Monitoring ZFS, although from 2017, but still relevant.
From the basics of what we can use and what should ideally be monitored:
- SMART: check the disks themselves
zpool status: checks for health on the ZFS pools themselveszfs scrub: not exactly about monitoring, but can show problemszpool events: pool eventsarcstats: useful to check ZFS cache efficiency
Checking S.M.A.R.T. for SSD
Disks are brand new, but just in case and for the future – let’s set up S.M.A.R.T. (Self-Monitoring, Analysis, and Reporting Technology).
Install the package:
root@setevoy-nas:~ # pkg install smartmontools
And check the disks’ state:
root@setevoy-nas:~ # smartctl -a /dev/ada0
root@setevoy-nas:~ # smartctl -a /dev/ada1
We are mainly interested in these indicators:
SMART overall-health self-assessment test result: PASSED: test passed (but usually FAILED appears here when things are very bad)- errors:
Reallocated_Sector_Ct:- number of bad sectors the disk found and replaced with spare ones
- 0 – ideal, an increase in this value is a bad signal
Runtime_Bad_Block:- number of incorrect blocks found during normal operation or link degradation (e.g. SATA speed drop)
- 0 – ideal, an increase in this value is a bad signal
Uncorrectable_Error_Cnt:- number of read/write errors that could not be corrected
- 0 – absolutely must remain, growth is already a serious problem
- Wear/Used reserve:
Wear_Leveling_Count:- shows the wear of SSD memory elements
- 0 means the disk is practically new or wear is minimal
Used_Rsvd_Blk_Cnt_Tot:- how many spare blocks have already been used to replace worn ones
- 0 – ideal state
Power_On_Hours:- number of hours the disk was on
- 83 hours – I just recently bought and attached the disks
CRC_Error_Count:- number of data transmission errors between disk and controller (cable, port)
- 0 – normal, growth often means problems with the cable, not the disk itself
Total_LBAs_Written/Host_Writes/NAND_Writes:- how much data is actually written to the disk
- compare with TBW (Total Bytes Written) from the manufacturer
- in my case
Total_LBAs_Written= 77982, where LBA is Logical Block Address, which SMART usually counts as 512 bytes, i.e. ~40 megabytes written to disk – against the declared Samsung 2400 TB
Temperature/Temperature_Celsius/Airflow_Temperature_Cel- disk temperature, I have 28 degrees now
SMART Periodic
SMART has its own scripts in /usr/local/etc/periodic for execution.
To enable check and reports – add smartd to autostart:
root@setevoy-nas:/home/setevoy # sysrc smartd_enable="YES"
And configure periodic in /etc/periodic.conf.local.
To enable tests, you must explicitly set the disks for which this check should be performed:
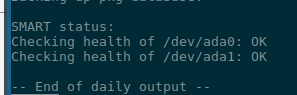
daily_status_smart_devices="/dev/ada0 /dev/ada1"
Result in the report:
ZFS Pool Status
We’ve already run zpool status above, now we’ll add cron execution and message sending.
Scripts for ZFS /etc/periodic/daily/, e.g. /etc/periodic/daily/404.status-zfs.
Add to /etc/periodic.conf.local:
daily_status_zfs_enable="YES"
Run the scripts:
root@setevoy-nas:/home/setevoy # periodic daily
Open root‘s mailbox:
root@setevoy-nas:/home/setevoy # mail -u root
Mail version 8.1 6/6/93.  Type ? for help.
"/var/mail/root": 12 messages 4 new 12 unread
...
 N 12 root@setevoy-nas      Sun Dec 21 17:20  82/3368  "setevoy-nas daily run output"
&
Read it (by specifying an email’s number – “12” here, and hit Enter):
(I will write about configuring mail forwarding separately)
ZFS Scrubbing
ZFS Scrubbing – data integrity check.
During scrub, ZFS compares the checksum of each block with the stored value, and if an error is detected, the system records it in the logs and, in the presence of a mirror, automatically restores the data from the second copy.
Since many I/O operations are performed for this, scrubbing should not be run often – once a month will be enough.
Run manually:
root@setevoy-nas:/home/setevoy # zpool scrub nas
And check with zpool status:
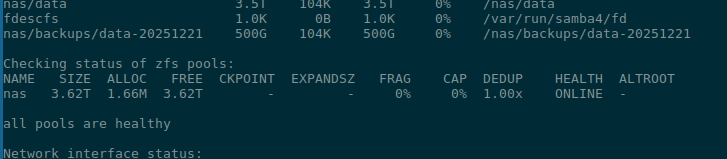
root@setevoy-nas:/home/setevoy # zpool status
  pool: nas
 state: ONLINE
  scan: scrub repaired 0B in 00:00:00 with 0 errors on Fri Dec 19 16:54:04 2025
config:

        NAME               STATE     READ WRITE CKSUM
        nas                ONLINE       0     0     0
          mirror-0         ONLINE       0     0     0
            gpt/zfs_disk1  ONLINE       0     0     0
            gpt/zfs_disk2  ONLINE       0     0     0

errors: No known data errors
Now in scan there is “scrub repaired 0B” – everything is good.
Script – /etc/periodic/daily/800.scrub-zfs, which checks the daily_scrub_zfs_default_threshold value, and if more days have passed than set in the threshold – then zpool scrub is run.
With daily_scrub_zfs_pools you can specify exactly which pools to check.
Add to our /etc/periodic.conf.local:
...
# SCRUB
daily_scrub_zfs_enable="YES"
daily_scrub_zfs_default_threshold=35
daily_scrub_zfs_pools="nas"
...
ZFS Events and History
With zpool events you can check all the latest events in the pool:
root@setevoy-nas:/home/setevoy # zpool events
TIME                           CLASS
Dec 20 2025 16:46:39.702350180 sysevent.fs.zfs.history_event
Dec 20 2025 16:46:39.711350328 ereport.fs.zfs.config_cache_write
Dec 20 2025 16:46:39.711350328 sysevent.fs.zfs.config_sync
Dec 20 2025 16:46:39.711350328 sysevent.fs.zfs.pool_import
Dec 20 2025 16:46:39.712349914 sysevent.fs.zfs.history_event
Dec 20 2025 16:46:39.720349727 sysevent.fs.zfs.config_sync
Dec 20 2025 14:46:44.749348450 sysevent.fs.zfs.config_sync
...
Dec 21 2025 17:26:30.905209986 sysevent.fs.zfs.history_event
To see details – add -z:
root@setevoy-nas:/home/setevoy #  zpool events -v
TIME                           CLASS
Dec 20 2025 16:46:39.702350180 sysevent.fs.zfs.history_event
        version = 0x0
        class = "sysevent.fs.zfs.history_event"
        pool = "nas"
        pool_guid = 0x2f9ad6b17a5e8426
        pool_state = 0x0
        pool_context = 0x0
        history_hostname = ""
        history_internal_str = "pool version 5000; software version zfs-2.2.7-0-ge269af1b3; uts  14.3-RELEASE 1403000 amd64"
        history_internal_name = "open"
        history_txg = 0x2d65
        history_time = 0x6946b6cf
        time = 0x6946b6cf 0x29dd0364
        eid = 0x1
...
And with zpool history you can see all the commands that were run:
root@setevoy-nas:/home/setevoy # zpool history
History for 'nas':
2025-12-19.13:37:17 zpool create -o ashift=12 -O atime=off -O compression=lz4 -O xattr=sa nas mirror /dev/gpt/zfs_disk1 /dev/gpt/zfs_disk2
2025-12-19.13:41:00 zfs create nas/data
2025-12-19.13:44:19 zfs create nas/backups
2025-12-19.13:48:44 zfs create -o encryption=on -o keyformat=passphrase -o keylocation=prompt nas/private
...
2025-12-21.17:26:30 zfs snapshot -r nas/data@daily-2025-12-21_17.26.30--1w
ZFS I/O statistic
Information on I/O operations with zpool iostat:
root@setevoy-nas:/home/setevoy # zpool iostat
              capacity     operations     bandwidth
pool        alloc   free   read  write   read  write
----------  -----  -----  -----  -----  -----  -----
nas         1.68M  3.62T      0      0     28    584
ZFS ARC monitoring
ARC (Adaptive Replacement Cache) – caching in memory of frequently used data.
You can check current values with sysctl:
root@setevoy-nas:/home/setevoy # sysctl kstat.zfs.misc.arcstats.size
kstat.zfs.misc.arcstats.size: 9379192
root@setevoy-nas:/home/setevoy # sysctl kstat.zfs.misc.arcstats.hits
kstat.zfs.misc.arcstats.hits: 26181
root@setevoy-nas:/home/setevoy # sysctl kstat.zfs.misc.arcstats.misses
kstat.zfs.misc.arcstats.misses: 6
Or install the zfs-stats utility:
root@setevoy-nas:/home/setevoy # pkg install zfs-stats
And run with -E:
root@setevoy-nas:/home/setevoy # zfs-stats -E

------------------------------------------------------------------------
ZFS Subsystem Report                            Sun Dec 21 18:07:59 2025
------------------------------------------------------------------------

ARC Efficiency:                                 104.72  k
        Cache Hit Ratio:                99.87%  104.58  k
        Cache Miss Ratio:               0.13%   137
        Actual Hit Ratio:               99.87%  104.58  k

        Data Demand Efficiency:         100.00% 0

        CACHE HITS BY CACHE LIST:
          Most Recently Used:           23.21%  24.28   k
          Most Frequently Used:         76.79%  80.30   k
          Most Recently Used Ghost:     0.00%   0
          Most Frequently Used Ghost:   0.00%   0

        CACHE HITS BY DATA TYPE:
          Demand Data:                  0.00%   0
          Prefetch Data:                0.00%   0
          Demand Metadata:              99.96%  104.54  k
          Prefetch Metadata:            0.04%   39

        CACHE MISSES BY DATA TYPE:
          Demand Data:                  0.00%   0
          Prefetch Data:                0.00%   0
          Demand Metadata:              91.24%  125
          Prefetch Metadata:            8.76%   12
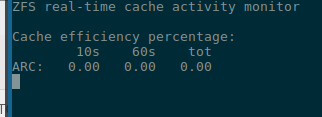
Or use zfs-mon:
Well, that’s probably enough for ZFS monitoring.
We will talk separately about full system monitoring later – I plan to use VictoriaMetrics, and then we can add some exporter for ZFS, for example zfs_exporter.
Useful links
- The Z File System (ZFS)
- ZFS Tuning and Optimisation
- ZFS Tuning Guide
- Oracle Solaris ZFS Administration Guide and OpenZFS Documentation
- Solaris ACL Model
- ZFS Troubleshooting and Pool Recovery
- ZFS Raidz Performance, Capacity and Integrity
![]()